Saturday, November 10, 2012

Brenda's November Quick Tip


Good morning to you all...

This is Brenda and I am so glad to be back on the DT for Creative Paperclay®.   I so love this product and cannot wait to get into full swing.  

Today's post will be a quick tip post.  Next time I will show you what I did with the finished things.  Now, sometimes we just don't have a way of making a mold, unlike the Amazing Mold Putty, which, by the way, I love just as much as the paperclay.  So improvise...On a recent shopping trip I found these adorable metal embellishments from Tim Holtz and...they were super cheap, regular $7.99 and I got them for $2.99.
When I took them out of the package to put away, I noticed the nice indentation of the packaging.  With my frugal mindset, I knew I could do something with it.  I hardly EVER throw anything away. 
So I pressed some of the paperclay into the indentations.... 
and added some beads to one of them and then pressed the paperclay ontop of that and let it dry...
now, just because you don't have any molds, use what you have.  There are endless possibilities.  Please come back in 2 weeks to see the finished project.  I know you will love it.
Thanks so much for stopping by today and I hope I've inspired you  to use your imagination.  

You can come see me here and check out what else I've made using this and other products.  And as always, have a great day and god bless!

Friday, November 9, 2012

Thanksgiving Cornucopia

Hi! 

My name is Dawn and I'm eager to show you some fun projects that you can create using Creative Paperclay ®.  With the holidays coming up, there is always something new and interesting to make to embellish your home!   I'm blessed to have many of my family coming over this year for Thanksgiving. With so many little cousins, you know this auntie needs to have a sugary treat out for eager mouths to nibble on (without their moms noticing)!


Supplies Needed:
Creative Paperclay ®
rolling pin
your imagination
sponge brushes
acrylic craft paint: browns, ochers, antique gold
Krylon Crystal Clear Gloss spray

For this project, you have to have confidence! 
First, I used a marble rolling pin to roll out the Creative Paperclay, a modeling material,
 to about 12 x 7 inches.
Then, roll your modeling material into a cornucopia shape.  
Let dry for several days.  
As this is a large piece, it took longer than recommended on the package.


Unfinished cornucopia form.


I used a sponge brush to fill in all the textured areas using an ochre color.
While the paint is still wet, add more brown colored paint.
Be sure to go from your lightest tan to the darkest browns.  
Antique gold should be last. 
I painted wet on wet so that my colors would blend nicely. 

When dry, spray with Krylon Crystal Clear Gloss to protect your new cornucopia.
Fill with Candies!  (I guess I forgot to add that to the supply list!)


Thank you for checking out this fun project using Creative Paperclay ®.  
Be sure to come back to see more projects and read more tips for using this fun material!


Thursday, November 8, 2012

Push Pin Toppers


I recently did a revamp of my Inspiration Board.  Basically it is a large bulletin board that I have covered with various brightly covered papers that hangs next to my desk.  I decided that my push pins needed a bit of a revamp too.  Most of the push pins I have are the one with a flat head and I tend to have a hard time pulling them out of the board.  So I thought it would be really cool to make something with Creative Paperclay that was 3D and easier to handle.

Items Used:
Craft Paint
Hot Glue and Hot Glue Gun
Push Pins
Tweezers

 Make various shapes with your Creative Paperclay.  The sky is the limit with this project.  Let your inspiration take you where it will.

After I finished making my shapes I made an imprint of the head of the push pin on the bottom.  This will come in handy later on when you are gluing your push pins to your shapes.


After the shapes are dry you, paint your shapes using Craft Paint to match your board or decor.


Once the paint is dry it is time to glue your push pins into place.  Start by squeeze a bit of Hot Glue into the imprints on the bottom of your shapes.  Be careful not to squeeze too much glue into your imprints or it will overflow.


Next push your push pins into the glue.  I used tweezers to do this, to avoid burning my fingers.

Here are some close ups of my finished push pins.


Here are the finished push pins on my board.

In closing, I would like to thanks Creative Paperclay and Terri Sproul for the opportunity to serve a second term on this wonderful Design Team.  I am looking forward to a great term. -- Annie Bella

Please come visit me at Corner of the Bedroom Studios either on my blog or Facebook page.

Wednesday, November 7, 2012

First creative design team

Hi everyone

Hope you enjoy!!

This is where you can purchase
The best clay

"Creative Paperclay® modeling material" 

This my first design for the 
Creative Paper Clay design team.
supply list
clay
Paint
Delta Cereamcoat
Straw
Water base Varnish
Folk Art
pumkin
Americana
country red
Rolling pin
Ice pick
Piece of paper
Optional
Leaf mold                                 Lets get started

I have design what I called
conversation tray
Some time it is hard to get a convert ion started
for holiday and partys.
It is allot of fun to hear what children think about different
subjects

Clay Projects

We start with the tray
I draw the shape on a piece of paper
Take a piece of clay roll out on a flat surface
roll it to fit your drawing.
I flip it a few times so it does not stick
also a powder can be sprinkle on surface
 Draw the vines and roll the edges 
to looks like a turned leaf.
Round the edges smooth.


 Draw the vines and roll the edges 
to looks like a turned leaf.
Round the edges smooth.
 Roll a small bit of clay to make a branch for handle. Roll as long as you want your handle.


I place something under the handle to hold in place. When it is where you like it add a small amount of water to make it stick.
You can use your finger or a brush


 Now we stat the leaves
Roll ball to get flat .On a flat surface.
I use a piece of Plexiglas surface to roll on ,with same kind of rod.
 I cut out of paper a leaf shape

 A ice pick works good to cut out the leaf
Much easy way is to use a mold 
 A more easy way to shape a leaf is to use a mold
 Base the whole leaf with paint
Both sides with the color Country red
Brush the edges with pumpkin .and straw.
When You get the leaf the way you like it
Let is dry
Seal with water base  varnish (I like the gloss for the shine)
Glue a piece of a tree branch or can be made with clay
Write your message on a piece of paper ( I rip the paper for a torn edge) and glue.
 I do the same for the tray.
Add a ribbon
The size can very.
I did it small I do not have allot room on my table and a few quests.

A better look .

 Here is the back.I only use a short message

 I also made some to lay around my center of the table
 There is some in my willow tree
These leave could be made into name  cards. They would look good glued to a napkin ring

 Thank you for coming and looking at my design.
My daughter will use them for her Thanksgiving
I will be in New York for the macy dad parade  (If they have it)

I hope you leave a comment

Tuesday, November 6, 2012

Edie's November Tip

Hey Everybody, It's Edie :) I just wanted to share this helpful quick tip for using Creative Paperclay® in your projects. Creative Paperclay® can be painted while it is still wet or after it is dry. However, if the clay is still wet, keep in mind that paint may make it TOO wet and you could end up accidentally messing up all of your hard work. If you want to paint a piece as soon as possible, stick it in the oven on 225* for 5 - 10 minutes. That will allow the outer layer of clay to harden enough to paint without becoming too wet. See you in two weeks with my project for the month!

Friday, November 2, 2012

Mexican Sugar Skull

Hello! My name is Rachel, and I'm so excited to be part of the new Design Team for Creative Paperclay® modeling material! Today, I'll be showing you my Mexican Sugar Skull made with Creative Paperclay®!
 I love celebrating the Mexican holiday, Dia De los Muertos know by many as Day of the Dead. Contrary to the imagery of the holiday, Day of the Dead is a celebration of life. A time to remember loved ones that have passed with food, drinks, flowers, and lots of color. One of the traditional pieces of Day of the Dead is the Sugar Skull.

SUPPLIES YOU WILL NEED:
First, I pressed my clay into the Sugar Skull mold.
Then I set it outside in the sun to dry. Drying time takes a bit longer when you use a mold, so this process took a couple days.
Once my clay was dry, I released it from the mold.
Connect the front and back pieces together using more Creative Paperclay®. Allow this clay to dry, and sand the whole piece to remove visible seams.
Now for the FUN part! Coat the skull in glue, and cover the wet glue with GLITTER. I used clear glitter for my piece, but you can use any color, because later, we'll be covering it with paint. Because of this, you could also use a fine sand to create the sugared look.
Once my glue was dry, and I was sure all of the skull was covered, I spray painted my skull. If you want to stay traditional with your skull, you could use white paint instead of blue like I used.
Once my spray paint was dry, I started adding the details of my skull using Acrylic Craft Paint. (my personal favorite is Folk Art Craft Paints.)
I think this little guy will be perfect sitting in the arms of my newest Day of the Dead Bride Art Doll made with Creative Paperclay® modeling material as well!
If you create a sugar skull, Please leave a comment with a link here, so I can come and visit to see! I would love for you to visit me at my "house" too!! Thank you so much for reading!! 
~rachel

Saturday, October 27, 2012

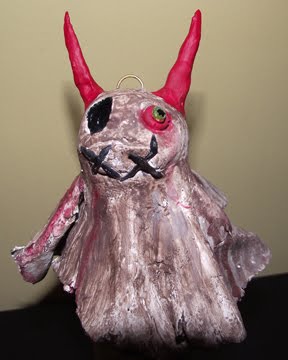
Creepy Kirk the Ghost

This my last post for the Creative Paper Clay Design Team. I had a blast working and coming up with so many new ways to work with this product and I had the privilege of working with amazing people. This month I made a Scary Ghost to hang with my Amazing Mold Putty Project. I took the Paper clay and rolled it out and didn't care how it went, the more raggedy edges the better! I rolled a piece of the clay in a ball for head and draped the rolled out piece of clay on top. I used a bottle for it to sit on and drape over. I then pinched the clay on bottom cut out eyes, added horns, added a mouth and added a few stitches by rolling small pieces of clay. Once dry, I painted it with watered down brown acrylic paint and added details and painted horns red. It was simple but fun and I love these sitting around inspiring me!