Wednesday, January 28, 2015

Delight AirDry+Washable Markers=Fabulous Flowers! by Linda Hess

I teach art to grades K-8th, a job that daily has me giving thanks.  It is truly the best "job" on this Earth!  With that tidbit of info you will understand why I embrace projects that are quick and easy for ALL ages (children-adults) while projecting high impact with the use of only a few materials.

I have to say that Delight Air Dry Modeling Compound is one of my favorite things to share with the students.  When I pull out plain white clay they were not very excited.  As I share how to change the color with markers you would think I performed magic for them :-)  I tend to pull this project out to create pins for Mother's Day or Happy Spring or (as I am currently thinking) a way to push the winter blahs away.  Lets get started...

Materials:
Delight Air Dry Modeling compound
washable markers (any colors)
flower cutters
needle tool or fork
damp paper towel

Procedure for cookie cutter flower:
1)  Open package and pull out a ball of clay.  Be sure to tightly close the remainder of the clay package in a Ziploc baggie before going any further.
2) Choose a marker and dab the clay as shown. 
3) Fold the clay over the color to seal it inside.  Knead the ball until color is dispersed.  If more color is desired, repeat.
4) Flatten the ball of clay into a sheet.  This can be done with your fingers (as I tend to do) or with an acrylic roller.  Once flattened, cut out 3 flowers (one of each size).
5) Thin and curve the petals of the largest flower.  Repeat with other 2 flowers.  Stack them, curving petals on each layer.  SURPRISE...use the cap of your marker to create a center for your flower.
6) Use the needle tool or fork to add detail to the center and the edges.
7) Mix another ball of clay with green for leaves.
8) Roll a 1/2" ball of green clay.  Flatten. Pinch one end to create a teardrop. 
9) Press the center with needle tool or edge of fork.  Press into place.  Add additional leaves if desired.
 
Procedure for Roses:
1) Follow step #2 & 3 above.  Roll six 1/2" balls from the mix. 
2) Roll one of the balls into a log as shown. 
3) Flatten.
4) Pinch thin along one of the long edges.
5) Roll from one end to the other as shown keeping thin edge at the top.  Flare out to create realistic rose center.
6) Flatten 2 more balls.  Pinch into teardrops. 
7) Thin the top edge.
8) Wrap one petal around the center and one from the other side so the edges touch. 
9) Flare out the edges to create realistic petals.
10)  Repeat steps 7-9 with other 3 balls.  Wrap around the center.  Flare out edges.
11) Create leaves from cutter flower directions above.  Press into place, then turn flower over and CAREFULLY cut off the bottom to create a flat bottom.
 
That's it!  All done. 
Once dry, use these to create pins, magnets, or journal embellishments.  Feel free to contact me with any questions.  ENJOY!


Tuesday, January 27, 2015

Gloriann Irizarrys ooak cloth dolls how to add a Creative Paperclay face tip


2015 Has arrived with new ways for you to share and learn from your Creative Paperclay Material ®. Yes a more interactive way for you ask questions and learn new ways, tips, tecniques and ideas. You can share photos and get feedback on new ways to tackle any thing Paperclay relate. Yes what a wonderful way to start a day by helping and guide others and we got a new way for your questions to be answer by the whole Creative Paperclay Designer Team and many other Members of our new Facebook community. All you have to do is search for us here  Creative Paperclay Q&A. Simply create a post with each question so we can answer each one to the fullest details. We will gladly share any tips or techniques that will guide you thru your Creative Paperclay Material®  designs.Feel free to stop by and join us for many great questions, tip and techniques.See you there :)

Now let share here one of our dolly community commonly asked question:
Wonder how do I add Creative Paperclay Material ® to the head of my cloth doll sculpt?
I want to sculpt more detailed face.

Easy I will be sharing my own technique in this post and let you examine all the groups responses just click here Creative Paperclay Q&A. Now  I will post photos of a doll i did and let you know all the techniques learned

2015 Llegó de una manera más interactiva para aprender a usar el Material Creative Paperclay®. Sí, aquí en nuestra nueva página de Facebook Creative Paperclay Q&A. Simplemente háganos sus preguntas en un post, y todo el equipo de talentosos artistas del Diseño podrán darle algunos links para que le ayude en su trabajo creativo.   


Ahora  vamos a compartir una de las preguntas más interesantes que recibimos en nuestra página de facebook,  especializada en hacer muñecas exclusivas, totalmente artesanales.  Todas son unas obras de arte.

¿Cómo podemos añadir Creative Paperclay Material® a las caritas de las muñecas de trapo?
Me gustaria poder escupirle y darles más detalles en las caritas de ellas.

Ahora para esta pregunta voy a compartirles mis propias experiencias y como es que yo las hago. Hay diferentes formas de hacerlo. Aquí les mostraré mi propia fórmula.
Cualquier pregunta, o si quieren compartirnos sus propias experiencias por favor, con  confianza, pase por nuestra comunidad abierta de Facebook clickeando aquí


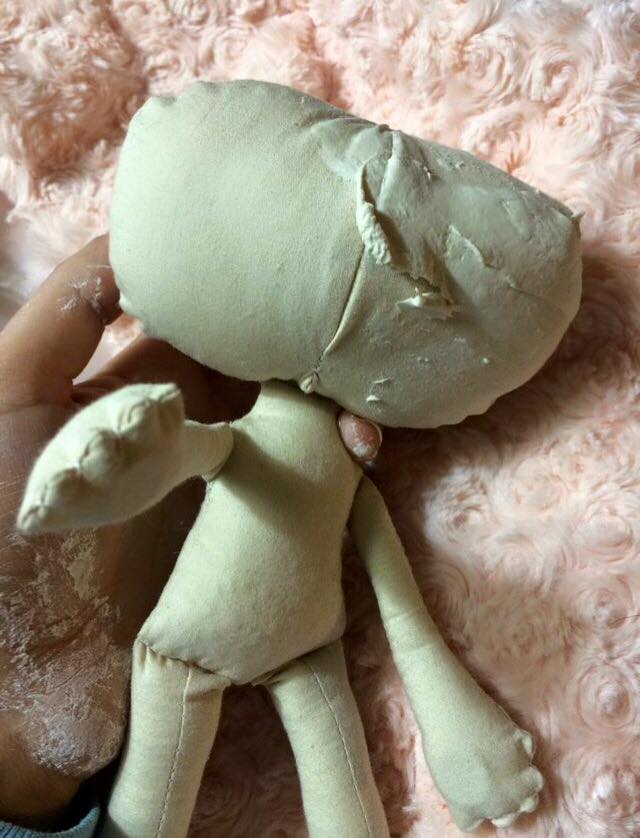
You want to make sure the clay adheres to the cloth properly so you sculpted face
will not  fall once the clay is all dry.
To achieve it make sure you add a thin layer of Creative Paperclay Material ® is very wet
and apply it all over the are you want the dolly face to be.
Press it firmly covering all the face in a thin layer and set it aside to dry.

Para asegurarse de que la masa se pegue bien a la cabeza de la muñeca, deje que cada capa de la masa Creative Paperclay esté completamente seca antes de añadir la segunda capa, sólo así se podrá asegurar que la masa estará completamente adherida a la tela.

La primera capa de la masa Creative Paperclay Material®  debe ser aplicada muy fina y húmeda. Apriete bien la masa con sus dedos contra la tela para que se pegue bien una vez que esta seque. Si desea puede proteger las partes de la muñeca donde no va a ser aplicada la masa de papel, con un plástico o si prefiere déjela al descubierto,  es decisión suya.
Déjela que seque completamente en un lugar seguro.
El tiempo de secado puede variar según el lugar donde usted esté trabajando.


After the first thin layer of clay had dry go ahead and add a second little ticker clay sheet over.
Make sure is very wet and be a little gentle with the second layer you don't want to peel the first layer but to add more thickness so you can later work your details of you dolls face on the following layers.

Una vez que la primera capa de la masa de Creative Paperclay Material® esté completamente seca y libre de humedad, usted podrá comenzar a trabajar la segunda capa un poco más gruesa que la primera.
Hay que trabajar la segunda capa delicadamente ya que la nueva masa va a estar húmeda, y puede que debilite la primera capa ya que fue aplicada muy fina. Poco poco cubra la cara y déjela que seque completamente.

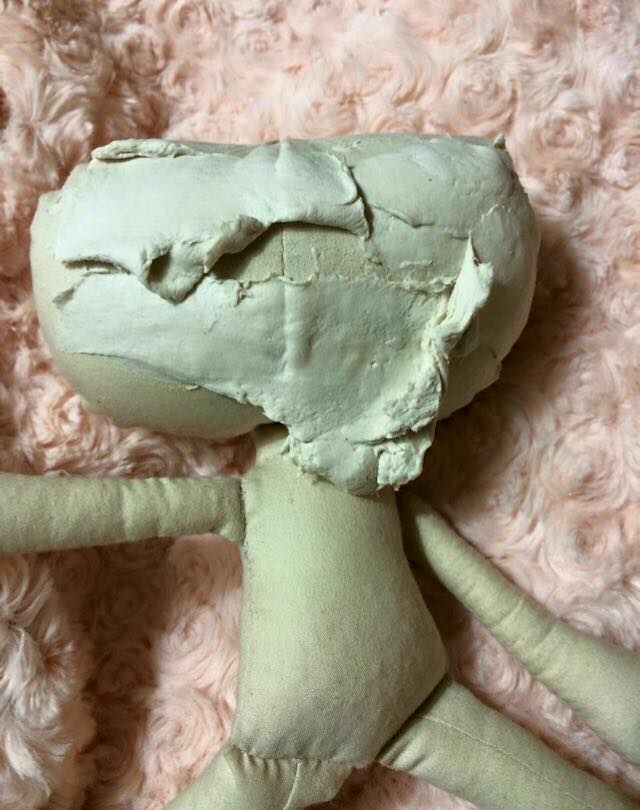
You can add little by little. Layer by layer till your satisfied.  Now there is no wrong way to where the clay needs to stop or were it need to be at. Yes it is all up to you and your artistic vision so feel free to add or remove has long you feel happy with the end result you will be able to create your own pattern for future dolls so feel free to experiment and and always take notes of what you like and don't like for you to reference on your next dolly or BDJ project.

Puede añadir poco a poco capa por capa hasta que se sienta completamente satisfecho del grosor que quiera que su trabajo al final tenga. La última capa es en la que va a esculpir los detalles finales de su muñequita. Siéntase libre de experimentar, poco a poco va a aprender el tiempo que toma en secarse cada una de las capas.
Al final esta masa puede ser tallada y lijada para darles los últimos detalles que va buscando que su muñeca tenga. Asi podra crear sus propios estilos y patrones. Recuerde siempre tomar nota para que le sirvan de referencia en los futuros proyectos que tenga en mente.


The back of the doll.
Well here you can add more clay if you want the whole clay head or don't if you have a wig plan no need to since these can be glued or even sewn  that will be up and your artistic vision.    

 La parte posterior de la cabeza

Aquí puede añadir masa o dejarla al descubierto.  Para esa decisión, es muy importante que tenga en mente que tipo de pelo va a poner a la muñeca. ¿Usará peluca? ¿O el pelo estará cosido con hilos de lana? Fácil, si le va a poner una peluca, yo recomiendo cubrir toda la cabeza con la masa de papel, y si va a coser el pelo de la muñeca pues déjelo al descubierto. Todo depende de su gusto como artista.
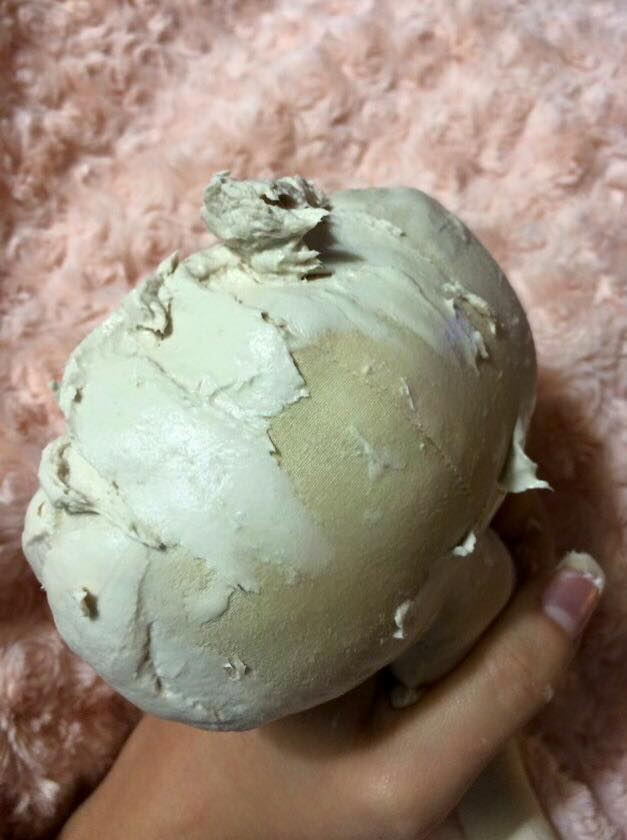
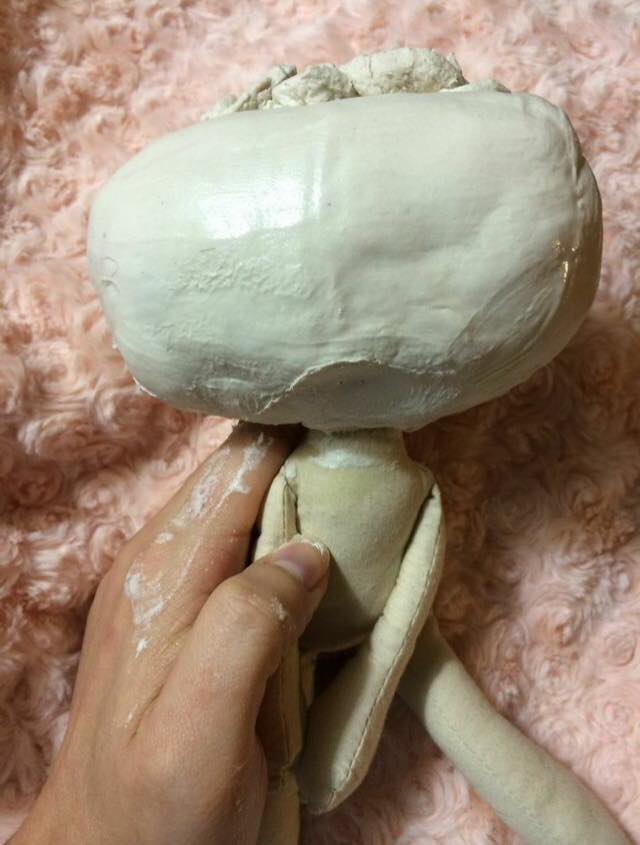
Top view
The top of the dolls head  should be fully covered in a few layers of the Creative Paperclay Material® This thick layer of Paperclay is for your gluing the wig it gets a solid surface to hold on. Make sure you smooth the la yer and set it aside to dry.

En la parte superior de la cabeza de la muñeca se le puede cubrir con más capas gruesas de Creative Paperclay Material®. Recomiendo esto si va a pegar una peluca para que luego esta no se despegue.

Antes de pegar la peluca, asegúrese que la masa esté completamente seca antes de ser pintada. Luego proceda al pintado y sellado dando, a cada paso, el tiempo correspondiente para el secado necesario.
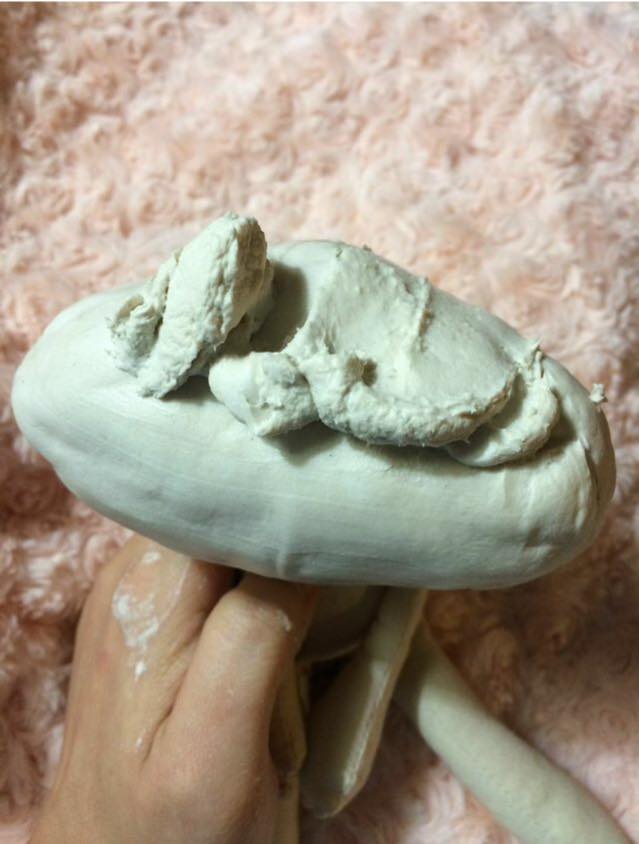


Front view.

Make sure all the clay is smooth before you let her dry so her head will be even and shape to the final size your looking your one of a kind Cloth + Creative Paperclay Material ® Doll.
Rubbing it with totally wet hands helps smooth the surface and reduces the chances of sanding later on. The finish product is entire up to you since there is so many ways to create many finished with the paperclay and this is why it is interesting once it added to a normal sewn cloth doll.
The possibilities are endless so feel free to experiment and share your finding with our Facebook community Creative Paperclay Q&A .


With this January 2015 Dolly Tip  I now leave you and remember  


Cuando trabaje la última capa asegúrese de humedecer bien los sus dedos y frote todas imperfecciones de la masa, esto le  va a economizar tiempo en el momento de   El resultado final es totalmente suyo, ya que solamente su visión le que va a guiar a lograr que su muñequita sea única y especial

Recuerde que si usted puede soñarlo, Usted puede hacerlo. Nunca se rinda.


Sincerely
Sinceramente


Monday, January 26, 2015

Shari's January Tip of the Month

Hi!

Each month I am going dedicate a post with a tip or two that I have found to be helpful when working with Creative Paperclay®

I have a wooden flower that I want to add paperclay to. My dilemma was that the face image I wanted to add I had made a few weeks ago. Here is the solution I used to add the dried face piece and make it look seamless.


First I added water to the back of the face, to a new piece of clay, to the wooden flower. I attached by pushing the  fresh moistened clay onto the dried and then pushed it on to the wood.


 I made a clay sludge mixture by watering down paperclay till it resembled a paste like consistency.

I filled in the gaps around the edge between the the face and the wood with the mixture.
I rolled a rope of paperclay and added it around the face too. I first smoothed it out with my fingers and then finished with a damp brush.


The wet paperclay will absorb into the dry. Because of this the piece will dry faster then if it were all wet clay.


The piece is now ready to add more paperclay, paint and enjoy!

Shari


I have been creating art for as long as I can remember. I studied graphic design in Portland, Oregon before moving to Denton, Texas and putting all my focus on creating mixed media art. In addition to being on the Creative Paperclay design team, I am a contributor for the Robin's Nest Design Team, an article writer for Mixed Media Art, and a blogger for DecoArt.
I strongly believe in giving back. I volunteer at Scrap Denton Creative Reuse Center where I teach workshops, art camps, and perform art demos. I am very passionate about mixed media art and enjoy helping and watching others discover their creativity.  

Follow My Altered Life's blog page 


Friday, January 23, 2015

Toys for Tots and Tools for Adults

Hi.  It's Ann Strecko Koeman (Annmakes) with a quick tip to share with you today.  Just in case you get a case of "I need to purge my house."  Hold off on tossing your children's old playing dough cutters.  If those animal and funny shaped looking cutters were good enough and tough enough to be handled by some tough tots, they sure can be used by a Creative Paperclay®modeling material artist!  Check out the collection my children have out grown and that I am growing into:


I look forward to working with these toys and seeing how I can use them to make some art.

Thank yo so much for stopping by today!  See you soon.  In case you are wondering what else I am up to please visit my blog:  http://annmakes.blogspot.com.


Thursday, January 22, 2015

Spring is Coming

I know spring's coming but not soon enough for me. I am like the bird in this assemblage, waiting for the first hints of the earth coming to life again. I like the idea of aging in a circle rather than on a continuous line. This piece was a case where so little was needed for the story to be complete.

Supplies
Creative Paperclay®
Acrylic Paint
Assemblage base


This assemblage consists of a broken ceramic bird, hurricane lamp's wick cover, and a twig from my yard glued together with resin clay.


It needed Creative Paperclay® buds and leaves to tell the full story. Not much, just a little. When dry, it was painted with acrylics.

It now sits on my desk waiting for spring.

Darlene Olivia McElroy
darleneoliviamcelroy.com

Tuesday, January 20, 2015

DO Try This at Home! then write all about it in a craft journal

Hi, it's Tori West, from Meadow Lane Studios. I know some of the other contributors to this blog have encouraged you to experiment and try new techniques, I want to encourage you to experiment, try new things, and write them down!  Sometimes the process of keeping track of what went wrong leads to coming up with brilliant solutions, and keeping track of successes leads to more inspiration and ideas, and more successful projects. So, my tip for this month is to start a journal or notebook about your craft adventures.  Have fun with it, and use it often; perhaps title it “My Incredible Adventures in Art; Spectacularly Successful Creations and Fabulous Failures!”  or, maybe just something like “Ideas, Experiments, and Inspiration”  You can also use your journal for writing down ideas that interest you, noting craft projects you’d like to try, techniques or products you thought were particularly satisfying, or anything that gets you fired up to create.

To get you started and give you some ideas for what you might want to include, I’ll explain how I use mine.  I prefer a three-ring binder because it is the easiest way to move pages around, add dividers, pocket pages, etc  This hasn't stopped me from writing down ideas and notes on scraps of paper and sticky notes, but I usually end up taping those in my notebook in their appropriate place.  If binders and organizing a notebook aren't your thing, just write stuff down in the journal as you go along, tape pictures in to it, scribble and draw in it, and make it your own.

My dividers are labeled:
  • Ideas - I never run out of ideas, so I've divided this further into sections so I can find the one I want later.  I also have folders in the file cabinet with these same labels so I can transfer them when my notebook gets full.  I divide them in to these categories
            Art
Classes
Crafts
Miniatures
            Writing
  • Experiments – I really like to find out “what if” for example, “What if I put bits of wax in with my Creative Paperclay® and then used a heat gun to melt the wax out?”  or “What if I put ice in with the clay and let it melt out as the clay dried?”  (see below – I discovered a way to make a type of clay “lace” that can be used for miniature landscaping and more, and I found a way to create an interesting texture in the clay that just might lend itself in the future to fairy grottoes and mystical settings!)
  • Brain Fodder – a collection of clippings, catalogs, photos, or whatever else might inspire me.  Sometimes I see something in a catalog that gives me an idea for a completely different type of thing.  I tape this in the book and write and draw my ideas around it.
  • Inventions - this is where I put the plans and diagrams for inventions, which is separate from the ideas sections because it's easier for me to keep them in one place where I can add in reference material, revisions and results.

Here are some of my notebook pages and experiments.  As you can see on the right, I've clipped some pictures that inspired even more experiments and projects.  To the left is one of the pages of the list I started for things I want to find out about DelightTM Air Dry Modeling Compound, since it isn't familiar to me yet.  The blobs on the table are the results of the experiments mentioned above.

In addition to writing them down, I keep most of my experiments
(and maybe experiment with them further!)
I love to go through this bin, it always makes me think of more "Zany Experiments"


The outside of my notebook is decorated with quotes about inventing and experimenting, so I'll leave you with one of my favorites! Thanks for joining me here!

"Creativity is inventing, experimenting, growing, taking risks, breaking rules, making mistakes and having fun." - Mary Lou Cook


Find me on Facebook

.

Sunday, January 18, 2015

Idea and Tip from Lynda

Hello again!!!  Lynda Jeffs here, from Memories in Tyme and the Creative Paperclay Design Team!   I get to work today, and forgot one of the girls at work had a birthday today!  I simply told her I left her card at home, thinking throughout my day - as to what I could do for her that would be quick and easy, yet not look like it was "quick and easy"!! Part of the whole idea will be on my blog (link above)...so make sure you check there too for everything that was made for her!
As I sat at work today, I had to think of what I could do that would be easy enough to get done in a quick hurry...  Today's tip and idea...are all based on what I discovered as I was creating!  

  1. As you find a mold you really like, and you know you will use it a lot...make sure you take the time to mold a few extra pieces (or more)!  This way, you can simply grab the pieces you need and design, without having to worry about drying time for the pieces.  
  2. Don't be afraid to experiment with your pieces and ways you can color them!  Ink some pieces, paint others with acrylic paint, and leave other pieces plain!  
    
  
With my idea today, I love how it didn't take too long to complete, supplies were what I had at home, and it is a one of a kind gift for a friend at work!  Here are the inside pages for the whole project - in case you are ready to make your own!    


Supply list:

6 x 12 sheet of cardstock, folded in half
2 sheets 8.5 x 11, trimmed to 5.5", folded in half
Cardstock for inside pages 
Die cut shapes - flower, either leaf or vine
Saying stickers
Creative Paperclay
Flower mold, Stampin' Up
Ink pads, Stampin' Up - Strawberry Slush, Crisp Cantaloupe
Ribbon, floss, and twine
Hole punch

Step one:  Take 6 x 12 sheet of cardstock (already folded), place 2 5.5 x 11 sheets of cardstock already folded inside.  Placing a ruler on the folded side, punch a hole at 2" and 4" to put the ribbon, floss and twine through.  
Step two:  Start to add photo matt's to the inside pages (10 total) measuring 4.5 x 5 for each one.  Add them to the inside pages.  
Step three:  Add the leaf vines and flowers to the front cover.  For the Creative Paperclay flowers, ink them with the ink pads using a sponge.  For a lighter look, make sure you paint with white paint first.  
Step three:  Start to add the inside stickers and embellishments to each page.  

This particular idea will only work in a pinch - IF you have Creative Paperclay embellishments already molded and dried beforehand!  Take a look at different places for mold's - and look for non-traditional molds, such as small lids to make your own embellishments with!  This is such a fun thing to work with - simply add your scrapbook embellishments, stamps, imagination - and you are all set!  
Until next time, 
Lynda Jeffs
Creative Paperclay Design Team 
and Memories in Tyme
     

Friday, January 16, 2015

Stenciling on Canvas

I've been thinking about this project for awhile now, and decided to put the thoughts into action. I wondered if Creative Paperclay® could be used as a stenciling paste. Good new—it certainly can!! This can be a great project for an older child, but it was beyond what my five year old partner was able to manage. I think this would be a more appropriate project for an eight or ten year old.

I started with an 8" x 6" Artist's Loft canvas (available at any of the big box craft stores). I colored it with a wash of Purple Mist and Burnt Umber acrylic paints.


While the canvas was drying, I worked with the Creative Paperclay® to make a smooth paste. I added water—a little bit at a time—until it was the consistency of smooth cake icing. Remember: it's easier to add the water a bit at a time than to get the mixture too runny. This step did take a considerable amount of blending to get a smooth, creamy consistency with no random lumps of the Creative Paperclay®. When I reached the consistency I wanted, I added a couple drops of Mars Black acrylic paint.


Next, I used painter's tape to tape the stencil onto the canvas. It is important that the stencil stays securely in place when you are applying the Creative Paperclay® cream/paste. I started with the top, then taped the two sides, and lastly, taped the bottom.


I used one of my favorite stencils—Bare Trees from Dreamweaver Stencils.


This is the tool that I used to apply the paste. Smooth a layer of the paste about 1/8" to 1/4" thick over the stencil. Next, scrape off the excess paste making sure all the openings are evenly filled and the stencil surface is smooth.

Next, carefully remove the tape and lift the stencil off the canvas. I removed the tape from the bottom, then the two sides, and then, every so carefully, lift the stencil, using the top piece of tape as a hinge. When the stencil is clear of the design, I peel the stencil and the tape off the canvas. Using the top piece of tape as a hinge insures that even if you do happen to drop the stencil, it will fall right back in place, and not damage your stenciled surface.

Immediately, wash the stencil or soak it in a shallow dish filled with water until you can properly clean it so that the clay doesn't harden on it. 

While the clay was still wet, I sprinkled fine onyx mica flakes on the surface. Here's my finished canvas. 


Carole