Sunday, September 30, 2012

Creative Paperclay® Candy Dish


I have got to say that this project was a lot of fun and very interesting to do. I grow a lot of plants and flowers and I have a hosta (actually several hostas now) that I’m particularly fond of. Well the other day I had the thought of using a hosta leaf as a pattern/mold for a candy dish. Here’s what I started with:
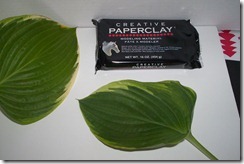
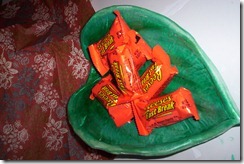
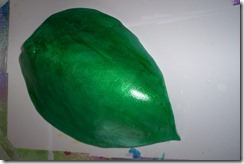
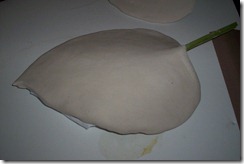
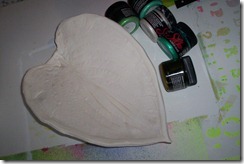
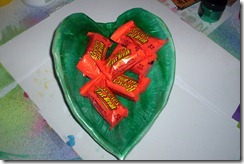
2003-02-12 13.07.52 Aren’t those leaves beautiful? There were many that were bigger but I wasn’t trying to make a plate, just a candy dish. lol  It took almost the whole 1 lb. package of clay to make the dish. I first rolled the clay out and then pressed the back of the leaf into the clay. I bent the clay while it was wet and put some crumpled up fabric under it to hold it up while it dried. 2003-02-12 14.11.48After the clay had set for a day, I turned the clay over and removed the leaf from it. The clay was still damp and the leaf pulled right off it. I then let the clay sit until it was completely dry. Once the leaf was completely dry I painted it with “Silks” Acrylic Glaze from Luminarte.2003-02-14 12.57.14 Once the paint was dry on both sides I coated both sides several times with Minwax waterbased Polyurethane. This is the final result:
2003-02-15 11.58.04           2003-02-14 15.51.43

This candy dish turned out pretty nice didn’t it? Quite the coffee table addition!     2003-02-14 16.49.582003-02-14 16.50.40I hope this inspires you to try using Creative Paperclay®. It’s a great clay to work with and you can make so many different things with it. Thinking Christmas anyone?
Barbara

Saturday, September 29, 2012

It's a Blog Hop


WELCOME
The Creative Paperclay®
and
Amazing Mold Putty
Design Teams
are so happy you have join us on this exciting adventure.
These two team have join up together both using 
Creative Paperclay®
and
Amazing Mold Putty
But YOU are getting all the prizes
and all you have to do is
VOTE
yes, vote for your favorite project at the end of this hop.
you will be enter to win one of three Blog Candy prizes
or

Now it's time to check out all the blogs
next stop if our Team Leader's Blog

Here is the rest of the blog just in case you get lost along the way, 
DON'T forget to vote at the end.

Thursday, September 27, 2012

Creative Paperclay Jack-o-Lantern

With Halloween coming up, it's time to start thinking about decorating.  Not only is Halloween one of my favorite holidays it is one of my favorites to decorate for.  From spiders and creepy crawlies to ghouls and goblins.  The scarier the better.  
So, for my project this month I decided to do something that was Halloween themed.  One of my favorite Halloween activities is carving pumpkins.  I decided to make a Jack-o-Lantern.

To start out I rolled out the Creative Paperclay to about a 1/4 inch thickness and shaped it around a  balloon.  This took about 3 days to dry.  Once it was dry I popped the balloon and was left with a hallowed out shape that was similar to a pumpkin.  As the Creative Paperclay dries it tends to shrink, so I had quite a few cracks that formed in my piece.  In my last post I showed you how to fill the cracks, in case you missed it you can find it here

Once I filled in all the cracks, let it dry, and carved my Jack-o-Lantern, I started adding thin pieces of clay to the outside of my piece to give it more of a smooth appearence.


After it dried, I sanded down all of the edges to make them smooth and begun decorating my Jack-o-Lantern.

I started on the inside first.  I painted the inside with a layer of black craft paint.

Then I coated the inside with Terri Sproul Mixers in Gold and 3D Crystal Lacquer to help to reflect the light from a candle.

 To achieve the "pumpkin" color I was looking for I decoupaged the outside in yellow tissue paper and then orange tissue paper.


 Finally I coated the entire outside of the Jack-o-Lantern with 3D Crystal Lacquer and Terri Sproul Mixers in Shimmer Garnet.  While this layer was still tacky I dusted it with some of the dry Shimmer Garnet for extra sparkle.  I also added some sparkle to the to the inside with some clear glitter glue.

 Here is my finished Jack-o-Lantern.  I can't wait to light him up come Halloween.

Don't forget to check out our blog hop on September 29th.  You'll see a bunch of amazing products from a bunch of talented artists on both the Creative Paperclay and Amazing Mold Putty Design Teams.  There will also be 3 chances to win some fabulous prizes.

Tuesday, September 25, 2012

Art to me is very personal. Hearts show up as a way to tell the world via art how I am feeling. Today I am feeling, hmmmmm melancholy. Melancholy- A deep, pensive, and long-lasting sadness So here is my little bound up heart
A little blue heart, Creative Paperclay® is awesome in that you can use it to express feelings, happy or sad, this heart was created by rolling out a small ball and then pressed down to the depth I wanted it, this is about 1/8 of inch and then using a cookie cutter, just like you would if you were cutting out cookies. ~*Remember.....Do not use equipment on food after you have used it on the clay!~** I then painted it using blue metallic paint by Jaquard, and distressed using a awl or whatever sharp thing you have. (this is all done after the clay has dried) I punched some holes in the clay and laced it up with some twine i had. Here is a pic of a piece of clay dried and then punched with a hole. This is to show it does not crack! You can punch holes in it. Its not a brittle clay.
I hope you create some HeArt! ANg

Saturday, September 22, 2012

Steampunk Earrings with Creative Paperclay

I am a bit into Steampunk this week. Some different addictive sites have me all a buzz about it and ideas flowing like crazy. So I thought....I am going to do a pair of earrings! And then my mind went a bit crazy! Now they are beautiful and light and awesome earrings but, as most of you know, when your mind starts....you are from one end to another of things to do. Here is what I did. I used Creative Paperclay and stamped a Steampunk image on it. I then cut it out using a lid of a bottle to have circle shape. I added holes where I would want to add hook and hangings when dry. Once it was dry I then painted all black and did a bit of a wipe off and dab with a paper towel to give a bit of texture. I then took a bit of gold paint and dry brushed it on. I wanted the outlines of the stamp I stamped to be highlighted. The back I painted black and stamped the stamp in gold ink on it. I then glued on a few pieces of old clocks and watches as a collage type feel on the front. I hung a few coordinating beads from the 3 holes on the bottom and added the earring wires. I love the way they came out and had a blast making them!

Thursday, September 20, 2012

Debbie B's quick tip

Hi all sorry no pictures but a quick tip from me would be.....
When you are working on a large piece you can add pieces to it as you go, dry on wet works well too. Just spray the dry spot you are adding to with water, blend the wet clay to the dry clay. (best to do when the clay is not too dry though -surface dry is fine).

Amaizing stuff aye!

All the best - see you next month!

Tuesday, September 18, 2012

Happy Halloween Banner by Edie

HellooooOOOooo!
Edie here and it is so good to see you again! I know, I know, it's been too long. What have I been up to? Well let's see... I have been working on projects for Design Team posts, blog hops and... oh YEAH! I created a brand new class!!!! It is called Frightfully Fun Upcycled Halloween and it will be available as soon as I can get the silly internet to cooperate and upload my videos LOL! I will have to tell you all about that next time ;D

For today's post, I have a super simple, super cute project to share with you! It is getting close to Halloween, (YAY!) so I have already begun making new decorations to add to my collection. While looking for inspiration I kept seeing these cute Halloween paper banners everywhere. You know the ones with the GORGEOUS folded paper and embellishments? Yeah, those :)

I love the way they look, but because they are so flimsy, I had never made one. I started thinking that if I ever made one of those banners, I would want it to be sturdy and last from year to year without fear of it being crushed or ruined in storage. And then it dawned on me... why not make it our of Paperclay?! So, that's what I did!

 I wanted to make sure this would work, so I made a mini-banner to begin with. I rolled out my Delight® air dry clay and cut a 1.5 in wide strip, then I cut 1 in wide triangles to make my flags.


Once my clay was completely dry, I painted the background of my flags orange, black and titanium buff.


 Next I used the same paint colors and stamped images and text, in alternating colors, on each of the flags.


 I cut tiny flowers out of watercolor paper using a flower punch and painted all of the flowers orange, then I used a regular hole punch to cut the circles and I hand wrote the letters.


I glued my flowers and letters onto the flags, then glued my flags onto a 20 in strip of Halloween ribbon. This banner is the perfect size to hang on a picture frame, mirror or small shelf. I am actually thinking about using is as an embellishment on an upcoming painting.


Since this banner turned out so beautifully, I plan on making a full size one that will hang in my home for Halloween.


This would also be a great project for kids to make and since they are so easy, you can make one for every Holiday and season!

That is all for today. It is time for me to get back to work and get my class online and out into the world :D You can see more of my work on my blog.

Saturday, September 15, 2012

Lyneen's Quick Tip - Paper Clay Roses

Most people don't know that I taught cake decorating at one time in my life.  Making roses was one of the first flowers a cake decorator learns to make.  I wish that Creative Paperclay® was a thin as frosting and I could pipe out roses.  
 
 Creative Paperclay® Roses can be made one petal at a time.
Start with a Creative Paperclay® cone, place it on a flat surface.

Take a small ball of clay and flatten it between your fingers creating a petal shape. 

Continue to add petals, shaping the edge of your Creative Paperclay® petals as you go.

Have a little water handy to apply to the  Creative Paperclay® to act as glue.

When finished set aside to dry. These are pretty thick I gave mine 2 days. Depending on your weather and humidity will determine you air dry time. 

Once dry paint them.  Now they are ready to use.

I made these for a Valentine I shared with you in our Blog Hop "Love Cast in Clay" last January. HERE is a link to the project.

Enjoy making roses with  Creative Paperclay®!


Thursday, September 13, 2012

Quick Tip for September: Filling Cracks With Creative Paperclay

This month I am working on a project that I needed to be round.  So I wrapped a balloon in Creative Paperclay.  When the clay dried, I ended up with a nice big crack in my piece.  This came as no surprise because as the Creative Paperclay dries it tends to shrink a bit.


To fill the crack, all I needed was some water and a bit of Creative Paperclay.

First I wet the surface around the crack.  This makes it easier to fill the crack in and blend the clay to your piece.

Next I took some Creative Paperclay and pushed it into the crack.

 Then I blended the clay into my piece.

After you do that let your piece dry.  Any lumps and bumps can be sanded down after the piece is dry.

Thursday, September 6, 2012

A Smurfy Canvas

Disclaimer: I have NOT been paid to do this. This canvas is for my own private use. It will NOT be sold or reproduced to giveaway in any form. This is just a post in the sole purpose of showing an example of what you can do with creative paper clay® I have no intention to breach copyright if it does I am more than too happy to take it down.
 
Hi all
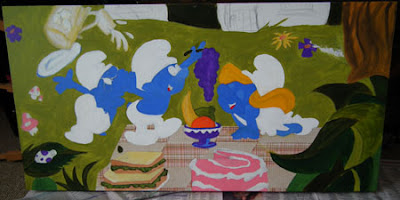
This month I will show you how I put together this Smurfy Canvas for my daughter.... measuring 20" x 40" - yes its huge!

To do this you will need:

Creative Paperclay®
Canvas the size you want
Picture to copy
Acrylic paints
Patterned paper
Black marker pen
Pencil


.

Step 1
Draw up your picture in pencil


 Step 2
Paint your painting
Step 3
Add your patterned paper on the mat


Step 4
Make your clay pieces that you want to stand out


Step 5
once your clay pieces are dry Paint them


Step 6
Draw your black lines onto your painting with the black marker pen if your painting is a cartoon painting like this.

Step 7
Stick your clay pieces in the desired places on the canvas.

You are done!


Here is the painting again and close ups....


Thanks so much for dropping by... Happy Smurfing!

Debbie Buckland signing off for now...
http://artycrafty.wordpress.com


Disclaimer: I have NOT been paid to do this. This canvas is for my own private use. It will NOT be sold or reproduced to giveaway in any form. This is just a post in the sole purpose of showing an example of what you can do with creative paper clay® I have no intention to breach copyright if it does I am more than too happy to take it down.