Saturday, December 29, 2012

Tip for Dec.


"Creative Paperclay® modeling material"

                                                         
Here is how I Help dry out my clay.
I roll out on a powder surface.
After i get my shape I lay it out on a cloth


I do my clay  on a tray

http://creativepaperclay.blogspot.com go look at all the ideas

Friday, December 28, 2012

Dawnmercedes' December Tip!

I hope you are all enjoying your holidays!  Here is a really important tip for adhering two pieces of Creative Paperclay ® together.  It applies to all sort so of clay...and I found it quite useful when using Creative Paperclay ®.  

So students...today's vocabulary words:  SLIP and SCORE.  

Add caption

Slip is basically watered down clay.  Add a bit of water to your Creative Paperclay ®. I use a frisbee b/c it has sides to keep my mess away from my project.  You will want enough water to make the consistency "gummy" but not "runny."  


Next step:  SCORE.
With a pointed stick or palate knife, create thin hash marks on both pieces of clay that you want to adhere together.  If you have a very thin piece, just roughing up the surface will be good.
Next add a bit of your SLIP. This acts like glue.


After I "glue" my components onto my bowl, I started the drying process by putting it into a zip log bag.  This creates an atmosphere so that both pieces of the Creative Paperclay will have the same dryness...and thus adhere well.  After a day or so (depending on the size of your projects.), take out your piece and let it dry out in the open air.

You will find that using SLIP and SCORING both pieces will give you a strong bond for your larger projects.

Thanks for stopping by today...
I hope you continue to have a safe holiday season!


Thursday, December 27, 2012

Creative Paperclay Tip for December

Creative Paperclay tends to crack as it dries due to shrinkage.  One way to keep the cracking to a minimum is to keep the Creative Paperclay as moist as possible.  One way to do this is to keep your opened clay in a Ziploc Bag or an airtight container when not in use.  Also keep a cup of water on your work space when you are working with your clay.  This way if you notice that it is starting to dry out while you are working with it you can moisten it.

Saturday, December 22, 2012

Brenda's Hot Cocoa Bottle

Good morning, Brenda from Creativity is a State of Mind here again and welcome to another Creative Paperclay® post.  With Christmas literally just days away I am scrambling for those last minute gifts.  Sometimes you just need a little something for someone and that is what I have for you today. I had made a project awhile ago using some snowflakes that I cut out of vinyl and then I was left with all these scraps of snowflake cutout from the vinyl.  I hate to see anything go to waste so I used them up like this... I started out using an empty bottle because I have soooo many and adhered those pieces randomly on the bottle. 
 
 Some of those pieces were pretty close to the edge and if I was to etch them I might go over, so I just used some scrap pieces of contact paper and adhered those close to those edges.  Then I added my glass etching paste and let that sit for about 10 minutes.
Because I hate waste I use whatever I have on hand and scrap the etching cream off of the item that's being etched and put it back into the bottle.  I've been using this same bottle of etching cream forever.  
 Once I removed those pieces of vinyl the snowflakes came to life.  
I LOVE IT!!!
 Now you might  be wondering why this is a paperclay post?  Well, the bottle was a Maggi bottle and the lid wasn't going to cut it.  
So I rolled out some paperclay and put it around the lid.  I wasn't worried about smoothing it out because... 
while it was still wet I rolled it over my "wood grain" embossing folder to give it dimension. 
Once it was all dry, I just used my exacto knife to cut away some of the clay so that it had a perfect fit  
and painted it brown, black, brown, watered down black, etc. until I got the "look" of a cork 
See the dimension?  Isn't that cool? 
and here is my faux cork.  (really baaaad picture) 
Next I rolled out some paper clay and 
used an embossing folder and sandwiched the paperclay between it.  
and gently used my rolling pin to get a good image embossed. 
Then I used my snowflake cookie cutter to cut the shapes out randonly
and let them dry overnight.
I made a boat load of these and have another project to show you soon. 
Very cool embossed snowflakes.
Then I painted them white and embellished 
them with some gold glitter glue.
I filled the bottle with hot cocoa mix and added two of my paperclay 
snowflake ornaments and now I have the perfect gift to give to someone. 
I am really liking this project and I have just the perfect person in mind to give this to. 
I really wished the camera could pick up on the etching better,
but in person this looks magnificent. 

I added a bow and now I have the perfect little gift


Thanks for joining me again today and I hope I've inspired you to use some Creative Paperclay®.  I'm sure you all put Creative Paper Clay® on your Christmas wish list so you can make all these fun projects we have all been showing you and if you don't get any from Santa, you can order it here or you can get it at Michaels.  
Until next time, as always, have a great day and God Bless.

Thursday, December 20, 2012

Jess B's - Fight Like a Girl

Welcome
and Happy Holidays to Everyone

Christmas is very near
and within this many many ups and downs
have occurred for many of us
Hold your chin up 2012 is almost over!

I have dedicated and will present this 
project to
Beatriz Reyes
a co-worker who is dear to me
we have been working together for
nearly 7 years
She is dedicated to her job
her family and her health
Always has an upbeat attitude and just
one of those people that you just want to be around

Without going through all the details

She is a fighter in more ways than one
being in remission of breast cancer for 8 years
she has beaten the odds
But this summer she was diagnosed again with the 
ugly bugger and going through chemotherapy once again
so I made her a

Fight like a Girl
Angel


 INGREDIENTS
Creative Paperclay®
Cricut Cartridge - Pink Journey and Indie Art
Terry Sproul Mixer- Ink Sapphire Pearl
Sakura 3D Crystal Lacquer
Delta Paint - Hydrangea  Pink
Deco Art - Glamour Dust - Rose Celebration
Modge Podge - Silver Glitter
Mini Feathered boa
Pearl
lace applique


Thanks for stopping by
A wonderful Christmas and prosperous 
New Year to all


Tuesday, December 18, 2012

Edie's December Quick Tip

Hey Everybody, It's Edie!
I am here with my December Quick Tip for Creative Paperclay® - Making holes in projects is obviously easier while the clay is still fresh and wet.  You can use a toothpick or a straw to make perfect holes every time. However, if you forget to make your holes and your clay dries, you can use a small hand drill, or even a regular drill bit turned by hand. I have a variety of tiny regular drill bits for this purpose. Apply steady pressure and be sure the drill bit won't damage anything when it pokes through.
HAPPY HOLIDAYS!!!! SEE YOU ALL NEXT YEAR ;)
Visit my blog.

Friday, December 14, 2012

Kitchen Jewelry Bowl


Hey there crafters!  This is a snap shot of a corner of my pear colored kitchen. 
I just love these curtains from IKEA. What I don't like...is doing the dishes.  ("I always get the hardest days" was my childhood lament!)  


I decided to make a cute bowl to toss my rings and bracelets in before I start the dishes.
Creative Paperclay makes coordinating home decor as easy as apple pie!

Supplies Needed:
Creative Paperclay ®
rolling pin
styrofoam bowl
acrylic paint
brush
ziplock bag
Krylon Crystal Clear gloss spray


First, start off with a styrofoam bowls to use as an armature.


Roll out your dough a big larger than you think you need.
Then place it into the bowl, gently.


Cutt off the excess...and smooth the edges!


Roll out more Creative Paperclay ® and shape as desired.
Attach...(check back in a couple of weeks for my tips on how to attache these clay leaves!)


I start my drying process in a plastic bag..
Once your piece is dried, you can decorate, paint, and embellish as you like!
When it is all dried, I sprayed a couple of coats of Gloss Spray to seal my bowl.


Yeppers...I'm not going to lose any more rings and things with this pretty bowl!
My kitchen got a little sprucing up...and I guess it really is time for me to do some dishes!
Ugh...it was spaghetti tonight!  

Thanks for coming to see my project this month!
Have a great Christmas!


Thursday, December 13, 2012

Unique Christmas Cookie Tin

One of my favorite things to give as a gift at Christmas time is home made cookies.  I have used and decorated coffee cans for this purpose many times, but never quite like this. DSCN1137   
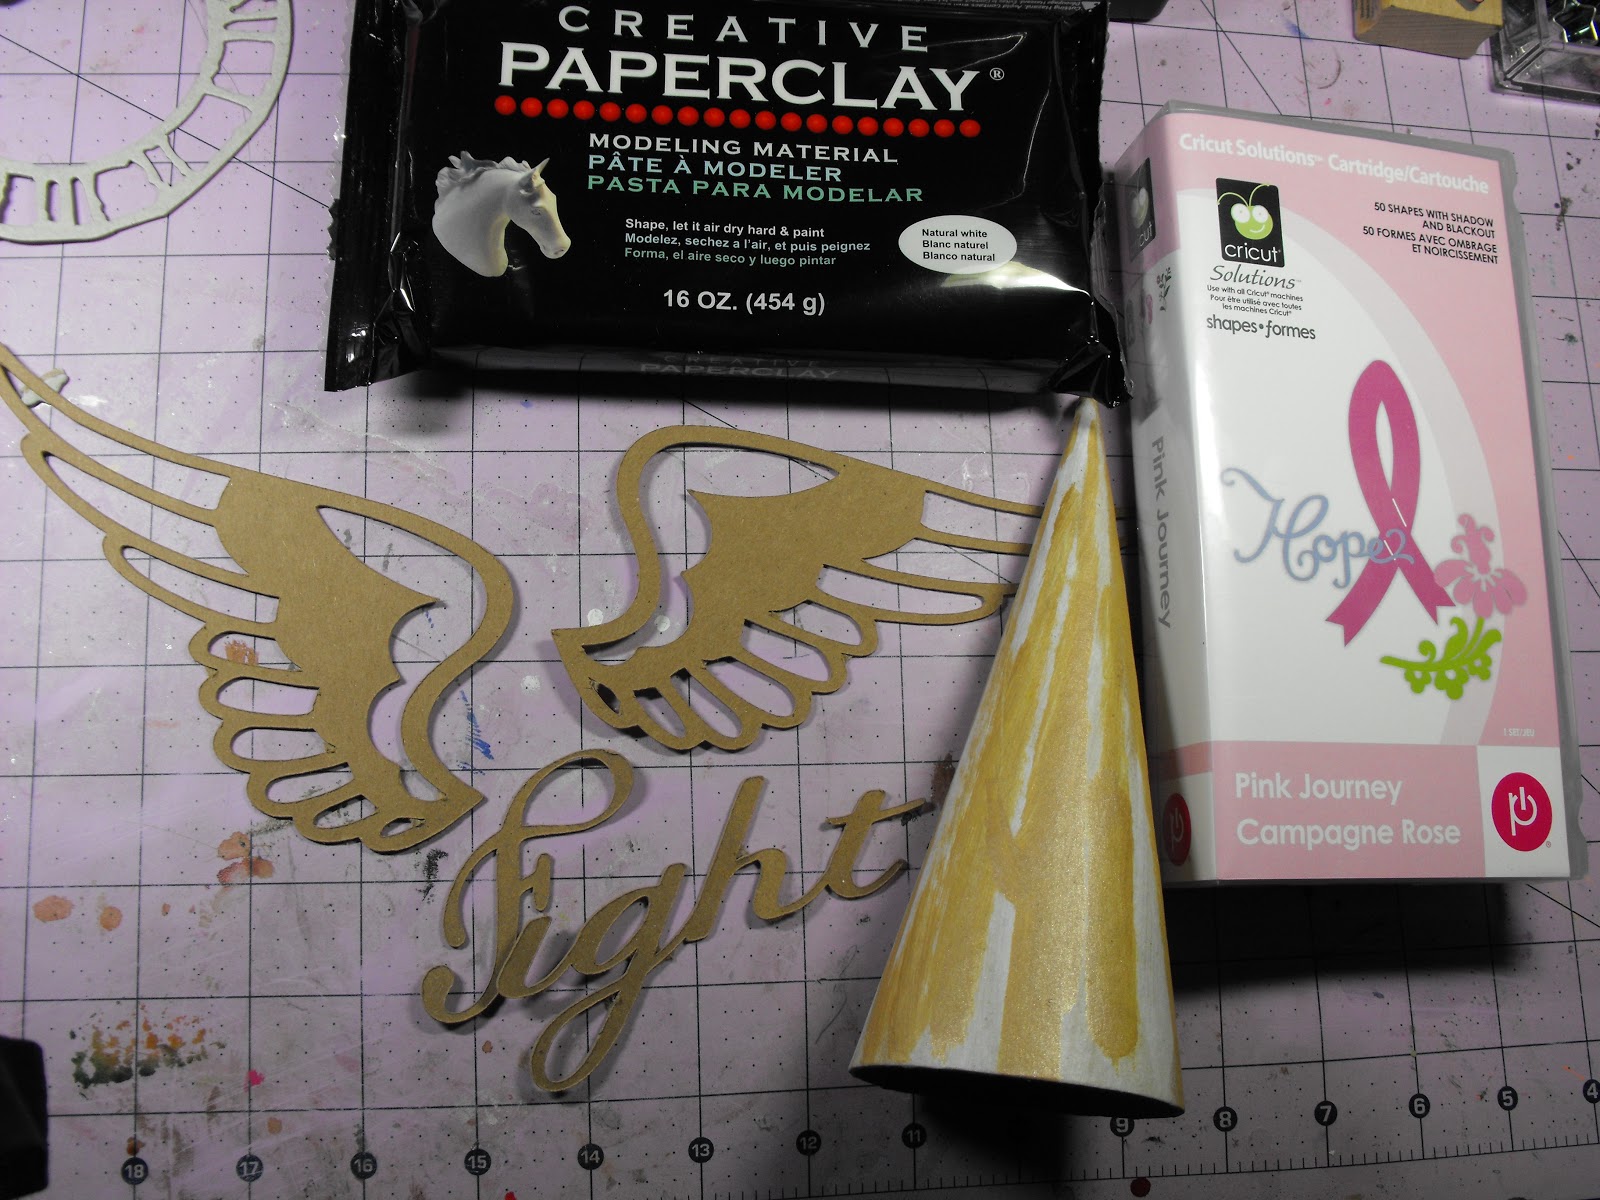
First I removed the label and cleaned out the coffee can.  Then I rolled strips out of Creative Paperclay that were approximately the same height as the coffee can, 2 inches wide, and 1/8 of an inch thick.  I applied them all around the can. DSCN1139   Next I smoothed out the seams using water and also accentuated the grooves of the can and let it dry. DSCN1143 While my can was drying  I sprayed some white tissue paper with homemade alcohol inks.  This was inspired by a technique that Terri Sproul used during one of her Saturday Craft Fair shows which can be found here. DSCN1142   Once the Creative Paperclay was dry I sanded it to smooth out any really bumpy spots. DSCN1144   Then using Mod Podge I covered the can with my tissue paper. DSCN1149   Finally I added a layer of Terri Sproul Mixers in Gold and glossy varnish.

  DSCN1157   Here is the finished product without the cover.  It is fun and funky and can be used over and over again after the holiday season has long gone.