Saturday, September 24, 2022

How to Create a Zombie Ornament


Hello everyone! My name is Cinnamon Willis and I am going to show you how I created this ornament! I had some left over plaster disks laying around after working on another project and I wanted to see if I can get some use out of them. You won't need plaster to make this ornament, you can just use some foil, paper or whatever you would like to use for the middle and cover it with the Creative paperclay.


Supplies:
  • Creative Paperclay®
  • Acrylic paint
  • Sanding paper
  • Aleene's Original Tacky Glue
  • Exacto knife
  • Wool or whatever you would like to use for hair
  • Pliers
  • Flexible wire


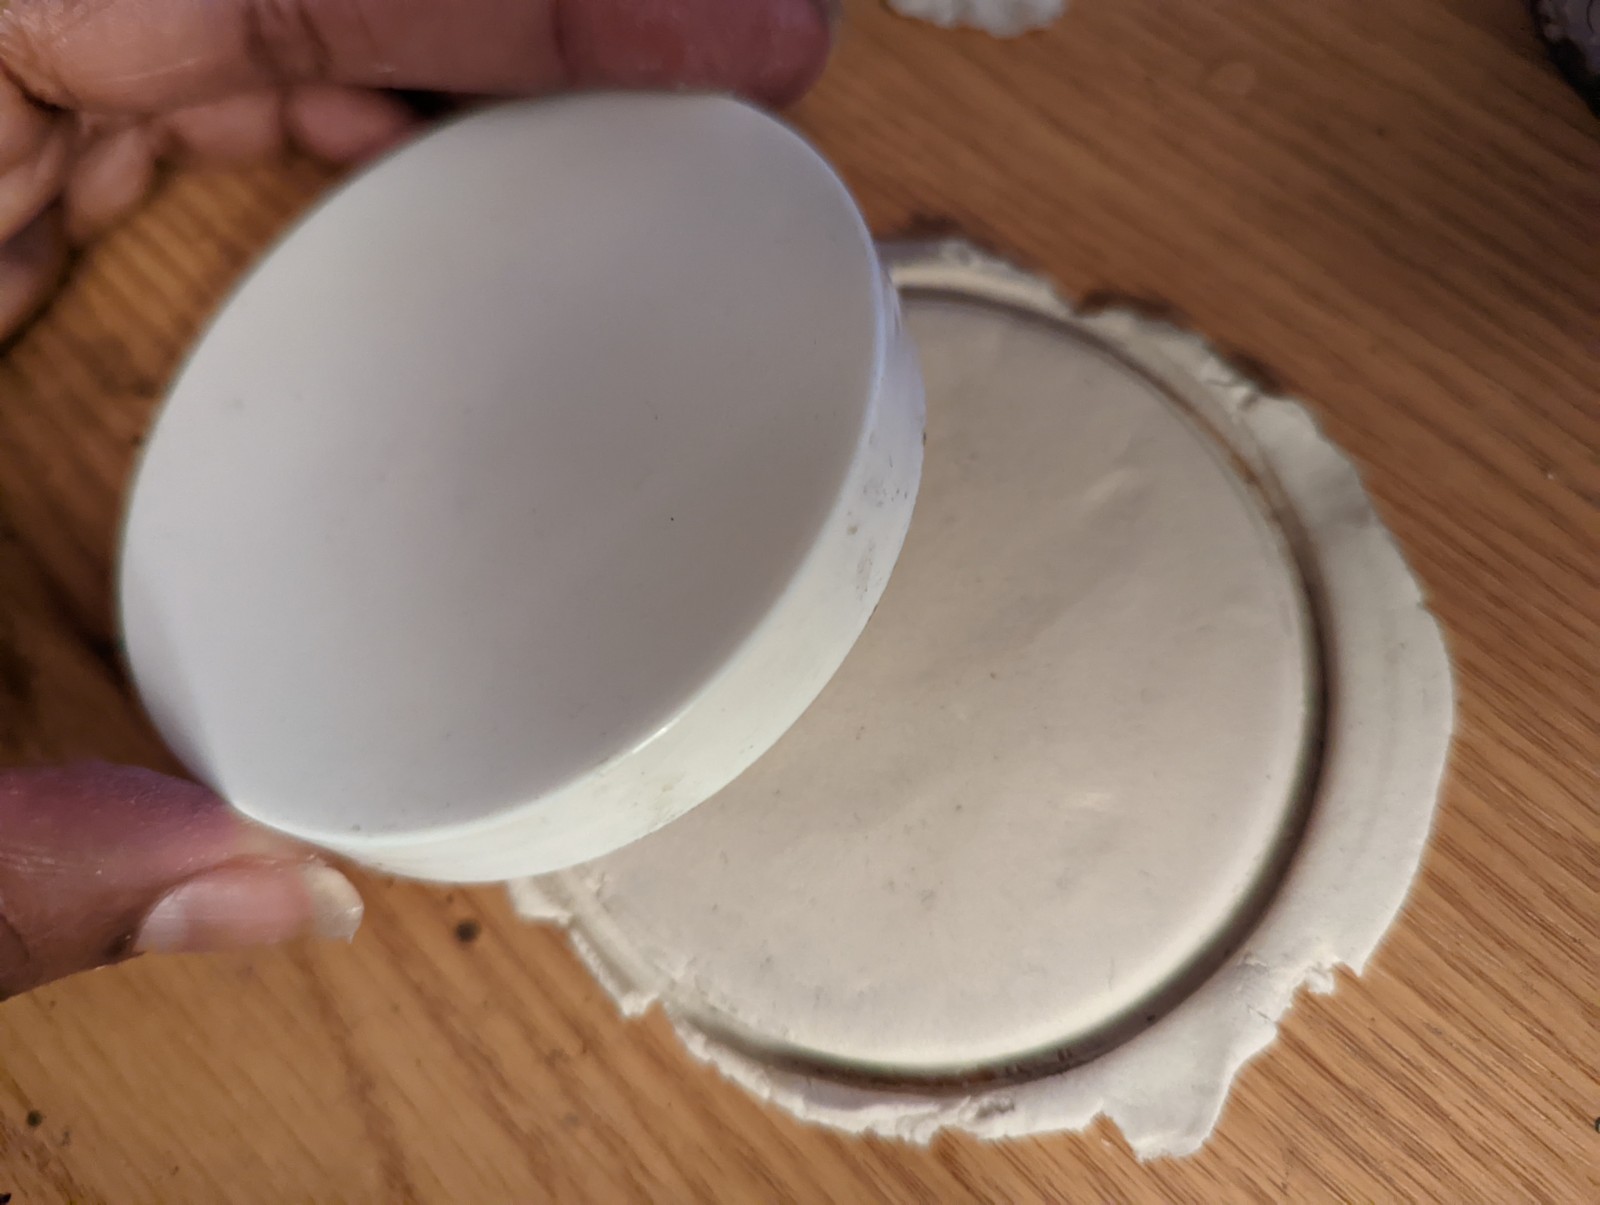
This is some left over plaster from a previous project, I let it cure in the bottom of a plastic cup so that I could get this disk shape and use it later. Take whatever you are using for the core of your piece and cover it with paperclay


Take your wire, tie it in a knot and then cover the knot with masking tape.


Take the knotted wire, put it in the back of the flat disk and cover it with clay. Bulk out the back of the head so that the wire sits smack in the middle of the piece. This ensures that the piece hangs right on the tree, if it is too far in the back the front will dip forward towards the floor.


Here I just started working on the face a bit. After working up the cheeks I sit the piece aside to let it dry for about 24 hours.


I find it easier to work in layers with paperclay. I let the first layer dry and then come back to work up more of the features like the eyes and mouth. I go through this process about four times before things start to look right for me.


Chisel into the face with your exacto knife to further create the desired face shape for your piece.


Now that I am happy with the way things look with the face, I can begin to sand it down to get it to look smooth.


Paint your piece with acrylic paint. I wanted to go for a zombie look.


Wanted to give her a little bit of freckles to add more interest to the face. After you are done with painting, make sure you cover the piece with varnish to protect the paint.


I am using yarn here for the hair. Cut to the length that I wanted want and then felted the pieces together so that there is a base for the head.


Take your Aleene's tacky glue or whatever glue you like to use and smooth it on to the top of the head.  Then take the hair that you prepared and push it down in place.


I take saran wrap and secure it over the head with a rubber band to make sure the hair stays in place. Let it sit overnight and make sure there isn't any glue coming through the hair to glue the wrap to the doll's head.


Here is the completed piece and it is currently for sale here!


Thank you all once again for stopping by, and I hope that you enjoyed today's tutorial! You can find Creative Paperclay® at the following retailers Creative Paperclay® Online Store, Michael'sAmazon, Joann's.

See more of my work at Melandolly.com and be sure to catch updates on my Instagram page


Friday, August 19, 2022

How to Create a Unique Wall Piece


Hello everyone! My name is Cinnamon Willis and I am going to show you how I created this cute wall piece!


Supplies:


Gloves
Drill with small bits
Copper acrylic paint
Drop cloth or someplace to work on that can support a mess
Creative Paperclay®
Water
Sanding paper


Roll and flatten out your clay. I used a lid to a container to flatten and then cut a disc out like you would with a cookie cutter.


When you get the shape just right, take your disc and set it aside to dry. Monitor the drying to make sure that the disc doesn't warp upwards. You might want to set a book on top of the clay with a piece of parchment paper in between.


When the piece dries, take your drill and drill the a hole in the top of the disk.


The nice thing about paperclay is that you can draw directly on it like paper. Draw the design that you would like to have on your piece. 


Just like with paper, you can erase your drawings with a eraser. You can go back and forth with your design until you are happy with it.


Paint your piece with any type of acrylic paints that you would like to use. I choose to put gold on the side of my piece.


Use a protective coating to seal your piece. This is how it turned out.

Thank you all once again for stopping by, and I hope that you enjoyed today's tutorial! You can find Creative Paperclay® at the following retailers Creative Paperclay® Online Store, Michael's, Amazon, Joann's.

See more of my work at Melandolly.com, catch updates on 

my Instagram page and here is a link to my shop!


Saturday, July 23, 2022

How to Make a Steampunk Character


Hello everyone! My name is Cinnamon Willis and I am going to show you how I created this cute steampunk sculpture!


Supplies:


Gloves
Mask
Drill with small bits
Copper acrylic paint
Drop cloth or someplace to work on that can support a mess
Small wood circle
Bronze gears and key
Creative Paperclay®
Water
Sanding paper


First start off with getting your materials in order. Cover your work area with a drop cloth (I have a board that I work on instead), gloves,


Get a small drill bit and drill two holes into your wood disk for the feet of your sculpture. Make sure the bit is the same size as the wire so that it fits in snugly.


Begin to make your armature out of the wire. Check to make sure the wire sits snug in the holes that you drilled.


Continue making the armature to how you would like your figure to look. When you are done with the shape, use masking tape to cover the parts that you want to cover with clay. Begin putting the clay on top of the masking tape. Continue building up the sculpture and set it aside to dry before beginning another layer. 


Here I made little nubby hands and a square head.


Sand down the pieces that you would like to get nice and smooth.


Paint the piece black so that you can cover it with the bronze or gold if you like. The coat of black paint makes the metal paint look more like a piece of metal.


Here is a coating of bronze paint that was put on top of the black. Streak the metallic on top of the black sporadically so that it isn't so uniform.


Start getting your gears and key ready to be placed on the piece. Use e6000 glue to put the pieces on the figure and use a small string of wire to hook the key on with to hang from the figure's hand.


Use a protective coating to seal your figure. This is how he turned out.

Thank you all once again for stopping by, and I hope that you enjoyed today's tutorial! You can find Creative Paperclay® at the following retailers Creative Paperclay® Online Store, Michael's, Amazon, Joann's.

See more of my work at Melandolly.com, catch updates on 

my Instagram page and here is a link to my shop!


Thursday, July 7, 2022

Little Teapot

Hi there, I'm Susie and I'm spilling the tea on how to create your own little teapot out of a recycled jar. I create monthly tutorials for as a Creative Paperclay® Design Team Member. They are meant to a simple building block for a creative to add their own ideas. So have fun with it. I do keep my videos short, because if you're like me, I like to get to the main idea and get busy creating on my own.

View the photos and then click on the video


Some supplies you'll need to gather:

Small Jar (I used a rounded little honey jar) Masking tape aluminum foil air dry clay (I use Creative Paperclay® water clay tools lace or your choice of item to create textures in the clay flower, insect and leaf molds if desired sand paper (fine grit) acrylic paints paint brushes Water based sealant (I used krylon spray clear matte finish)


You can find more tutorials from other design team members on the Creative Paperclay® blog.
http://creativepaperclay.blogspot.com/ You can find my work at: www. ArtbysusieK.com @Artbysusiek on IG, FB and TikTok @WillowHollowWoods on IG and FB

email ArtbySusieK@gmail.com

Saturday, June 25, 2022

How to Create a Cache Pot with Paperclay Embelishments


Hello everyone! My name is Cinnamon Willis and I am going to show you how I created this cache pot for my small hoya plant!


Supplies:


Plaster of Paris
2 Plastic quart containers
Plastic drinking cup
Gloves
Mask
Drop cloth or someplace to work on that can support a mess
Wood stick or something to mix plaster with
Creative Paperclay®
Water
Rocks
Sanding paper


First start off with getting your materials in order. Cover your work area with a drop cloth (I have a board that I work on instead), gloves, your container for plaster, container for water, stirrer and empty drinking cup with rocks in it. When you have all of your materials together, measure out your plaster in one cup and measure your water in another cup. Whatever amount of plaster you'd like to use, you would need half of that amount to be water. For example 2 cups of plater would need to be mixed with 1 cup of water. 


Start sprinkling your plaster into your cup of water. It is important for you to sprinkle the plaster around the entire surface and not dump it into a pile in the middle. When you are done sprinkling, take your mixing tool and stir the mix until it is uniform and creamy. 


Take your small drinking cup and place it in the center of the mixing container. Fill the cup with rocks so that the plaster doesn't make it rise out of the container. Make sure you leave about an inch between the bottom of the cup and the base of the mixing cup so that the plaster fills under it. Let it sit to cure for about 48 hours.


Lightly tap the bottom and the sides of the container to release your pot.


Remove your cup . 


Start cleaning up some of the imperfections from the plaster. I use a combination of sanding and cutting with an exacto knife.


Brush down the area that you want to apply paperclay with water. Paperclay will not stick to a dry plaster surface, so you might need to continue applying water to the surface a couple of times until it begins to stick to it.


Work on the face in stages. I worked on the top part and set it aside to dry for around 24 hours.


After letting the piece dry, I came back to sand down some parts that I wanted to be smooth.


Repeat the last two steps as much as needed. Work up the piece and come back to sand things down for a smooth finish. 


Use a protective coating to seal your pot. I highly recommend you to water your plant outside of this pot and place it back after letting it drip dry first to prolong the life of the plaster.

Thank you all once again for stopping by, and I hope that you enjoyed today's tutorial! You can find Creative Paperclay® at the following retailers Creative Paperclay® Online Store, Michael's, Amazon, Joann's.

See more of my work at Melandolly.com, catch updates on 

my Instagram page and here is a link to my shop!