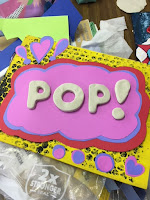
I introduced my 6th graders to the Pop Art of Roy Lichtenstein. We explored his art, discussing the colors, backgrounds, his use of motion words, as well as his influence on comics. In talking about his use of action words, I mentioned "Batman"...the boys immediately lit up. I have a pop art piece on the wall of my classroom, a hand on a telephone receiver with the single word "SLAM!". We talked about how the use of one word allows the viewer to understand the force behind the image.
Each student received a wood board. These boards had been taking up real estate in my classroom for four years (and God only knows how many before I got there) and I was ready to rotate them out! The day's assignment: Paint your board in a solid color (I gave them a limited number of choices) making sure the surface was completely covered. After the painting was complete they rotated through a bubble wrap station to create "Benday Dots" over the surface. As you can imagine, the bubble wrap printing excited them...something a bit different from the norm to roll with paint and print. I was amazed at how quickly they completed the tasks. The drying racks were quickly filled and students were ready to continue to the next step.
All of my middle schoolers have art journals. I had them choose a motion/action word and sketch a design to highlight it. They were to add possible colors with the understanding that nothing was set in stone and the design could evolve from the original as the piece took shape. That was class #1.
Class #2: For the next step I brought out brightly colored cardstock, pieces of matboard, and 1/4" foam core scraps. Working from individual sketches, the students began to create the "pop" that would give motion to the words. I demoed how foam core or matboard pieces glued between the layers would quite literally have their designs popping off the wood board. If I hadn't pulled them into the project before, this defintely got their attention. All around the classroom the students began to work and were disappointed when it was time to clean up. I promised that they would have plenty of time to work during the next class and that I was bringing in a very cool product for them to use to add another dimension to their pieces.
Class #3: Creative PaperClay®
The students were excited to get to work the following Monday. I gave them these basic instructions: "You will receive a piece of airdry clay and a paper towel. Go to the sink and get the towel damp (wring out any excess moisture). Wrap any part of the clay in the towel when not in use so that it remains moist. All of the clay MUST BE USED today!"
I put out rolling pins and texture sheets, alphabet cutters of a couple of different sizes. "Do NOT roll the clay paper thin! Keep some thickness to your letters. Do NOT pound your clay into the table! It WILL stick and you will be sad." I showed them how to use their fingers to flatten the clay as well as using a rolling pin. Again the students were told to use all of their piece of clay or share any extras with classmates who might need a little more. Soon the classroom was filled with "action" 😉
Once each student completed his/her word and any other details, they were placed on a sheet of scrap paper to dry until next class. I was so excited with the multiple ways pieces developed. Next class (final for the project): coloring and highlighting the words
Last class: I sadly was away for this class and had a substitute. Instead of having the students paint, we had them use Sharpie Markers (I value my substitute's sanity 💓 ) The students first used a fat, black Sharpie to highlight the edges. They were directed to color the edges solidly, not leaving any white showing. Next, they could choose a color for the top of the word. Many went back to their original sketches for color reference, while others picked the brightest & boldest color in the bin. Once words were colored, they were glued in place using Elmers Glue. Thankfully my substitute told the students they could not take the finished project home until I had a chance to see them. I was thrilled when I got back to work!

Dominic D. (left) & Annie W. (right)

Michael C. (left) & Daniel M. (right)

Jilliane D. (left) & Isabella M. (right)

Isabella O. (left) & Diya G. (right)
Malia H. (left) & my example (right)
I hope you have enjoyed this post. I think even Roy Lichtenstein would be pleased with how his work was interpreted. To see more of my work and the work of my students please check out https://polymercreations4u.wordpress.com/ as well as the Creative PaperClay blogspot on the 2nd Wednesday of every month
Until next time...stay CREATIVE!


2 comments:
These are certain wonderful projects. Everyone did GREAT!
Sorry to say this, since the Lichtenstein art is certainly colorful, but did you know it was ALL PLAGIARIZED? Lichtenstein simply cut out comic panels, traced them up, re-lettered them to look not as good, and passed them off as original art. He didn't put in anything that wasn't already there in the originals. There's a site, http://davidbarsalou.homestead.com/lichtensteinproject.html that shows all the original panels and lets you see who the REAL artists were. I believe that a lot of Lichtenstein exhibits now actually include this information so viewers can see where these images came from. Your students might find it interesting to see how these this artwork came to be. As someone who has worked in comics for 35 years, I like to set this particular record straight when I can.
Wow! They all did an awesome job!
Post a Comment