Las Gemelas - Connected for Life - Conjoined Twins

SUPPLIES:
2 -7" Kidrobot Munnyworld Munny Vinyl Doll Blanks
Creative Paperclay®
Masking Tape
Craft Knife
Gesso (I used Black Golden brand. )
Acrylic Paint (I used Liquitex and Golden. )
Paint Brushes (Gesso can be hard on brushes. Use cheap foam brushes.)
Sandpaper (I use 320-420 grits)
Dust Mask or Bandana – use this when sanding
Sculpting Tools are optional. I use manicurists tools and knitting needles. My friend Christi Friesen also makes some great tools.
Rolling Pin or Glass Jar
Rolling Pin or Glass Jar
Shop Rag – To smooth over clay.
Krylon Crystal Clear Gloss Sealer
I used almost a full package of Creative Paperclay® for this project.

I used 2 -
7" Kidrobot Munnyworld Munny Vinyl Doll Blanks
(How cool would it be to use the 18" blanks? I might have to do that next time!)I really enjoy working with these blank dolls and Creative Paperclay®. No need to build an armature and the Creative Paperclay® dries so quickly when it is used in such thin layers.
***TIP: If the vinyl is too hard to cut through, use a heat gun to warm it a bit. It will cut like butter with a little heat.
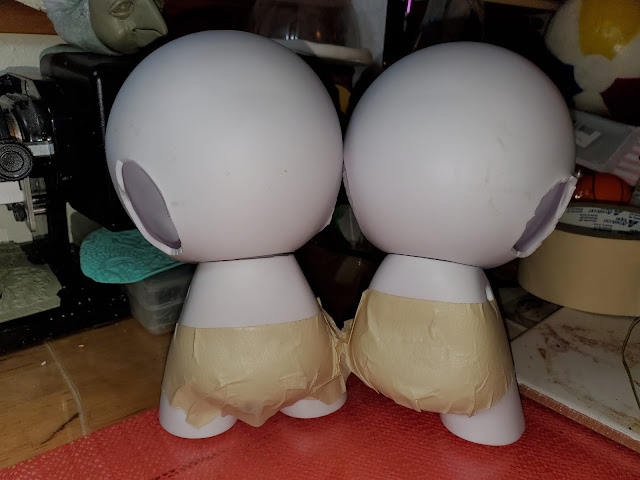
Next use masking tape to position your twins in a natural looking conjoined position. The heads are kinda big so you probably need to tilt at least one of them to get them together.
 Here is the back view of the taped together twins. the tape needs to hold them together securely. You do not want to have any give or movement when you are sculpting.
  Next tape over any openings where you cut parts off; ears, leg, and tails, arm can be left open as place holders for sculpted arms. Roll our pieces of Creative Paperclay®. About 1/8 of an inch is a good thickness to work with. It will allow for maximum coverage and quick drying,
Smooth the clay out using a rolling tool. I like using a size 15 aluminium knitting needle. It is one of my favorite sculpting tools.
Once you cover the entire piece use a pencil to mark off the placement of facial features and hoodie. I like my features low and widespread for a child-like, puppy dog look. Centerline - Eyeline - Nose Line - Mouth Line - and Eye Placement
No need to be too fussy. Thee are just general guidelines.

Next you will add facial features, arms, and any other desired details. I created the face tutorial here: Sooshie Sea Star
Paint your conjoined twins with acrylic paints. I used Golden acrylics. If you need some tips on painting on Creative Paperclay® with acrylic paints please go to my YouTube channel for an 8 part, hour and a half, tutorial on painting a Creative Paperclay®bust with acrylic paints.Last but not least, after they dry have a photo shoot. Play with filters. I think these 2 look great in black and white. What do you think? Please share some images with me.
Next you will add facial features, arms, and any other desired details. I created the face tutorial here: Sooshie Sea Star
After adding details, allow the piece to dry completely. Lightly sand off any blemishes and fill any cracks. Allow it to dry again.
***TIP: The bottoms of the feet don't always dry because they are on the bottom without air circulation. Lay the dried piece on it's side for a few hours. Be sure to sand them down so that it stands up right.

Here they are ready to party with all of their little monster friends!
If you decide to make your own please be sure to share a few photos with me!
I hope that you have enjoyed this project as much as I have! I'll be back with more "What's On My Workbench Wednesday" fun on the first Wednesday of each month.
Come back for more cool ideas and projects! Creative Paperclay® and Delight™ are conveniently available for you to purchase online and at the below listed retailers.
Until then, stay cool and don’t forget the sun screen!
Fin - The End
I hope that you have enjoyed this project as much as I have! I'll be back with more "What's On My Workbench Wednesday" fun on the first Wednesday of each month.
Come back for more cool ideas and projects! Creative Paperclay® and Delight™ are conveniently available for you to purchase online and at the below listed retailers.
Fin - The End
Instagram: https://www.instagram.com/redwoodcoastcreativearts/
https://lorraineteresina.wixsite.com/lala
https://lorraineteresina.wixsite.com/lala
Pinterest:


2 comments:
Love this Lala!
Thank you very much, Melandolly!
Post a Comment