Hello and happy Friday everyone, Cinnamon here and I am going to show you how I created this articulated doll out of one of my sketches. Since paperclay is made with paper fibers, you can draw directly onto it with pencils. Follow the steps below to see how this was done.
Supplies:
- Creative Paperclay®
- Small hand roller or something to flatten out clay
- Thread
- Exacto knife or plastic knife
- Sand paper
- Thin 22 gauge wire
- Colored pencils
- Sealer, Varnish
I started off with a sketch that I did years ago. I scanned it into my computer and made a few changes to it so that I could turn it into a doll such as made some legs and turned the skirt into pants. (I ended up not using the skirt in the photo at all by the way.)
I printed out the new sketch and cut out the pieces. I then took my clay and flattened it out with the hand roller. This could also be done with getting something flat like a book and pressing down onto the clay until it is the thinness that you would like. I recommend not going thinner then 1/4 inch in thickness, thin pieces are prone to warping when they dry.

When you are happy with the thickness of your clay, you can press your cut out pieces of paper into the clay. After your sketch pieces are flushed to the clay, you can use them as a guide to cut out the pieces from the sheet of clay. I used a tool that was flat like an exacto knife to give me clean cuts but you can use a plastic knife to get the same results. Begin to separate your pieces from the clay.
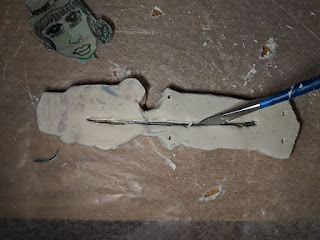
After separating the pieces, I noticed that a few of the thinner areas were tearing after cutting the pieces out. I put them face down and reinforced them by inserting a thin piece of wire in those areas and smoothed the clay around it to conceal the wire. Remove the pieces of paper after you used them to shape your pieces around them. I left the face on because I wasn't sure how to go about redrawing it. I suggest to remove all pieces before the clay dries since it is a lot harder to remove after the fact which I found out the hard way.
While the clay is still moist, poke all of your holes in for you to later attach the limbs with thread. Set the pieces aside to dry. I noticed after the pieces started drying that a few were beginning to warp. I sat a cup on top of those pieces to help them dry flat.
When the pieces are dry, sand them down so that you can get a smooth surface for drawing onto.

When you are happy with the thickness of your clay, you can press your cut out pieces of paper into the clay. After your sketch pieces are flushed to the clay, you can use them as a guide to cut out the pieces from the sheet of clay. I used a tool that was flat like an exacto knife to give me clean cuts but you can use a plastic knife to get the same results. Begin to separate your pieces from the clay.
When the pieces are dry, sand them down so that you can get a smooth surface for drawing onto.
Begin drawing straight onto your pieces, paperclay is made from paper fibers so it easily accepts pencil as well as paints. Color in your pieces with colored pencils or paint if you would like.
This is how she looks, AND she's flying!
Thank you all once again for stopping by, and I hope that you enjoyed
today's tutorial! You can find Creative Paperclay® at the following
retailers Creative Paperclay® Online Store, Michael's, Amazon, Joann's.
See more of my work at Melandolly.com, catch updates on
my Instagram page and here is a link to my shop!
 .
. 


1 comment:
I love this project!
Post a Comment