Tuesday, December 15, 2015

Mix n' Match Mediums - Tori's Tip for December


Wondering if you can use a certain type of paint, crayons or markers on Creative Paperclay®?  Here's my tip - If you can use the medium on paper or wood, then it's okay to use on the clay.  The "secret" is in the prep work.  The assortment in the photo above contains just a few of the many artistic mediums I've used with this amazing modeling material!

- acrylics, watercolors and other water-based media can be painted directly onto the clay without any prep work.  The paint will be absorbed into the clay up to a point, but if you get it too wet you will start removing it rather than adding it, so let the paint dry between coats or washes.  The paint will also be absorbed differently in areas that are left just as the clay dried, and those that have been sanded.  These absorption rates can be used to your advantage to enhance textures, etc.  These media can also be used over gesso.

- pencils, crayons, chalk & oil pastels can also be used directly onto the clay as it dried.  Again, you can take advantage of the texture of the material, leaving more "tooth" for the mediums to grab on to, or sanding the clay smooth.  With pencils, you can either use a light touch to keep the pigment on top of the clay, or use a heavier touch and actually change the surface for texture and 3-D effects.  (Plus, the crayons can be melted onto the clay too! - you can see some of the effects here)

- oils, oil pastels, markers and spray paint, are best used on a surface that has been prepared with gesso, in the same way you would prepare a wood panel.

- inks & dyes also work well with the clay, and it's a great surface for stamping onto with rubber stamps and stands up well to embossing, layering and texture effects.

I suggest making up some samples of dry clay and having a fun day of just playing with different media and prep techniques with no objective in mind other than exploration.  It's a great way to get some inspiration and new ideas!  You might try making up a bunch of 1 or 2 inch square "tiles", using those to practice and play with various mediums, then putting them all together for a unique art piece. (What about a play date with your artsy friends?!) Thanks for joining me here, I'll close with my usual advice - Play, Experiment, and Have Fun!


I'd love for you to join me for more projects & art adventures on my personal blog
Find me on Facebook, or peruse & ponder pics with me on Pinterest


Friday, December 11, 2015

Snowball Ornament

Hello, Ann here from the Creative Paperclay® Design Team and the blog: Annmakes.  Today I have a fun altered project for you.  Here it is:


To make this glittery snowball tree ornament I actually rescued a broken tacky christmas decoration from last year.  By itself the gold plastic ball looks, well, blah.  It was part of a very nicely decorated gift wrapping, once upon a time.  Now, it was going into the bin or I was going to save it and transform it into a usable ornament for a Christmas Tree.


So, I started with this gold plastic ball.  I covered it with Delight™ and purposely left the bumps so it would look more like a real icy snowball.  The kind you make on a wet snowy day.  Yes, here in Canada we have names for the several varieties of snow we get.  LOL.


I also made a new hook by inserting half of a paperclip into the top part and secured that with a dab of glue.


Once the Delight was dry I covered the top part of the snowball with some shiny sealer that already has a golden glitter incorporated into it.


Once the sealer dried I glued on some acrylic snowflake table scatter, a piece of gold ric-rack and a bow.


Finally, I strung a piece of ribbon through the hook to hang the snowball from the tree's branch.

I hope that you are inspired to make some ornaments or other winter decorations of your own.

Supplies used:
Repurposed tacky gold ball/decoration (my own)
Paperclip (Staples)
Ric-Rac in gold (my stash)
Acrylic snowflakes (my stash)
Piece of white and gold cord (my stash)
Glitter Mod Podge (Plaid)
Glue (Tombow)
Delight™ (Creative Paperclay®)

Please stop by my blog at: http://annmakes.blogspot.com some time and check out my other projects.

Thank you for stopping by.  Happy Holidays.

Thursday, December 10, 2015

Multiple choices with Creative Paperclay®


I decided to try and make a faux handmade paper with Creative Paperclay® and netting. Think of all the things you could do with this. It didn't end there. I cast a couple little men so I would have multiple options.
Here's what I got out of my experiments.

SUPPLIES

Netting
Creative Paperclay® slurry
Silicone mold of man
Gold Metallic acrylic paint
Soft gel gloss
Gold glitter
Ribbon
Small bag


I laid the netting on wax paper then applied the Creative Paperclay® slurry on top.


I laid another sheet of wax paper on top and brayered the slurry flat. I left the wax paper on until the slurry was almost dry.


Next I applied slurry into a silicone mold and left the slurry to dry in the mold.


Next, I painted both gold. There can never be enough gold and bling.


I applied soft gel gloss through a stencil then removed the stencil and added coarse glitter for a rich tapestry look.


Glue the cast man and a ribbon and you have a great gift tag, gift card or ???


Or make a pocket shrine for your man, maybe a Chinese fortune cookie fortune, herbs, etc. Then tuck it in your purse. Or gift to a girlfriend that is looking for a boyfriend or husband for luck!


Dream in Color

Darlene Olivia McElroy

Sunday, December 6, 2015

Lynda's Beginner Tips

I am so sorry for this post being late - between my hand being incapacitated and starting work again, I am always a bit behind!!!  Being a part of this team, has really helped me expand my horizons a bit - and create one of a kind things for my friends and family AND my house!  I have learned a lot from my team mates and the things they have created!  As you can tell, I do not do large projects - mine are more beginner related, to show you some of the fun things you can make as you are just starting out!  
That said - I have a few tips for those of you who are wanting to start to play a little bit, but are more scared than anything!  
  • Do not start on a large project, start with something a bit more easy and manageable!  Check out Pinterest pages, this blog for easy projects, the Creative Paperclay website for inspiration!
  • Look at your own home and craft box for what you need in order to create something - BEFORE spending a bunch of money on supplies.  As you grow with this - your supply list can grow too!
  • Have a sketch pad - or something that will help you to plan out your project.  This way - all the details can be in one place!  
  • Keep your stuff in one area - it makes it a lot easier to grab your supplies and create than to find everything all over the place!
  • Find some of your existing craft supplies that you can use along with this - such as stamps, paints, molds, etc., and simply have fun!
  • For all of your leftover Creative Paperclay and Delight product - put them (with the packaging) in a container with a lid on it that is air tight!  It keeps it really fresh if you make sure to wrap it up as well!    
Thanks for stopping by, see you in 2 weeks!  I am working on ornaments for each of my family members - to put on their trees!  Each one of a kind - and made special just for them!  I can't wait to share them with you!  
Until next time,
Lynda Jeffs
                                   Creative Paperclay Design Team
   

Friday, December 4, 2015

December First Friday Fan Day


Need some inspiration for your next Creative Paperclay® project? Check out what folks are making with Creative Paperclay™.


Snowman décor piece
Mushroom fairies
Sacred hearts
Holiday decorations
Making a doll (tutorial)

Donuts for a doll house
Paperclay snowman (tutorial)

HELP US FIND YOU!!
  1. Use the hashtag #CreativePaperclay on all your social networks.
  2. When using Facebook, be sure the your posts and images using the #Creative Paperclay hashtag are set to public, otherwise we won't be able to find you.
  3. Share your projects on the Creative PaperClay® Facebook page.
I'm always trolling the web, looking for great Creative Paperclay® projects. If you find something, post it on our Facebook page.

GOT QUESTIONS???

Find the answers to your paperclay questions. See what other folks are creating. Stop by our Facebook group and say, "Hi!" Creative Paperclay Q&A
Carole

Wednesday, December 2, 2015

Winter Snowman Picture Frame by Tamara Dozier


Hello everyone! This is Tamara Dozier and I've rejoined the Design team. I'm trying something new ... Videos!  This first one covers the sculpting process to create your own Winter Snowman picture frame. Hope you enjoy!


Supplies for Winter Snowman picture frame

Creative PaperClay®
Dollar store picture frame
Xacto knife
Various sculpting tools
paint brushes
Rolling pin
white glue
Acrylic paints in your choice of colors
Glitter


Tuesday, December 1, 2015

Easy Holiday Lights by Tori West


I've always loved the look of candle lights, especially for winter holidays, and with the advent of LED tea lights just about any material can be used for decorative displays without the worry of them catching fire!

This month I'll be showing you how I created an easy votive candle holder using:

a jar
plastic wrap
tape
scissors
craft knife
thin cardboard
Creative Paperclay® modeling material
transparency film (for printing transparencies on an inkjet printer)
Delta Ceramcoat gloss varnish
Rust-Oleum® "Hammered Gold" spray paint
gesso
paintbrush
sandpaper
paper, pencil, tracing paper


I had a set of small mason jars so I decided to use those, the jars are slightly tapered, and had a decorative textures, so I created a cardboard collar to straighten and smooth the sides.


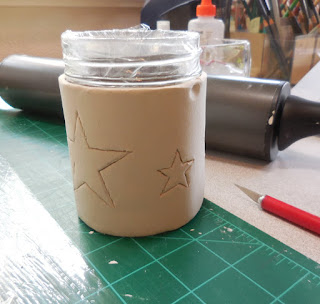
Next I covered the jar with plastic wrap, including the bottom.


I designed a pattern based on the measurements of my jar, rolled clay out to and even 1/8" thickness and wrapped it around the covered jar, than transferred the pattern.

  (for information on transferring patterns click here)


(for information about smoothing seams click here)


Next I cut around the pattern lines, using the knife in an up and down motion.  The pieces were left in place so the edges wouldn't curl up during the drying process.

oops ---I accidentally stuck my thumb on the edge when I moved the piece.  Thankfully, Creative Paperclay® is so easy to fix I'll just let that dry and then add fresh clay later to repair it, rather than trying to smooth it out now and risk stretching out the clay at the top.


When all the clay was dry, I finished cutting out the design, repaired an dings or dents, and sanded as necessary.   I covered the entire piece inside and out with white gesso, and when that was dry, sprayed on two coats of  hammered gold spray paint.


While I was waiting for the spray paint to dry, I created a frosted lining for the inside of the light cover.  I started by dribbling gloss varnish over the surface a sheet of transparency film.


Next I textured it by using a piece of wadded-up plastic wrap and dabbing gently to spread the varnish.  When using this method, the texturing needs to be done fairly quickly before the varnish starts to dry, or dabbing the sheet will result in the varnish sticking to the plastic wrap instead of the transparency film.


When the entire sheet was mottled I set it aside to dry.


Once the sheet was dry I cut strips to the length and width necessary to fit inside my light cover, placed it inside with the shiny/smooth (untextured) side facing inward to reflect more light, then added the LED light - Done!


This project was so quick and fun I decided I needed more lights for a holiday display.  Happy Holidays, friends!


I'd love for you to join me for more projects & art adventures on my personal blog
Find me on Facebook, or peruse & ponder pics with me on Pinterest