Wednesday, August 8, 2018

Easy Peasy Home Decor with Delight!™


Those of you who follow my work and blog know that I have been experimenting with acrylic pours this week (https://polymercreations4u.wordpress.com/ ).  Experiment is the key word here.  Researching the process ahead of time yielded a wealth of information, many "formulas" for the pour ratio, and (yes) many thoughts on what to use for a flow medium (all purpose glue, Mod Podge®, Floetrol®).

Plaid® Crafts sent a box of goodies a couple of weeks ago filled with a variety of paints, glitter, and Mod Podge®!  Yippee...I had everything that I needed!  Mod Podge®, paint, and water plus a stash of canvases.  I tend to jump into things with both feet...this was no different.  I started with a 50/50 mix of Mod Podge®/paint.  Most people would mix a couple of colors and then test.  Yea, not me.
I mixed up 6 colors of paint adding enough water to make it flow (or so I thought). Plaid® sent me Mega Glitter Mod Podge® along with the regular gloss I mixed up a cup of that too (50/50 with silver paint).  I mean, who doesn't like glitter??  Excited to get started I took all of my supplies outside to paint. (NOTE: Flow painting can make a HUGE mess.  I worked on a plastic covered table and then was able to roll up the mess and throw it away at the end).
I am not going to bore you with the details of my first painting experiment since you can check out my blog post for the results of that one and the subsequent experiments...let's just say that my first mix was a bit....ummmm, thick.  Instead of getting gorgeous the gorgeous flow painting I expected, I got what I have referred to as rocky terrain.  Bummer.  You would think that seeing one rocky terrain I would think "Perhaps I should thin the mix a bit more...get a better flow."  Yea, No 😖  Instead I carried on and created 3 more rocky terrain canvases using up all of the paint mix in the process.
While not the effect that I thought I would get, I set them aside to dry in hopes they would speak to me in some way.  Fast forward a few days and they began to scream "CLAY!!" I grabbed one of my favorite products Delight!™ Air Dry Modeling Compound as a vision took hold.  I saw 2 versions in my head, so decided to do both (of course). (NOTE:  Each flower used about 1/4 of the Delight!™ package)

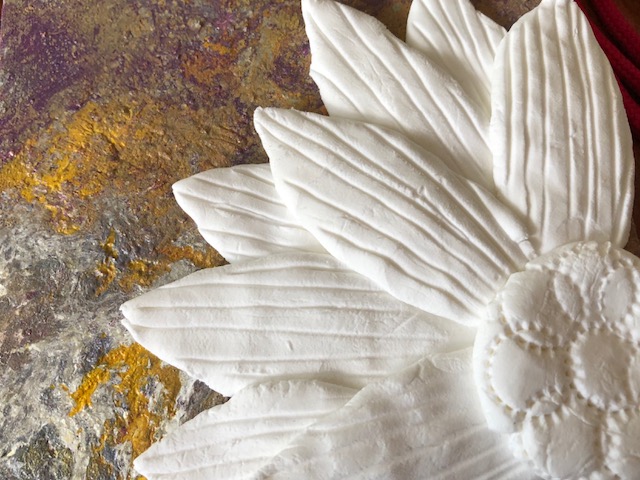
I decided to start with a sunflower, growing from the side of my canvas.  I separated the clay into 8 pieces to start.  
One of the pieces was rolled into a ball, flattened (about 1/4" thick), and pinched on one side to form a teardrop.  This was the start of my sunflower center.
The petals were created using the following steps: 
1) Roll a ball.  
2) Roll the ball into a log with a slightly tapered end.
3) Flatten the log into a petal shape (about 1/4" thick).
4) Pinch the edges to thin and make it more "petal like".
5) I used a turkey lacer (or you can use a toothpick) to make texture lines on the petal.  The shape can be adjusted at this point (if desired).  Repeat process with 2 more pieces.
The petals were positioned with the center before starting on the next batch of petals.  
2 more were created following the above directions.  I wanted these to fit behind the others without the design sticking out too much, so I flattened the bottom edges to fit each snuggly behind the first petals.
 
I divided the remaining 2 clay balls in half, rolled each into a ball, and then continued with the directions to create 4 more petals.  These were added to make the snuflower come to life.  once i had all of the petals in place I wasn't as happy with the center, so I removed it to rework the shape.
A little texture gave the center just the look I wanted (NOTE: The texture was created with the tip of a fruit corer!)
The entire piece was set aside to dry overnight before adding paint.  I quickly moved on to my second floral thought: An artsy flower, not as realistic in nature as the first.

For the second flower I thought of 7 petals and a simple center.  I separated the clay into 8 pieces and rolled each into a ball.
7 of the balls were rolled into teardrops and flattened to about 1/4" thick.
A few of the petals got cracks in the surface as I flattened them.  A fingertip dipped into water and then rubbed over the surface and edges helped to smooth any problem areas.


The petals were put together, manipulated as needed to fit together without too many gaps.

I wanted the center to be simple, so a ball of clay pressed on top of the petals worked perfectly.  (NOTE: The center was pressed on loosely to allow for additional details to be added)
The design needed some "POP".  I grabbed some texture sheets and stamps from my stash (I do love texture) and went to work.  
The first thought was all petals the same, but that seemed a bit...plain.  I decided to use multiple textures, some bold and some simple to give the flower a wonky balance.
The center was replaced.  With the texture on the petals I thought the center needed a little something too.  The fruit corer came in handy once again.
Happy with the design, I placed the flower onto the canvas and set it aside to dry overnight.

DAY 2: Painting 
I am a member of the NAEA (National Art Educators Association).  I recently participated in an online conference.  We received a goodie box filled with materials to use during the conference.  One of my absolute favorite products in the box was from OOLY, the Chroma Blends Pearlescent Watercolor set.  I wondered if they would work on my flowers...so of course I jumped in (no turning back once I start!)

For my sunflower I wanted to use colors that made it come alive on the canvas rather than blending in.  For that reason, I began with the orange and then highlighted with the golden yellow.  The center was painted first with brown and then highlighted with purple (I pulled the color choice from the canvas background).
 

Once dry, The sunflower was glued to the canvas.  It looked a little bare, so again I went to my stash of materials (I have been crafting for so many years I have a little of everything!).  I found metal scrapbooking words that were the perfect finishing touch.
 For the second flower I wanted the color to be a bit more bold, so I chose the vibrant red.   
Purple helped tie the flower to the canvas color.
 
Once dry, the flower was glued in place.  
I hope you have enjoyed this super easy way to create new pieces for your home decor.  I post for this blog the 2nd Wednesday of every month.  Hope to see you again next time!
You can also visit  https://polymercreations4u.wordpress.com/ for experiments in creating Acrylic Flow canvases.


Monday, August 6, 2018

A Mixed Media Canvas Using Creative Paperclay®

Hello and welcome to another tutorial. Today I will show you how I made this mixed media canvas using Creative Paperclay®.


Here are the supplies you will need:

house template cut from cardboard
heart cookie cutter
canvas
scrapbook paper
acrylic paints
rubber stamps
ink pad
embellishments

paintbrushes
old credit card
scissors
craft knife
water

You can follow along in the video below:


Here are a few more pictures of my mixed media canvas.


I do hope you enjoyed my tutorial. You can share your creations with us on our Facebook page. We would love to see them! For more inspiration have a look around the blog. There are tutorials for many levels using Creative Paperclay®. You can also visit my blog www.papermachepatch.com.

Thanks for stopping by!

Suzette


You can find Creative Paperclay® online at Creative Paperclay Co and also at Michaels, Hobby Lobby, Dickblick and Amazon. 

Friday, August 3, 2018

August 2018 First Friday Fan Day


Need some inspiration for your next Creative Paperclay® project? Check out what folks are making with Creative Paperclay™.


Bird Wind Chimes
Slab Vase
Clay and Rope Pot
How To Make a Tuberose
Marbleized Candle Holder

Unicorn Charms
Three Clay Projects

HELP US FIND YOU!!
  1. Use the hashtag #CreativePaperclay on all your social networks.
  2. When using Facebook, be sure the your posts and images using the #Creative Paperclay hashtag are set to public, otherwise we won't be able to find you.
  3. Share your projects on the Creative PaperClay® Facebook page.
I'm always trolling the web, looking for great Creative Paperclay® projects. If you find something, post it on our Facebook page.

GOT QUESTIONS???

Find the answers to your paperclay questions. See what other folks are creating. Stop by our Facebook group and say, "Hi!" Creative Paperclay Q&A
Carole

Wednesday, August 1, 2018

Make a Beach Ball and Practice Smoothing Over Creative Paperclay® - Finishing Techniques


Make a Creative Paperclay® Beach Ball - Smoothing Over Creative Paperclay® - Finishing Techniques
Supplies:

Masking Tape (florist tape, gaffers tape, and painters tape work too.)
Aluminum foil or newsprint paper
Creative Paperclay® 
Gesso (I used Black Golden brand. )
Acrylic Paint (I used Liquitex and Golden. )
Paint Brushes (Gesso can be hard on brushes.  Use cheap foam brushes for this. ) 
Sandpaper (I used 100 -420 grits)
Sculpting Tools are optional.  I did this with my fingers and a bit of water.
Shop Rag – To smooth over clay.  
Dust Mask or Bandana – use this when sanding

How do you get Creative Paperclay® to be smooth after it dries?

I had a really hard time with this at first.  I was so used to other mediums that get smoothed out before drying and curing.  I was definitely frustrated with my first attempts to smooth things out.  I had some thoughts of my own from previous clay mediums, wood working, and my desire to paint my finished sculptures. Luckily for me the Doll Making and Creative Paperclay® communities are really great about sharing ideas.  I got lots of suggestions, Some worked for me, some did not.  

Here I will share my experiences and my favorite way to smooth and prepare Creative Paperclay for painting.

For my purposes I like to prep the surface of Creative Paperclay® for painting with acrylic paints.  I usually like a relatively smooth surface where the paint will sit on top of the clay rather than sink in.  I know that some people use watercolors or watered down acrylics and that is fine.  It is just not the look I am going for.  

As an artist I am primarily a figurative, sculptor.  My favorite subjects to sculpt are whimsical characters, dancers, and magical, Mystical Beings.  I currently am working on a collection of figures with a vintage look.  I have been inspired by the vintage images of bathers at Ocean Beach and The Sutro Bath House that used to be in San Francisco, where I grew up.  I think that Creative Paper Clay® painted with acrylic paints is the perfect combination of mediums for this collection.


Hola, me llamo Benicio, El Guapo .  Yo no tengo ningun razon para estar aqui.  Yo solo soy dulce para sus ojos! 

Hello, I am Benicio, The Handsome One.  I don't have any real reason for being here.  I am just eye candy!


For the purpose of this discussion I will use a beach ball project as my sample - Demo piece.  These techniques can be used with any Creative Paperclay® project. 

Step One - I found a small rubber ball and covered it with masking tape.  This is the kind of ball that is filled with air, not the solid rubber type.  An actual beach ball would work for this project but, I didn't want to go quite that big this time.  Maybe some time in the future!  


Step Two - Apply a thin layer of Creative Paperclay® over the entire surface of the ball.  I used a rolling pin to get big flat sheets of Creative Paperclay®. 

Tip - for a smoother finish rub a little water over the surface as you work and when the ball is completely covered.   


Step Two.Five - Allow the creative paper clay to dry completely.  Because I did this project in the Spring and we had lots of rain it took more than a week to feel really dry.  

There will probably be some cracking where the clay has shrunken but the ball has not.  Don't worry, we can fix this!  

Step Three - With a sharp tool like an awl or upholstery needle poke through the clay and allow the air to escape from the ball. If you want you can cut the clay ball open to remove the ball but, that was just too much work for me.  

Step Four - Patch up any cracks and craters by using a slurry of Creative Paperclay® and water.  Allow this repair layer to dry completely, at least over night. 

Tip - At this point you can use a wet rag to smooth over the mostly, dried clay surface.  The paper pulp fibers in the clay get compressed when you do this.  Just be sure to not add too much water.  Creative Paperclay® can be reconstituted even after it is bone dry.    


Step Five - Put on a dust mask (Because breathing is essential!), work in a well ventilated area, preferably outside (This can be a bit messy.) 

Step FIve and a Quarter - Using 150- 320 grit sand paper, sand the entire surface of the ball in a circular motion.  Move around the piece rather than focusing on any one spot.  It may seem daunting but the material is rather soft and takes really well to sanding.  Do not only rely on your eyes.  Use your hands and fingers to feel over the surface and find any rough or uneven patches.  If you have any particularly rough spots you can use sanding screen.  I used 
3M Drywall Sanding Screen in medium.  Go easy with this stuff.  It will remove a lot of material.

Step Six - Cover the ball will several light, coats of acrylic gesso.  Black or white will do.  I apply gesso in a crisscross pattern rather than in the same direction.  This will help eliminate definite brush strokes Allow the gesso to dry in between coats.  Sand the gessoed surface in between coats.  This will produce a surface that feels a lot like plaster for fresco painting.  I just love it! 

Step Seven - Paint your Beach Ball or art sphere as desired.  Classic Beach Ball colors and styles are nice and that is what I have done so far but, I really think this is a great surface for painting all sorts of fun designs.  I plan on doing more non-traditional Beach Balls.  

Here is a nice close up of  the first Creative Paperclay® face that I sculpted.  At this point she is covered with a few coats of white gesso.  Before painting her with acrylics she also got several coats of black gesso.  I fell in love with this face at every stage.  I like the Creative Paperclay® covered in gesso and sanded so much that I almost left her unpainted!     


This is Gianni - From The Fysh Styx Collection.  He is a full body sculpt of Creative Paperclay® over newsprint paper, cardboard, aluminum foil, and masking tape.  I sanded and gessoed him just like the other projects above.  He may be getting a pirate tattoo on his chest soon! 


Now just because I can sand and gesso the surface of Creative Paperclay® down to a fine and smooth finish, that is not always the look I am going for.  Sometimes I want a rougher look.  I think it adds some interest to the finished piece when there is a bit of surface texture left.  Although it can be challenging to paint the rougher surfaces I like the look of age and nostalgia. 

This is Sweet Treats.  She reminds me of Albert Einstein!  Do you see it?  Look up Albert Einstein with his tongue sticking out and then tell me what you think!  She may be younger and cuter but, not overly cute.  That's not my thing.  I think the rough texture makes her so much more interesting.  If I wanted a cute baby doll, I'd go to Toys R Us, OOPS!  I guess not anymore, perhaps Amazon is the better option for that.


This is Frida Fysh Styx.  She is a full body sculpted wall art doll.  The texture is part of her visual interest.  Without it she looks just like all of the other cute, smooth faced dollys.  I encourage you to try out a few rough pieces and a few smooth pieces.  You may find that you have a favorite Or you may be like me and love it all!  


At this point you may be wondering what you're gonna do with your newly created beach Ball Sculpture.  This is what I did........  


 This is Beach Ball Babylon, my first totem project.  I placed a mermaid, who is looking for some action, on top of the beach ball.  They are attached by a dowel that runs through all three pieces.  I hope you love her as much as I do!  If you decide to make your own please be sure to share a few photos with me!
I hope that you have enjoyed this project as much as I have!  I'll be back with more "What's On My Workbench Wednesday" fun on the first Wednesday of each month.

Until then, stay cool and don’t forget the sun screen!  

Fin - The End
Ciao! 
LaLa   

https://www.facebook.com/LaLaRedwoodCoastCreativeArts