Sunday, November 15, 2015

Fun Key Chain - By Lynda

I had a lot of fun last month creating the scene for Halloween with my husband, in fact I am hoping to make another one for Christmas!   but there isn't a lot of time left to get it all done, and they take a lot of time to create, let me tell you - even with 2 people doing them!  Today's project, is a bit easier to make, and won't take as much time to finish up!  


I really love easy projects...this one, is no different!  I recently got a new smart phone, being a klutz, I knew I would need a case for it!  I also needed a key chain for some of my keys and it had to match my phone case!  And since I change my phone case a lot, then I needed something that was cheap enough to make, and that I could customize for each of the cases I bought!!!


Supplies needed:
Delight product 
Flower (or alternative) mold
Floss or ribbon
Key chain ring
Acrylic paint 
Silent setter (or something to create a hole)

Directions:
Step one:  Using your mold - take a piece of the Delight product, and mold your piece.     


Step two:  Using your Silent Setter - create a hole while the piece is still wet, allow to dry completely.  Push the extra Delight product out of the chamber of the piece that created the hole!


Step three:      Place dry creation in microwave for 10 seconds ONLY!  The piece will start to raise just a bit, and will really look cool when you start to paint it! 
  
Step four:  Start to paint your piece, I used a black on the bottom, with a red on top - wiping some of the red off with water as I went.  I wanted a bit of black to show through, so I played a bit with the paint and water to achieve the look I got here!  Same with the other colors shown here - the darker color is on bottom, and the accent colors on top!


Step five:  Braid colors of bakers twine together to create the string to hold it all together.  Put it through the hole, and then through the key ring.  

This was another fun project, using the Delight product this time!  I love how each one turned out, and can't wait to make more!  I have another project using molded flowers up on my blog, so make sure you click the link and check out the fun cards I ended up making!  Click the link below!
Lynda Jeffs
Creative Paperclay Design Team 2015  
   

Friday, November 13, 2015

Hooliday Gift Tags

Hello, it's Ann here today with an early Holiday Season How to for you.  I hope you like my Hooting Owl Tags!


So these tags are made from Creative Paperclay®.   First you roll out some of the Creative Paperclay® on a non stick surface.


Then using a template that you can make or already have, trace and cut the clay.


Let each clay tag dry thoroughly.


Using any stamp and some ink, stamp on the desired image and saying.  Let dry.


Colour the image with colouring pencils.  If you would like you can use some dimensional paint for the pom pom and fluffy brim of the hat.


To make these tags hangable just make holes at the top with a regular paper hole punch.


Cover the tag with clear glitter, and add chunky gold glitter to the edges.

Now you have some really cute tags to use on gifts and that can be used as ornaments.

I hope that you are inspired to make some handmade gifts this year.

Thank you for stopping by.  Please visit my blog at : http://annmakes.blogspot.com to see more of my projects.

The supplies used in this project:
Creative paperclay®
Pretty Pearls 3D Paint by Craft Medley
Faber Castell Art Grip Colouring Pencils
Stamps Owl For You BMC 0025 from Spiced Sunshine Stamps
Tag Template from Arnold Grummer
Stamping Ink in Black from Ranger
Chunky Glitter Glue in Gold Craft Medley
Golde Crochet yarn (my stash)


Thursday, November 12, 2015

Winter Story


I am feeling cold with all the news stories about the upcoming winter so I took out on old canvas to put down a story of how I feel about winter. Brrr. I am such a summer girl that I cringe just thinking about cold weather.

SUPPLIES

Creative Paperclay® slurry
Waxpaper
Soft gel matte
Wax paper
Toner image
Colored pastel pencils
Gold rub


I start with pouring a paper clay slurry on my canvas then brayering it flat. I put a sheet of wax paper before brayering and leave it on until the slurry is totally dry.


I apply a layer of gel over the dry slurry and let it dry. Because I plan to do a dry gel transfer and will use moisture to remove the paper, it is important that I seal the surface. Next I apply gel to both the face of the image and the surface, lay the image face down and brayer flat. I let this dry overnight. I usually do this at night so I have something fun to do while the coffee is percolating.


I slightly sand the paper, then spritz with water and rub the paper off. The ink will stick to the dry slurry.
After it has dried, you may see some paper ghosting just spritz again and rub it off.


I then add paint, gold rub and some pastel and more soft gel matte to ghost the image more. I wanted that cold, ghosty of feel of a show storm. I finished by patching up a few areas of where the slurry got rubbed off with my enthusiasm.

Tell your story with imagery and paper clay.

Dream in Color and Play Hard.


—Darlene Olivia McElroy

Friday, November 6, 2015

November First Friday Fan Day


Need some inspiration for your next Creative Paperclay® project? Check out what folks are making with Creative Paperclay™.


Full blooming rose
High heel doll shoes
Sculpted figure
Snow lady
Troll figure
Sculpt a mini doll
Wall planters
Forming hands and fingers tutorial
Spice bowls

Fox and dog charms
Monster container

HELP US FIND YOU!!
  1. Use the hashtag #CreativePaperclay on all your social networks.
  2. When using Facebook, be sure the your posts and images using the #Creative Paperclay hashtag are set to public, otherwise we won't be able to find you.
  3. Share your projects on the Creative PaperClay® Facebook page.
I'm always trolling the web, looking for great Creative Paperclay® projects. If you find something, post it on our Facebook page.

GOT QUESTIONS???

Find the answers to your paperclay questions. See what other folks are creating. Stop by our Facebook group and say, "Hi!" Creative Paperclay Q&A
Carole

Tuesday, November 3, 2015

Winner of our Blog hop

Thanks for stopping by and enjoy our Blog Hop with Gina's Designs Lasercuts design team and Creative Paperclay Design team


The winner of our Blog hop is

Chris Peters

you have won
Creative Paperclay
Sandits 
and a some product from Gina's Designs

Please PM us on our Facebook page with you address within 14 DAYS

Thanks again


Giving Thanks All Year Long

Hello again, friends, I'm thankful that you could join us on the blog!  Naturally, when thinking about my project for this month the holiday came to mind, but I also wanted to create something that could be used throughout the year as a reminder that I have many things to be thankful for every day!  Some time ago I read an article about writing out notes of thanks and then keeping them in a jar to be read on Thanksgiving.  I liked the idea, but my thoughts were that I wouldn't do it if the paper and pens weren't easily accessible or if it was inconvenient.  When I saw a "cigar box" type of container at the craft store, I knew just how I could use it for this project and combine the paper, pencils, and container in one!


To make a "thanks giving" box like this one you will need:

a cigar-type box with clasp/closure
craft knife
Kraft paper or similar brown packing paper
Delight™ Air Dry Modeling Compound
sandpaper
acrylic paints; golden brown, spice tan, burnt umber & burnt sienna
gesso
white glue
corrugated cardboard
a paper cutter is helpful, but not necessary
brown marker or pencils
optional: stamp & ink
pattern

Click here for PDF pattern


Start by removing the clasp hardware from the box, then measure and cut an opening 2 1/2" x 1/4" in the center front (what will now be the top of the box).   Next cut one piece of corrugated cardboard to the outline of the pattern, place the cardboard on the front of the box and mark where you would like divisions for the paper slips and pens.  Cut 5/8" strips of corrugated cardboard and glue to the box as shown, matching the height of your marks.


Test fit the front piece of cardboard, but don't glue it on yet.


Cover the front piece of cardboard with gesso and set aside to dry.  While you're waiting for the glue and gesso to dry, prepare your brown paper strips.  Cut the paper to various widths and lengths from about 1/2" x 2" to 1 1/2" x 3"  When the glue and gesso are dry on the box and cardboard, apply paper strips to cover the entire box, and the inside of the cardboard piece, overlapping the top edge and leaving some of the strips on the section pieces sticking out as shown.


Glue front piece on and cover with more paper strips.  Be careful when covering the panel on the back of the box to make sure that is doesn't get glued shut.


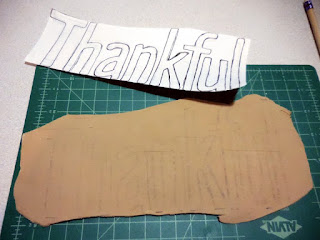
Draw or print the words you'd like to include and glue those to the box as well.  To make the words I chose, I printed them out, then traced them onto the Kraft paper with a brown marker, then cut them out in strips and glued them to the box.


Mix paint with about 1/3 package of modeling compound to make a color closely resembling the color of your brown paper.  In my case, it was mostly spice tan, with a little bit of burnt umber and burnt sienna, and golden brown mixed in.

Roll the clay out to approx. 1/8" thickness between 2 pieces of plastic wrap or plastic bag.  To transfer the texture, place the bag on top of the box and roll slightly.
Cut off excess around clay, set the extra aside in an airtight container, and allow the clay to dry flat.


When the clay is dry, transfer the pattern and cut out lettering.  Glue letters to the box front, sand edges and/or add more colored clay as necessary to fit them to the box.


I chose to fill in some of the areas between the words with a small decorative stamp and brown ink that matched the marker.  Add some pens or pencils and some paper to the box sections and you're done!


Thank You for joining me again!


I'd love for you to join me for more projects & art adventures on my personal blog
Find me on Facebook, or peruse & ponder pics with me on Pinterest


Sunday, November 1, 2015

Creating Holiday Scene Tips by Lynda

I worked on my first scene using Creative Paperclay this past month, and will be making a huge Christmas scene based on what I learned with my Halloween
scene!!!  If you decide you want to work on one yourself - I have a few tips to make the project go a bit smoother for you! 
  • Plan things out a bit, instead of jumping right in and creating!  
  • Sketch things out, or write down your ideas and put them in one place!
  • Check out ideas on Pinterest or blogs - for inspiration!
  • Allow yourself more than enough time to create what you need to!  
With the Halloween project - it was made with my husband!  I am not sure if I had more fun creating it with him, or watching him create things himself!  Include your family in a day of creating - we really bonded, and for that - I recommend this for sure!  
Lynda Jeffs
Creative Paperclay Design Team