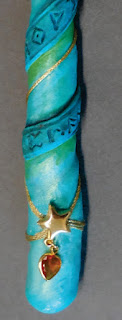
Earlier this month one of my crafty friends sent pictures of some wands she created.
I was so inspired that I thought I'd try making my own wand with clay.
To make the wand you will need:
Creative Paperclay®modeling material
3/16" x 12" wooden dowel
small screw-eye
drill
white glue
trinkets, yarn, or other embellishments
acrylic paint
sandpaper
rolling pin
craft knife
Start by drilling a small hole in the center of one end of the dowel and inserting a screw-eye just far enough to hold it firmly. This will be what you hold on to while sculpting, and what enables you to hang your wand to dry.
Using sandpaper, taper the other end of the dowel and round off the tip
Coat the entire dowel with white glue, thread a piece of string through the screw-eye and hang the wand to dry.
Roll clay slab to approximately 22" x 14" and 1/16" thickness. The dowel should be able to fit as shown.
Cut clay along the edge of wand, then into a triangle with curved edge as shown.
Dampen the dowel and place it at the edge of the triangle. Pull clay up and smooth/attach it to the dowel. Roll the clay around the dowel. When the triangle is rolled onto the dowel, wet fingers and smooth as desired. I chose to leave mine with an irregular spiral along the length.
Hang wand to dry.
While the wand is drying, gather up some embellishments you might want to use for your wand!
After my wand dried, I decided to add another spiral of clay wrapped around the wand with runes drawn into it.
If you choose to do this, cut the strip of clay, attach one end to or near the bottom of the wand by wetting the dry clay then pressing the wet clay onto it. Continue wetting the dry clay and adding the strip a little bit at a time all the way up to the tip. The runes were pressed/drawn into with a toothpick AFTER the strip had been attached to the wand.


Paint and embellish as desired.
I used layers and washes in several shades of blue & green, walnut, and iridescent blue, then added a simple gold cord and star drop earring.
Thanks for joining me here again! As always, play, experiment, and have fun
Tori
Find me on Facebook, or peruse & ponder pics with me on Pinterest
Tori
Find me on Facebook, or peruse & ponder pics with me on Pinterest


No comments:
Post a Comment