Showing posts with label bowl. Show all posts

Friday, October 24, 2014

Kid's Project: Gilded Leaf-shaped Bowls

The autumn weather is definitely here in Ohio!! This project takes advantage of all those beautiful leaves laying on the ground. Chloe and I gathered leaves on one of our walks. We looked for the largest leaves that we could find.

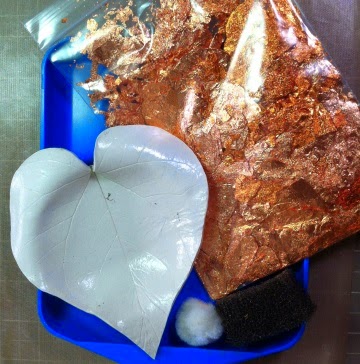
To begin the project, we rolled out a ball of Creative Paperclay® to a thickness of 1/8", and a little larger than the leaf we were using. Place the leaf vein-side down on the clay. With one motion, roll the rolling pin over the leaf, using plenty of pressure to capture the veining. I started at the base of the leaf and rolled all the way to the top without stopping.


Next, gently peel away the leaf. Use a craft knife or scissors to cut around the outer edge. To cut down on finishing sanding, at this point I smooth the edges by dipping a finger or artist brush in water and "painting" along the edges of the clay leaf.

I used bowls that I already had as molds and supports for the clay leaves. I made a donut ring out of plastic kitchen wrap to support the clay leaf while it dried.

Lay the clay leaf into the bowl, and gently form the well of the bowl. I let my leaf bowls dry longer than usual before turning them over. I didn't want to risk the bottoms collapsing by flipping them over too soon.

After the pieces were completely dry, I began the gilding process. The first step was to seal the clay surface with matte PPA. Next, was a coat of Duo adhesive. Duo goes on a milky white liquid, but when it dries clear, it provides a very tacky surface for the gilding. I followed the steps in this short video to gild each of the bowls.

Gilding is a very forgiving process. Here you can see that I missed applying the Duo adhesive to a spot. No problem—I just painted Duo over that area, let it dry, and gilded again. I gilded the top and bottom of the bowls in two step, because you want to avoid touching areas that are coated with Duo.

Hint: Since the Duo is milky white, it's hard to see just where it has been applied when you're gilding white surfaces—like Creative Paperclay®. I found a way to avoid missed spots in the future. Just add the tiniest spec of acrylic paint to the Duo. Now you have tinted Duo, and you can see were you've applied it. 

Here are the finished bowls. The smaller ones are about 5" long and 4 3/4" wide. The larger ones measure 7 1/4" long and 5 1/2" wide.


Carole

Chloe

Table Cell Table Cell

Thursday, September 26, 2013

September "Tip" of the Month

Today I am supposed to post my "Tip of the Month", but I am completely stumped as to a "tip".  So I am going to take you on a creative journey into my experiments.

You never know when or where inspiration will hit.   Today my inspiration came while looking out the back window of my house at the variety of trees and leaves.  It is a gorgeous Fall day in Virginia and the leaves are beginning to turn...BAM!  I "need" to make a bowl with leaves.  Quickly I run outside to collect a bunch of leaves from one of the trees, bring them inside and wrap them in a damp paper towel until I am ready to use them.

I look through my studio cabinets and find an aluminum bowl...PERFECT mold for the bowl in my head!  I grab a package of PaperClay (about 1/2 the package) and begin squishing it (to mix in a few bits that are slightly dry).  I need to roll it flat so that it will fit around the bowl/mold...my trusty acrylic roller is the perfect tool. 
**NOTE:I know, I know...normally I would go to the pasta machine, but the Paperclay tends to be a bit messy in the pasta machine (trust me, I have tried).  Since I learn from my "mistakes" I think the roller is a much better option than cleaning the pasta machine**


Once flattened, the PaperClay sheet is placed on the outside of the bowl/mold, smoothing as I go. 
 Now to add the leaves.  Pressing them in might work....ummm, no.  I only get the thick veins that way.  Ah Ha!  The acrylic roller will once again be the best tool.  I overlap the leaves around the clay covered bowl and then roll into place, adding additional leaf vein touches in empty spots.  Once the bulk of empty space is filled, I carefully peel away the leaves revealing the patterned clay underneath.


 Looks pretty cool.  I know that it will be even better once it dries and color is added to bring out the details.  Never one to wait patiently, the bowl has been placed in my oven to quick dry the clay (I am baking it at 275 degrees for about 15 minutes). 
What is the plan for when it comes out??  Well, you will have to return next time to see how the project progresses.  Until then, enjoy the cooler weather and the beauty that surrounds you :-)


Monday, December 5, 2011

Golden Christmas Bowl

Hi! Its Me Debbie again.

I don't know about you but I love gold at Christmas. I wish everything twinkled and shone and there was real gold and silver and gems everywhere. But unfortunately that is just not a reality for most of us little people.....

But wait! Lets fake it and make a golden bowl out of Creative Paperclay®!


Please note: this bowl cannot be washed in water. It cannot be put in the dishwasher.

You will need:
  • Time
  • 1 and half blocks of 8oz Creative Paperclay®
  • Gold and Burnt Umber Acrylic Paint
  • rubber stamps by Viva Las Vagas Stamps (I used unmounted "Three Wise Men" and "Decorative Frieze")
  • Clear embossing powder with heat gun and Versamark Pad.


Decorative Frieze

Three Wisemen

  Now to show you how. A video in side form. Hope you don't mind. ;)  Thanks for watching.

Thursday, August 11, 2011

Paperclay Bowl


Today we're going to make a bowl, which will take more clay than I usually require for one of my tutorials. You will need a 16 oz package of Creative Paperclay, most likely, depending on the size of your bowl
You will also need a bowl or similar shape to form your bowl over, and some foil. Once you have it finished, you will want to paint it, so I recommend acrylic paints.
I found it easiest to roll the clay out on the foil, so that I could lift it ont the bowl I used as a form. I created a texture for interest while it was still flat.


Then I picked it up, foil and all and draped it over the upside-down bowl. I pulled the clay away from the foil some where it was crimped, so that the clay would not dry around the folds and get stuck. If you just release the clay a bit from the foil, and smooth the foil flat, that clay will lay against it well.


Let your bowl dry for about three days, then pull the foil away from the bowl, gently, as you go. You might find that you should allow the clay to dry a bit more before you paint. But you can use this time to add an edge along the top of the bowl, to hide raw edges. I just made small balls of clay, wet them a bit, and folded them over the edge. You can make the legs ahead of time, so that they will dry at the same time as the bowl, and be ready. See the picture below. I made a foil core, then covered that with clay to make the legs. Once both the bowl and the legs are dry, you can choose about any glue or adhesive to attach the two.


Basically, all you have left to do is paint. I suggest that you use a rather stiff brush to get the paint into the texture well, and that you dry brush a lighter color over the dark once you have good coverage of the base coat. I have painted my base coat on this bowl, but I'm waiting to do the final color because I am getting ready to paint the room it's going in, and I want them to match. I will post another pic of the finished bowl showing the final color that I chose, once my room is done.

You can order Creative paperclay at: http://www.paperclay.com/