Thursday, September 27, 2018

Sculpting a Pumpkin with Creative Paperclay®


Supplies;

Creative Paperclay®

Paper Mache' pumpkin Hobby Lobby, JoAnn, Michaels

Acrylic paints

Crackle paint

Sculpting tools

Paint brushes

Water

Rolling pin


I love this time of the year because it means it's getting closer to Halloween. One of my favorite things to sculpt are pumpkin faces. 
This pumpkin can be made in any size and you can make any expression. I love the green pumpkins so decided that's what this one would be.


Roll out a thin layer of Creative Paperclay with a rolling pin, the clay should be large enough to cover the pumpkin. Paint a thin coat of glue on the pumpkin so the clay will stick to it and cover the pumpkin. Press the clay so you can see the indentations on the pumpkin.


Choose the side you want the face to be on and take your thumbs and press in where the eyes will go. 


Take a piece of clay the size you want the nose to be, I like bigger noses on the pumpkins. Roll into a tear drop shape. Take a brush and paint the nose area with water to use as a glue. put the nose in place and blend the edges into the pumpkin head. Smooth with your brush and water.


Next the mouth. 


I make a piece that's in the shape of a stretched out triangle, put that on the face close to the bottom of the nose smooth the top edge. Add a sausage shape for the bottom lip smooth the bottom edge to the face. Smooth the mouth with your brush and water.


The cheeks are pieces that look similar to a large kidney bean. Make two the same size. Brush water to the cheek area and add the pieces to the face on both sides and blend to the face.


No I'm not picking his nose I'm making nostrils.

Take a tool and press in at an angle on both sides to create the nostrils. Take the tool and press in on the upper lip in the center to make the little indentation on the upper lip.


Take the tool and gently open the mouth up enough to add a tongue. Take a small piece of clay in a tear drop shape and press it flat in a tongue shape. Put the narrow end of the tongue in the mouth and blend it in to secure it in the mouth.


Take two pieces of clay rolled in balls for the eyeballs, add a little water to the eye sockets and stick the balls into the sockets. lend the edges to the sockets. Take two strips of clay for the eyebrows and blend hem into the forehead and onto the eyeballs. I made this pumpkin to look like his eyes are 
closed.
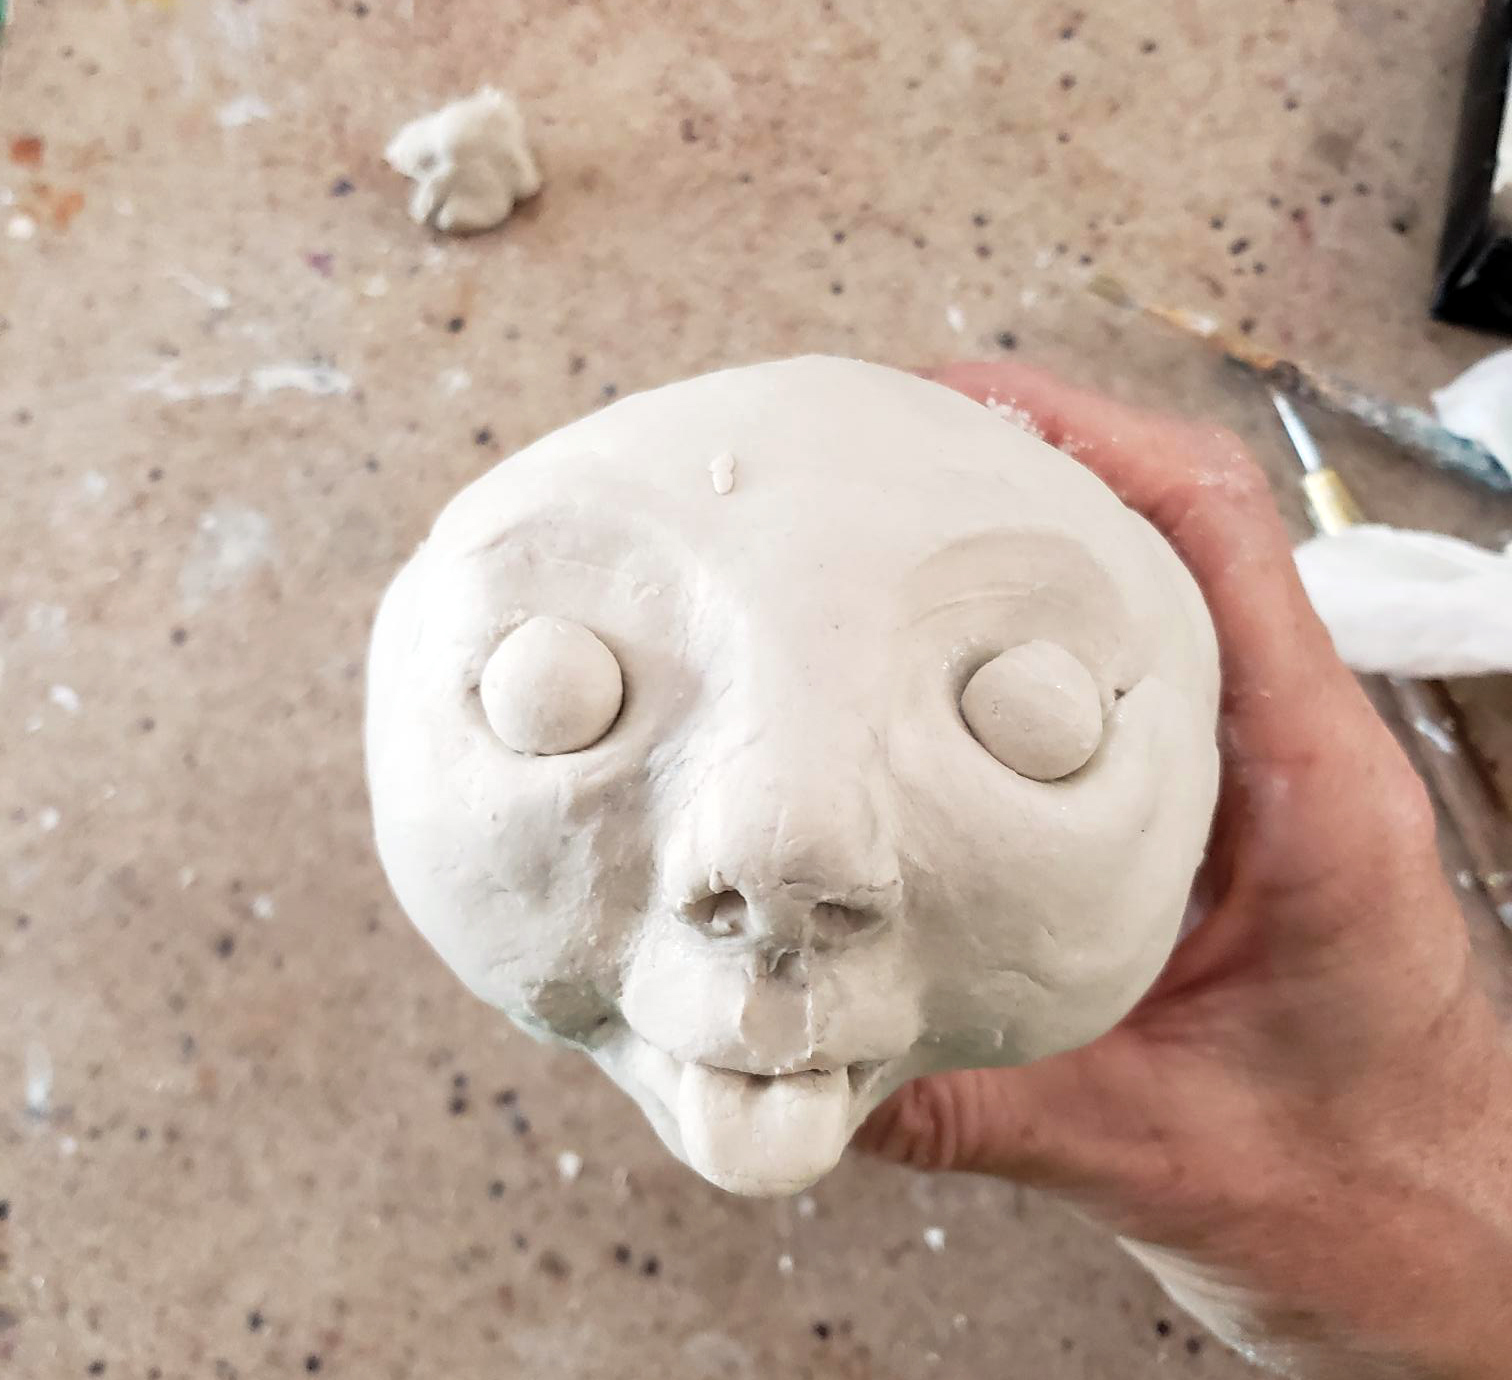


Take a sharp tool and draw a line at the bottom of the eye for the closed eyelid. Take a tool and press in the inner corners for the tear duct. 


The face is finished just smooth with a brush and water. 


For the stem take a piece of clay that looks like a carrot. Make grooves in the stem with the sharp tool.  Add the stem to the top of the pumpkin and twist it to the shape you want.


Let the pumpkin completely dry.

Sand smooth after it's dry.


Paint the pumpkin in whatever base color you want. I used an orange color and a dark green for the stem.  Let dry.

Paint the pumpkin with crackle paint and let dry then paint the top coat with a contrasting color. I chose light green color. I painted the tongue red after the pumpkin had dried. 


Your pumpkin is finished! 


Thanks for checking out this tutorial.


Creative Paperclay®       
https://www.paperclay.com
Hobby Lobby, Michaels, Joann, Amazon


Monday, September 24, 2018

Creative Paperclay Gnomes!


Supplies Needed for this Project:

E-6000
Paint Brushes
Spray Sealer


As you can see from this picture it's a different head. I used crumpled aluminum foil to create the center of the gnome's body. You use less Creative Paperclay this way.


I put an extra strip of clay around the lady gnome's head and scored it to look like her hair.


I used two pieces of Creative Paperclay to form the arms and two pieces each to make the hands and feet.

My lady gnome turned out very well and then I concentrated on the boy gnome

Same technique for the body in using aluminum foil for the body under the Creative Paperclay. When putting the pieces together, I used E-6000 to adhere any pieces that didn't want to stick together.


All the rest of the pieces were made the same but the boy body was round without any ruffle on the bottom. He turned out just fine also. Once the two pieces were completely dry, I painted them both with assorted Plaid Acrylic Paints and sealed them with a spray sealer.  These guys were a lot of fun to make. I hope you like them also. Please take the time to go on over to the Creative Paperclay website and check out their different products and also the many different projects that they have to keep you busy creating! Also, while you're at it, check out the Plaid website and check out all of the products that they have to offer. They also have many different projects with tutorials . I would appreciate it if you would leave me a comment below and thank you for reading my post.

Barbara


Thursday, September 20, 2018

Fun Fairy House


Hello everyone! Jenn here today sharing my Fun Fairy House project I created using the amazing Creative Paperclay®!
This project has actually been a vision for awhile so I decided to just sit down and do it!
To create my house I used the following clay:
Other Supplies:

White Gesso
Molds both silicone and plastic
Acrylic paints and Spray inks
Antique Wax
Woodgrain Stamp
Small Mason Jar with lid
Spray clear sealant
Glue

How It Was Made
Start with a clean, dry mason jar and lid. Roll a piece of paperclay out to about 1/8" thickness. Wrap woodgrain stamp around a rolling pin and roll across the flattened clay. Wrap this around the jar and pinch closed. Smooth out the seam closure with fingers and add woodgrain stamp as needed to match up. Set this aside and allow to dry completely.
Next, mold all pieces needed such as the door, mushrooms, window and all of the leaves for the roof.
Create a base for the lid by molding some Delight™ around the rim and up into the shape of the roof. This will create a nice surface to adhere the leaf roof too. You can use straight pins to hold down leaves that want to be difficult.
Create the lid by gently stacking the molded leaves while they are wet, shaping them as you go. Once they are nearly dry, use a hot glue gun to adhere them in the same places they were dryed in. This ensures that they all fit. Add a fun twisted piece of scrap clay to the top and set aside for drying.


 For the molded door I added a bit more interest by rolling a length of clay across my woodgrain stamp and wrapping it around the door as seen below.


Once the lid is completely dry and all leaves are securely in place, Use a filing tool to smooth out any rough edges on each leaf then painting begins. Start by coating the leaves in white gesso. Alternate between shades of greens and yellows, dark and light to get the look seen below. 
Next I painted all of my other pieces and allowed them to dry. Once dry they were adhered using glue.
When completed the lid will still unscrew and the jar can be used for trinkets, etc.!
Here are some closer views of all the fun detail achieved on this project!


Thanks so much for viewing my post today! I hope that you are inspired to give this amazing clay a try and create something amazing!
Creative Paperclay® and Delight™ are conveniently available for you to purchase online and at the below listed retailers.

Until Next time Stay Creative!


Friday, September 7, 2018

September 2018 First Friday Fan Day


Need some inspiration for your next Creative Paperclay® project? Check out what folks are making with Creative Paperclay™.


Whimsical Bird
Deer Antler Ring Holder
Paper Clay Casting Technique
Paper Clay Votive
Footprint Keepsake Bowl
Fall Fridge Magnets

Detailed Rabbit Using Silicon Mold
Paper Clay Fairy Garden Log House

HELP US FIND YOU!!
  1. Use the hashtag #CreativePaperclay on all your social networks.
  2. When using Facebook, be sure the your posts and images using the #Creative Paperclay hashtag are set to public, otherwise we won't be able to find you.
  3. Share your projects on the Creative PaperClay® Facebook page.
I'm always trolling the web, looking for great Creative Paperclay® projects. If you find something, post it on our Facebook page.

GOT QUESTIONS???

Find the answers to your paperclay questions. See what other folks are creating. Stop by our Facebook group and say, "Hi!" Creative Paperclay Q&A
Carole

Thursday, September 6, 2018

Calaveras - Day of the Dead Sugar Skull Ornament or Refrigerator Magnet with Delight TM


Calaveras - Day of the Dead Sugar Skull Ornament or Refrigerator Magnet with Delight TM

Aren't these fun?

The Day of the Dead (El Día de los Muertos in Spanish) is a Latin American holiday (November 1 - 2) to to celebrate and honor our ancestors, friends, and family who have crossed over in to afterlife.  During this time we celebrate with feasts, parades, prayers, ofrendas, and altars.  The "Calaveras" or Sugar Skulls are often personalized with names and embellishments of lost loved ones.   

This is my first project using Delight TM.  I kept it pretty simple.  I really just wanted to do some experimenting with it.  It's really interesting stuff.  Kinda marshmallow-ish in texture.  It's so soft and light weight I thought ornaments, Magnets, pins, and earrings!  This project works for all of the above as long as you have the proper hardware.  I was thinking that this is a great project for a group to do.  Even a whole classroom of children could do it!  You can use any rubber stamps.  It doesn't have to be this one.
  
Supplies:

Delight TM
Acrylic Paint (I used Apple Barrel Gloss in Black)
Paint Brush
Acrylic roller, brayer, or a glass jar
Markers (I used Copic Sketch Brush Tip)
Sandpaper or nail file (I used 320 -420 grits) Optional
Dust Mask or Bandana – use this when sanding
Sealer - ( I have used PYM II because it is what I had.  I have also used Krylon Matte and Crystal Clear and Golden Archival Spray Varnish.) Optional   
Check out this article about sealer by Creative Paperclay® Design Team Member Gloriann Irizarry 


Roll out a piece of Delight TM, Just like a cookie or pie crust.  Make it however thick you like your cookies.  I like mine thin and crisp so, that's what I did.

Any acrylic paint should work.  This is what I used. It doesn't have to be black.  Purple or magenta would be equally awesome!  I tried using inks and was not satisfied.  The clay stuck to the stamp. 

Lightly brush paint onto your stamp.

I got this stamp at Michael's
Stamp onto Delight TM.  Don't push too hard.  You don't want to smudge the paint.
White is nice and classic!

You can add color to Delight TM with a bit of acrylic paint mixed in.  I like this swirly look!  Have fun with colors!  Day of the Dead is a festive celebration.  We use lots of bright happy colors in our imagery and art!


Next, cut them out with scissors or a craft knife.  I tried both ways.  I'm really thinking this is great for a group.  Even the little ones can get in on the action with scissors instead of knives.  After you cut them let them dry for a few hours or put them in a warm 200 degree oven for 20 minutes.  See, just like cookies!

***If you are making an ornament this is the time to add your holes.  Just above the butterfly's head is the perfect place.  Use a needle tool, toothpick or bamboo skewer to make the hole.
Sometimes the edges are rough.  Don't fuss with it too much.  Let it dry.  You can sand this down later if needed.  You can also wet with water to smooth it after it dries.  

After they are dry and cooled add some color with markers.
I used Copic Sketch Markers with brush tips. I like how they are similar to paint brushes.  Except you never have to wash them or re-dip them in paint. You can use any markers you like best.
Embellish and personalize your Calaveras with flowers, beads, sequins, gems, or stickers.  glue a magnet or pin back onto the back.  For ornaments or even a pendant, tie a ribbon through the hole.
Creative Paperclay® and Delight™ are conveniently available for you to purchase online and at the below listed retailers.

I hope that you have enjoyed this project as much as I have!  I'll be back with more "What's On My Workbench Wednesday" fun on the first Wednesday of each month.


Until then, stay creative!  


Monday, September 3, 2018

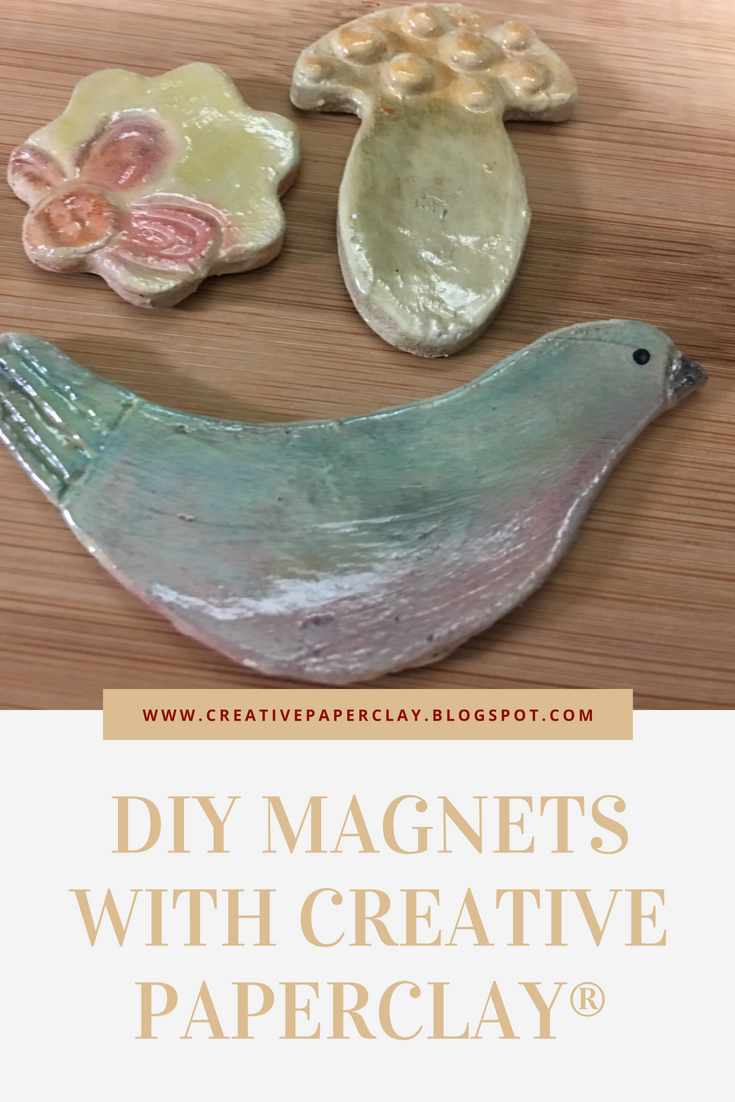
DIY Magnets

Hello, welcome to a new design team post. Today I will share with you how to make magnets with Creative Paperclay®.


You only need a few supplies and its a simple tutorial great for beginners.


Supply list


Follow along in the video below.


You can share your creations with us on our Facebook page. We would love to see them! For more inspiration have a look around the blog. There are tutorials for many levels using Creative Paperclay®. You can also visit my blog www.papermachepatch.com.

Thanks for stopping by!

Suzette


You can find Creative Paperclay® online at Creative Paperclay Co and also at Michaels, Hobby Lobby, Dickblick and Amazon.