Friday, December 20, 2013

Caterpillar's Mushroom by Rachel Whetzel

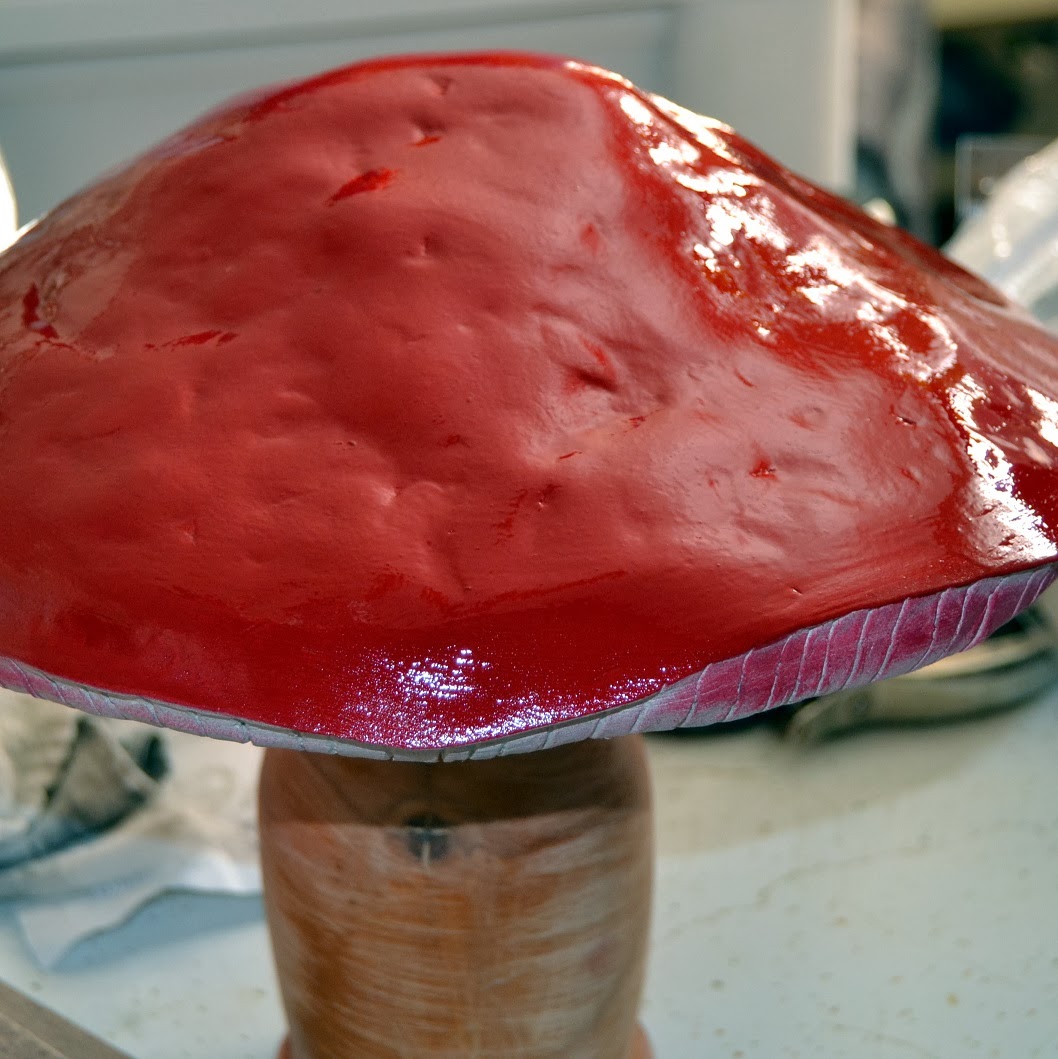
Hello! It's Rachel Whetzel. Today, I'm sharing the process of creating a base for a future Art Doll I have plans to make. I have made a lot of Alice in Wonderland themed dolls. I've made Alice, in various ways, I've made the Queen of Hearts, and the Cheshire Cat. I've made the White Rabbit, and the Mad Hatter, and I've always wanted to make the Caterpillar. The thing is, the mushroom has always gotten the better of me. Until now.
In my tip earlier this month, I shared a bit about creating the bones of a structure, and how to help make it strong. I also utilized items I had on hand, and some I had thrifted.
I also went on line, and did some research on the Amanita muscaria mushroom, and used pictures like the one below for reference and inspiration.
PHOTO SOURCE: http://www.kew.org/plants-fungi/Amanita-muscaria.htm
WHAT YOU'LL NEED to make your own Caterpillar's Mushroom:

  • Something to form the bones of your piece. I used a large wooden candle holder, and an old plant tray
  • Newspaper
  • Tape
  • Creative Paperclay®
  • Paints. I used Krylon spray for the red, and acrylic craft paints for the rest
  • Knife or something straight to press into wet clay
  • Sandpaper

To get started, I further filled out my base using news paper and tape as I have shown you HERE and HERE. Then I got to work covering the whole piece in clay.
Once the whole piece was dry, I filled in any cracks, and then added another layer of clay to the underside of the mushroom. Once I had that layer of clay added, I used a Dough scraper to put lines in the clay to form the gills of the mushroom.
I used water to smooth out the edges of the gills. When I was finished, they looked like this:
Then I added the edge to the mushroom, and when the edge was finished, I pulled the gills to the VERY underside of the top.
Once I had the general shape and feel I wanted, I let my piece dry overnight, and sanded it. When I had sanded the piece into well, I wiped it down with a wet washcloth, and spray painted the top of the piece with red spray paint.
As you can see, I also sanded the wooden candle base that has become the mushroom stem in order to prepare it for paint. Then I cleaned up the overspray of my red paint, and put stripes on the stem to add a whimsical touch to the piece. While the stripes dried, I added spots to the top of the mushroom.
Once all my paints had dried, I used some Valspar antiquing paint to add depth to the gills of the mushroom, and onto the stem as well!
I may end up muting the antiquing paint with a bit of white paint later, but for now, I like the way it turned out!! I can't wait to create the Caterpillar and his Hookah and place them on this cutie.
Leave me a comment and let me know! I would love for you to visit me at my "house" too!! Thank you so much for reading!! ~rachel

Thursday, December 19, 2013

Easy miniature armature Tip


Hello This is LuLu Lancaster and I have a simple little tip for creating miniature pieces with Creative PaperClay ®

I create many tiny elements and sometimes find that putting them together totem pole style can be helpful in keeping them put.

I use straight pins.

I start with a small subject sculpted from Creative PaperClay ® with a straight pin sticking out. This one I have made a tiny skull. Sometimes I build up the pin and sometimes the other direction. 

If I intend to use this in another sculpture sometimes I will leave the pin sticking out the bottom.


                     Building these skulls upwards the pin creates stability and keeps them all together.
here I have used the pin technique for a small cat 

and here I have added a bone to the top of the pin totem.


This totem I have kept a length of the straight pin coming out the bottom. It can be easily insert it into a sculpture.

Thank you so much for taking the time to read my December Tip ;)
LuLu Lancaster


Tuesday, December 17, 2013

Dressing Up Your Magnet Boards - So Easy a Kid Can Do It


This was a really fun and easy project, that even a child can do it!  I really like easy things that someone can create without having to spend a lot of time.  I have had the magnet frame for a while, and wanted to dress it up by using magnets with some of the flowers I have made out of Creative PaperClay!  Let's get started with the list of supplies and directions:  

Supplies used:  
Creative PaperClay
Paint (I used Radiant Pearls Paint)
Flower mold
Magnets
Hot glue gun

Directions:

Step one:  Using a small bit of Creative PaperClay, round it in a ball, then flatten it out to get all the imperfections out.  
Step two:  Place the clay in the mold, putting the best looking part of the clay in first, filling up the entire mold. Make sure to trip the back to flatten it out for the magnet. 
Step three:  Allow to dry either overnight, or heat in the oven for 30 minutes at 250 degrees.
Step four:  Paint the clay pieces the colors you want, with the paint you have available.   
Step five:  Add the magnet to the back of the clay pieces - add to your magnetic frame!  

By using molds, any kid can make a one of a kind magnet board for their room, made with little supplies and effort customized to their room!  And the fact they made it themselves is sure a great boost for the ole' soul if you know what I mean!  I hope you enjoy today's project, and it gives you inspiration to create your own magnets!  
Lynda Jeffs
Creative PaperClay Design Team
                                                   and Memories in Tyme  

Sunday, December 15, 2013

Basic Armature Tips by, Diane

Hello Creative friends!
I'm so happy to be here this morning and share a few tips with you.  I thought a little  armature talk would be my focus here today and I hope it will be helpful to you, on your new journey with Creative Paperclay®.
Creative Paperclay® is a remarkable clay that adheres to almost anything. An armature gives your piece support and strength and as a bonus, you use less clay.

Today, I will share my two most favorite armatures. One we will make and the other, Mother Nature has provided for us.... please join me!


With most of my creations I use aluminum foil and florist tape (or masking tape) for my armatures. Why, you ask? Because it's inexpensive and I'm not limited to one shape. I can manipulate and form the foil into any shape or form that I desire. When I purchase my foil, I prefer to buy the very cheapest brand. it is a thinner foil and that makes it easier to form.


 In the above pic you will see a Snowman sculpt I'm working on. This Lil' Frosty started from a foil armature.

 Frosty has legs and is standing, which means he needs support for the clay. Without the support, his legs may wobble,droop, bend or topple over.

I am a very basic armature maker, so this should be easy for you to follow along.

1. Decide your shape, then start forming your foil by rolling, squeezing, pressing and pinching. Sometimes, I use needle nosed pliers to squeeze the foil tight. You can see above that I  have a basic shape. I cut the foil on the bottom, as this is how I will form my legs.


2. I add foil to the head and to the legs. Remember to keep it tight by squeezing as your form your armature.


Continue until you are happy with your armature. In the pic you can see by the legs that the foil is kinda lifted. Simply give a little squeeze with the pliers.


3. Now you can wrap your foil armature with masking tape or florist tape. This adds a little more strength to the armature and the clay will adhere wonderfully.


4. Now you have an armature for your clay. Let the FUN begin !
 Add your Creative Paperclay® remembering to moisten your armature lightly and the clay will adhere beautifully.

  My next favorite armature for Creative paperclay®.....


Oh for the love of Gourds!
Natures most beautiful natural armature.
 Creative Paperclay® & Gourds go together like Hot Chocolate & marshmallows.


With a few important steps you can create a masterpiece using clay and gourds.

1. I like to soak my gourds in a sink with warm water and just a little bleach, for about 10 minutes. Then let the water out of the sink.
2. Fill sink again with warm water and dish soap, then with a kitchen scrubber remove the dirt and debris.
With a dish towel, dry your gourds thoroughly.

.

Note: during this step you should always wear a dust mask, as the gourd dust may irritate your sinuses and, or lungs.

3. Using medium grit sandpaper, go over the areas you will be applying your clay. A gourd has a shiny smooth surface, so roughing it up a bit is an important step for the clay to adhere to the gourd.


4. Add some white glue to the area you sanded and lightly smear around.


5. Then add your clay to the sanded and glued surface of the gourd. Remember to use some water on the edges of the clay and feather onto the gourd to get a good seal.

Now just have tons of fun with all your sculpting and creative details.

I hope this tip has been helpful  to you on your creative journey.
Thank you, for visiting here today at the Creative Paperclay® blog.
 And as always, your welcome to visit me anytime at my place .

Merry Christmas & Wishes for a Happy New Year!

~ Diane


Friday, December 13, 2013

Tip: Look Beyond the Usual

Hey, there!! Carole here with a tip for you. Consider all possible sources when looking for your clay crafting supplies. Look beyond the clay aisle at your favorite big box craft store. Venture into the cake and candy making aisles!!Look beyond the art supply stores—what about the toy store, the hardware store?? And my personal favorite—local thrift and resale shops.

I found this gem of a princess castle at the thrift shop. It has molds everywhere—each side has a princess gown and there are accessory pieces bordering the bottom.


This couldn't be any easier!! Remember: it was originally made for a kid!! Here you can see I've loaded this gown mold with clay.

The  clay released from the mold beautifully. I'll have a bit of sanding and final touch-up, but very little. Here is the molded princess gown laid out to dry. 
Princess Gown
I'm intrigued by the bitty accessory pieces. They each could hid behind a dime.

Princess Fan

Rosebud

So--tell me where do you look for your alternative art supplies? What do you find?

Visit my Create & Craft blog to see what else I'm working on.

Thursday, December 12, 2013

Giving the Gift of Creativity.

Hello there! It’s Susan from TheBoredZombie.com with something a little different for my December project – a challenge! During this holiday season, I challenge you to give the gift of creativity!

If you’re like me, a lot of your friends and family don’t quite understand your obsession with creating. Some may say things like “I don’t have the patience (time, talent, etc) for that.” Some marvel over your creations as if there is no way human hands could create such a thing. Some are generally indifferent. I'll bet there's also at least one or two you can think of that are genuinely interested. They ask questions about how you did it. Want to know what kind of materials you used or compare it to something they tried some time ago. They let you prattle on about books, blogs, tools and supplies actually listening and maybe even remembering a few things. Instead of making them a gift and telling them all about it – why not give them gift of making themselves? 

I’m so excited to be doing just that and challenge you to do the same. Last month, Diane posted a tutorial that I just loved and thought perfect for a beginner with Creative Paperclay® Modeling Material. With Diane’s permission, I’ve printed her instructions and put together a getting started kit for a good friend of mine. 


Included in the kit are all of the supplies she will need to make this project. Remember – this is for a beginner, don’t assume they have supplies on hand! I had to be a little creative, I picked up large gems to use in place of the buttons and bought a craft wood plank since I never could find one to reclaim. I made notes on the printed tutorial where I made substitutions. I picked up the items at Michaels with a coupon and it totals roughly $23. With more creative shopping, you could probably get it right in the $20 range.

As an added bonus - I included this on the second page of the tutorial:
I'm pretty sure you can't get that kind of personal service from a store bought kit! I so hope she loves the gift - I totally do, there's a good chance I'm going to give this tutorial a whirl myself! If you put together a kit, I'd love to hear about it. Drop me a comment here or an email to susandowenby@gmail.com.

On my blog, theboredzombie.com, I'm musing a bit on creatives, busy times of year, and how I was inspired to put together this gift. Stop by and take a peek!

Thank you for visiting the Creative Paperclay® Modeling Material blog. Your support means the world to all of us! Happy Holidays, I'll see you again on December 26th.


Tuesday, December 10, 2013

Creative Paperclay ® Penguin Cutie Ornament by Gloriann Irizarry

Penguin Creative Paperclay®  Presents 


Little Penguin Cutie Ornament 
by Gloriann Irizarry


Baby is really cold out side! Since is really close to Christmas and the weather sure is reminding us to stay warm. I decided to create a little cute friend to make snow angels with.
 Yes a ornament that can be either hang on your Christmas tree or display at your table. 
This little penguin will sure warm your heart with his bright smile and red scarf.

I hope you enjoy this project instructions and remember 
Happy Crafting!
Sincerely Gloriann Irizarry.


Materials List 

Delight Creative Paperclay ®
2 foam spheres 
Wooden stick
Clay roller
Needle tool
Mini water bottle spray
Paint brushes
Your favorite acrylic paints
Black
Orange
White
Red 
Light Blue 


I start by stacking the small foam sphere on top of the bigger one


Start the figure by rolling your Delight clay into a 1/4 thickness sheet.
I used Delight Clay because is so smooth and lighter and this is great for you to create a
 nice ornament that will not weight you tree down. 


Place the clay sheet on the top of the foam armature and begin to cover the entire double stacked with an even 1/4 sheet all over. Cut any excess and smooth all the edges by misting the clay with the water bottle. Use your fingers to smooth the clay is really easy this clay is very soft and lightweight
 very friendly for you to work on.


Once your done smoothing the clay your figure should look like a pear.
We will be working with this to create our little penguin.
To be able to work the little guy make sure you let this dry for a while.
It is easier to work the rest of the details if your pear shape is fully dry.


I notice it is a lot easier to cut shapes out of the clay sheet if you moist 
and then the needle tool will slice with ease. 

Cut 2 of these for the little wings.


I cut 2 little wings out of a 1/4 thickness clay sheet.


Mist the top edge of the wing and smooth the top to attach it to the penguin.


Repeat the process with the other wing to attached to the body.


I cut a pair of feet to our little frozen. Not to worry there is no rules to how you want the to look. He is a little fantasy creature and everything goes. Just have fun trace and use a needle tool to cut it off.


Remove the wooden stick out of the armature.
Smooth the feet edges a little and shape them. 
Moist them and attach to the out little friend.


Make any adjustments so he looks good standing up.


I wanted to create a little scarf for him to wear.
Start by flattening a clay sheet to a 1/4 thickness.
Use your needle tool and cut the scarf to the thickness you want your little friend to wear.


Now we are ready to keep him warm by rolling the strip around his neck. 


I wanted to create the knot to pop up more so I cut a square piece.


Added the details with the needle took.


Then attach the little square to the scarf.


 Now is time to give him a beak. 
Easy! Cut 2 triangles out of a 1/4 thickness clay sheet. Make one bigger than the other.


Moist the face and start by attaching the button first. 


Pinch a little to give the beak some shape and personality.


Now grab the bigger triangle and do the same. 
Pinch a little to give it a little smile.


Here is your opportunity to give some personality to your new little frozen friend.


Make sure to remember to shape the profile look too.


I wanted to cover the wooden stick hole from the top of his head. So I cut 2 little leaves.
I will use them to give the effect of hair and be able to cover the hole on top of his head.


Pinch the 2 leaves and stuff them on the hole.


Now is time to adjust the feather hair do to any desired style.


I wanted him to have a little tail. I cut it out of the 1/4 thickness sheet.


Moist and attach to the lower back and smooth all the edges.


Now with the wooden stick I pinch the little feet to give him some flippers.
I also poke 2 holes for his nose at the top of the beak.


Now let him dry completely so we can then start to paint him up.


Lets have some fun with paint


I start painting the whole sculpture with one full coat in the Egg Shell white acrylic paint.


Once the first coat dry I grab the orange and color the bottom of his feet.


and color the top.


Then the beak in the same orange.


Grab your favorite acrylic paint color. In my case the red for his scarf.
Not to worry about off line, Because you will be using
 the black and will cover any off set from the red paint. 


After the feet and scarf dry go ahead and color his body in black.


 Use a small detail brush to help you clean and smooth the paint edges. 


After the black paint has dry you can go and paint the eyes very simple.
Paint the blue circle first.
Then the center black dots.
Add some lashes.
And add the white glimmer circle last.


I decided to display him until my Christmas tree is up. 
Once I'm ready all it takes is an O ring behind the little hair feathers a nice colorful ribbon and 
We got an instant little cute Christmas tree ornament. 


I love this clay for ornaments, Because is so lightweight and will not pull your tree branch down.
 I also like it, because the clay is more flexible once is dried. Very handy for those who also have at home one curious feline kitty friend. Yes they seem to think we just hang a new toy for them to play with. 
Whats not to like about curiosity that any way?


I wish everyone to have a very bless holiday and enjoy the family and friends. 
Till next time.

Always 
Gloriann Irizarry
gloriann@byglori.com