Showing posts with label altered canvas. Show all posts

Monday, October 23, 2017

Wings of Love Mixed Media Canvas Featuring Creative Paperclay®

Hi Friends:  It's time for a new mixed media canvas featuring Creative Paperclay®!  I found this great wings mold at Michaels, paired it with a heart mold that I picked up on sale at JoAnns, along with my favorite Creative Paperclay® and a few metal pieces, and I created this Love Wings mini canvas.

Creative Paperclay® Love Wings Canvas


I really love using Creative Paperclay® with molds to create focal pieces on my mixed media canvases.  It's also great for adding texture and stamped images onto the background.

This project uses black gesso and lots of yummy mixed media products!


Please see my video tutorial for full instructions for this project:


Supply List:
Creative Paperclay® Modeling Material
Prima Marketing Art Alchemy Acrylic Paint, Opal Magic Aqua-Rose (Amazon)
Prima Marketing Art Alchemy Acrylic Paint, Opal Magic Yellow-Blue (Amazon)
PrimaMarketing Art Alchemy-Antique Brilliance Amethyst Magic (Amazon)
PrimaMarketing Art Alchemy-Metallique Wax-Vintage Gold (Amazon)
PrimaMarketing Art Alchemy-Opal Magic Wax - Royal Robes (SSS)
Prima Marketing Art Alchemy-Opal Magic Wax-Blue Velvet (Amazon)
Stampendous Glass Glitter (Amazon)
Studio 71 Black Gesso (JoAnn)
TimHoltz Ideology Quote Chips (Amazon)
Liquitex Professional Matte Gel Medium (Amazon)
Other:  Mini Canvas, beads, metal frame


I hope you enjoyed my project and learned some new ways to use Creative Paperclay® in your mixed media projects. Thank you so much for stopping by the blog today. Have a great, creative day! -Patti


Monday, August 28, 2017

Beach Therapy Canvas Featuring Creative Paperclay

Hi Friends:  Do you love the beach?  Do you like reminders of the great times you've had there? I know I do!  Here's a tutorial for creating a Beach Therapy mixed media canvas project using seashells made with Creative Paperclay® and some Wilton molds.


I love using Creative Paperclay® with molds in my mixed media projects because it is so easy to make clay accents to use on projects.  Just add the clay to the mold, pop it in the freezer for a few minutes to help it set, remove from the mold and let it dry for a day or 2.  Once dry, I can easily add them to my projects, paint them to match my design ideas, and create lovely mixed media canvases, cards, or other altered art items.

I used some yummy Prima paints and waxes, and lots of pearls, beads, and glitter on this project. It was so much fun to create the canvas, and I love how I used the sand paste with my Creative Paperclay® letters to create the effect of letters in the sand.  Here are some detail photos of the canvas:

Please see my video tutorial for full instructions for this project:


Supply List:
Creative Paperclay® Modeling Material
Wilton Fondant and Gum Paste Silicone Mold, Sea Life (Amazon)
Wilton 2115-1561 Seashell Candy and Lollipop Mold (Amazon)
Wilton 417-7554 Alphabet & Numbers Fondant Cut-Outs Set (Amazon)
Prima Marketing Art Alchemy-Sparks-Ginger Magic (Amazon)
Prima Marketing Art Alchemy-Sparks-Magical Pond  (Amazon)
Prima Marketing Art Alchemy-Sparks-Butterfly Spells (Amazon)
Prima Marketing Art Alchemy-Sparks-Fairy Wings (Amazon)
Prima Marketing Art Alchemy-Sparks-Mermaid Sparkle (Amazon)
Ranger Paint Dabbers, Pearl Metallic (Amazon)
Deco Art Media Texture Sand Paste (Amazon)
Golden Fiber Paste (Amazon) Liquitex Matte Super Heavy Gel Medium (Amazon)
Liquitex Professional Gloss Heavy Gel Medium (Amazon)
Liquitex Gesso - White (Amazon)
Beacon 3-In-1 Advanced Craft Glue (Amazon)
Cousin Jewelry Basics Brown Seed Beads (Amazon)
Stampendous Glass Glitter (Amazon)
Heidi Swapp Marquee Love Distress Paint Kit-Rust (Amazon)
Darice Pearls - White - Assorted (Amazon)
EKTools Powder Tool (Amazon)
ArtMinds™ Wood Parenthesis Frame, 4" x 6 (Michaels)
A Touch of Glass Beads
Other:  8X10 canvas, glass gems and seed beads, grip shelf liner, cheese cloth

I hope you enjoyed my Beach Therapy canvas and learned a new way to use Creative Paperclay® on your mixed media projects. Thank you so much for stopping by the blog today.

Have a great, creative day! -Patti

Monday, July 10, 2017

Birds and Butterfly Wall Hanging Featuring Creative Paperclay®

Hi Friends:  Are you looking for more ways to use Creative Paperclay® in your home decor?  Here's a fun Birds and Butterfly wall hanging using Creative Paperclay® on the canvas backgrounds and as the focal image on each panel.

Here's a picture of the full wall hanging:

Birds and Butterfly with Creative Paperclay


Here are some detail images of each panel:


Supply List:
Creative Paperclay® Modeling Material
Inkadinkado Mindscapes Clear Stamps (Amazon)
Inkadinkado Gem Stone Insects Clear Stamps (Amazon)
Inkadinkado Clear Stamps - Gem Stone Birds (Frantic Stamper)
Prima WIRE NET Finnabair Clear Stamp (Amazon)
Prima Marketing Art Alchemy-Sparks-Mermaid Sparkle (Amazon)
Prima Marketing Art Alchemy-Sparks-Iris Potion  (Amazon) 
Prima Marketing Art Alchemy-Sparks-Fairy Wings (Amazon)
Prima Marketing Art Alchemy Acrylic Paint, Metallique Steampunk Copper (Amazon)
Prima Marketing Art Alchemy-Metallique Wax-Bronze Age (Amazon)
Prima Marketing Art Alchemy-Metallique Wax-Aged Brass (Amazon)
Prima Marketing Art Alchemy-Metallique Wax-Vintage Gold (Amazon)
Prima Marketing Art Alchemy-Antique Brilliance Mystic Turquoise (Amazon)
Prima Marketing Art Alchemy-Opal Magic Wax-Turquoise Satin (Amazon)
Prima Marketing Art Alchemy-Antique Brilliance Lucky Emerald (Amazon)
Prima Marketing Art Alchemy-Antique Brilliance Amethyst Magic (Amazon)
Prima Marketing Art Alchemy - Metallique Wax - White Gold (SSS)
Prima Marketing Finnabair Mechanicals - Tin Hearts (Amazon)
Viva Decor Inka Gold (Amazon): Gold
Tim Holtz Ideology - Foliage (Amazon)
Faber-Castell GLASS BEAD GLITTER GEL (SSS)
Glossy Accents (SSS)
Aleene's Tacky Glue (Amazon)
Beacon 3-In-1 Advanced Craft Glue (Amazon)
E6000 Glue (Amazon)
Other:  small canvas panels, ribbon, word charms, jewelry pieces, gems, fasteners

Please see my video tutorial for full instructions to recreate this project:


I hope you enjoyed my project and learned some new ways to use Creative Paperclay® in your home decor. Thank you so much for stopping by the blog today. Have a great, creative day! -Patti


Sunday, September 18, 2016

Lynda's Creative Canvas Project

I think this is by far one of my most favorite projects to date!!!  Simple - yet beautiful - and I can't wait to do even more!!!   I couldn't decide the photos to use at first - kept going back to these, partially because I love them so much, yes the photos and the people in them!  

Supplies used:
16 x 20 Canvas 
Delight product
Cookie cutters - flower and heart
Stampin' Up molded flowers (3)
4 different sheets of cardstock/paper
Paint - various colors to match
Sizzix die cut - vine 
Twinkling H2O's - Sunflower & Rose Gold
Studio G's silver & gold glitter glue
Mod Podge glue
Hot glue gun

Directions:  
Step one - Flatten out the Delight product and cut 3 flowers and 3 hearts from the flattened out product.  Set aside and let dry completely.


Step two:  With the paint you have selected - paint streaks all across the entire canvas - set aside to dry completely.  


Step three:  Using 2 sheets of paper with 1 photo, start by using the Mod Podge glue to adhere the photo matt's together.  Finish by adhering the Mod Podge glue to the top of the papers as well.  Set the canvas aside to dry. 


Step four:  Add the photo to the top of the matted papers after the glue has dried - and start to paint each of the 3 hearts and flowers with the Twinkling H2O's paint.  Set aside to dry.  

Step five:  Die cut the Sizzix vines - one for each of the flowers, glue to the bottom of each - add a flower to the top.  

Step six:  After the paint has dried - add the shapes to the canvas - using gold glitter glue for the flowers, and silver glitter glue for the hearts to add a bit of bling!  


The entire project didn't take too long to make - and by using the Delight product - took less time to actually finish drying!  I can't wait to see what the rest of the projects I have in my mind - looks like!  Fun and easy project for sure!!  
Until next time,
Lynda Jeffs
Creative Paperclay Design Team 2016 


Friday, July 18, 2014

Simply Perfect Creative Canvas Layers with Rachel Whetzel


Hello, out there in Creativeland!! It's Rachel Whetzel, here. Once in a while, I feel like a project is so simple, it's probably TOO simple. Then I remember that simple can sometimes be totally AWESOME, and this is that kind of simple. My project today is part of a project I'm working for Gauche Alchemy, and it is the background canvas for a different piece of artwork. Today, I'll show you just how simple it is to use Creative Paperclay® as part of a mixed media canvas. This is the kind of project you can have your kids do. It's also great for beginners who want to amp up their art work, and make something they are pleased with. It's also perfect for projects with limited time. It's Simply Perfect. (see what I did there...?)

WHAT YOU'LL NEED to make your own canvas:

  • A sturdy canvas. I have plywood cut at my local hardware store, then I cover it with dictionary paper
  • Creative Paperclay®
  • Paints. I use Folk Art acrylic craft paints.
  • Stain. I used Valspar antiquing stain
  • Paint brushes
  • Embellishments. I used a butterfly wall cling I bought from the Dollar Tree years ago.
  • Texture. For this piece, I used a doily I bought at a yard sale.
Get your canvas surface wet, and layer your clay onto it. In order to get the right shape for my doily, I traced it onto the canvas before I started putting on clay. 
 Next, I pressed my doily into my still moist clay.
 Then I carefully lifted it out of the clay. If you find that clay has stuck to your cloth, rinse well with water while the clay is still wet, and it will come out easily. Allow your clay to dry, and then get to work painting on some layers!
I painted my colors on, and then used stain to add dimension to the doily. Topped off with a butterfly and some dotted swirls, and my canvas is ready to go!! Be sure to check in at  Gauche Alchemy in August, to see the completed piece I am creating using this background! 

Thanks for reading! If you'd like to keep up with me, and see more of what I'm up to, I'd also love it if you'd visit MY BLOG and Subscribe! You can also find me on FACEBOOK!

Friday, February 7, 2014

Jan Creative Paperclay Tip from Rachel Whetzel

One of my favorite ways to use Creative Paperclay®, is in my mixed media art work. You can use clay on projects and cover it with paper! I love using it to create dimension on canvases.
Leave me a comment and let me know what you'll be using Creative Paperclay® for next! CLICK HERE to visit me at my "house" too!! Thank you so much for reading!! ~rachel

Don't MISS IT!! We're hosting a Valentine Link Party on Feb 8th!! 

Thursday, September 6, 2012

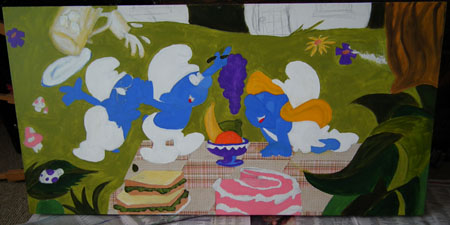
A Smurfy Canvas

Disclaimer: I have NOT been paid to do this. This canvas is for my own private use. It will NOT be sold or reproduced to giveaway in any form. This is just a post in the sole purpose of showing an example of what you can do with creative paper clay® I have no intention to breach copyright if it does I am more than too happy to take it down.
 
Hi all
This month I will show you how I put together this Smurfy Canvas for my daughter.... measuring 20" x 40" - yes its huge!

To do this you will need:

Creative Paperclay®
Canvas the size you want
Picture to copy
Acrylic paints
Patterned paper
Black marker pen
Pencil


.

Step 1
Draw up your picture in pencil


 Step 2
Paint your painting
Step 3
Add your patterned paper on the mat


Step 4
Make your clay pieces that you want to stand out


Step 5
once your clay pieces are dry Paint them


Step 6
Draw your black lines onto your painting with the black marker pen if your painting is a cartoon painting like this.

Step 7
Stick your clay pieces in the desired places on the canvas.

You are done!


Here is the painting again and close ups....


Thanks so much for dropping by... Happy Smurfing!

Debbie Buckland signing off for now...
http://artycrafty.wordpress.com


Disclaimer: I have NOT been paid to do this. This canvas is for my own private use. It will NOT be sold or reproduced to giveaway in any form. This is just a post in the sole purpose of showing an example of what you can do with creative paper clay® I have no intention to breach copyright if it does I am more than too happy to take it down.

Tuesday, February 21, 2012

Creative Paperclay® and Articus Studio Molds!

This month I had the opportunity to use Creative Paperclay® with an Articus Studio™ mold.  I choose to use the Frozen Charlotte Art Doll Mold  as I love adding them in my art. Finding them can be a challenge, once you find one they can be pretty expensive.  If you have priced a Frozen Charlotte lately you would know what I mean. So, now I am able to make them as needed with Creative Paperclay® for my projects.
First, take a ball of Creative Paperclay® and press into the mold. It is very important to work the areas that have deeper depressions, like the feet and face.  Once you have filled the mold then set aside to dry, at least overnight (12-24 hours) in the mold, depending on humidity.  
Once released if they are cool to the touch they are still damp. Let them set another 12-24 hours to completely dry.
When the Frozen Charlotte is dry, prepare for use.  With an emery board or small file clean up the edges of the doll.  Then with a bit of ink add a little color to age it. Seal it, this one was sealed with USArtQuest PPA Matte.  Sealing product depends on the project and the effect you are after.
Recently I read in one of the Stampington magazines about a technique using paper napkins in mixed media projects.  I saw this beautiful Kleenex packet with the Eiffel Tower and thought "wonder if they would work," as they say, the rest is history.
Supplies:
USArt Quest PPA Matte
Viva Las Vegastamps! "I Love Paris"
Stewart Superior Memories Ink - Black
Small Canvas- 2 1/2" X 2 1/2"
Old sheet music
Printed Kleenex
Heart Cut from Creative Paperclay®
Lace
Craft Paint - Burgundy
Paint brush
Separate the tissue layers of the Kleenex or napkin.  There are usually three layers of tissue. The first is easy to separate. Getting the second and third apart can be tricky.  Be sure to separate. If left in tack the extra layer of tissue could cause problems when adhering. 
Prepare canvas with USArtQuest PPA Matte adhesive. The first layer of paper on the canvas is old sheet music adhered with USArt Quest PPA Matte. Be sure to spread the PPA it evenly on the top and sides of the canvas. Let it set. Then spread a second layer of USArt Quest PPA Matte.
Carefully lay your tissue on the surface of your canvas. Once the tissue makes contact with the glue it is in place, trying to move the tissue will rip it. Make nice crisp corners, you may need additional adhesive. Carefully paint the PPA Matte over the surface of the tissue. Let it set to dry.

While the canvas is setting cut lace (3 1/4"), long enough to wrap around the back.  Stamp Viva Las Vegastamps! sentiment "I Love Paris in the Springtime!"  Earlier I had cut small hearts from Creative Paperclay®, paint one burgundy, any craft paint will do and let dry.  
Once the adhesive is barely tacky,  cover the canvas with Sakura Crystal Lacquer, attach the lace and "I Love Paris." Also, the Creative Paperclay® Frozen Charlotte and heart.  Cover the heart with Sakura Crystal Lacquer.  Set aside to dry overnight!
Finished it is a perfect little gift for that person that loves Paris!!!

Hope you enjoyed this project, please visit my blog HERE for more inspiration! 
Until my next post Happy Creating! 
Lyneen