Showing posts with label cameo. Show all posts

Friday, April 23, 2021

How to Create a Cameo Framed Art Piece


Hello and happy Friday everyone, Cinnamon here and I am going to show you how I created this cameo framed art piece.  Follow the steps below to see how this was done.


Supplies:
  • Creative Paperclay®
  • Small hand roller or something to flatten out clay
  • Decorative frame
  • Exacto knife 
  • Sand paper
  • e6000 glue
  • Acrylic Black and gold paint
  • Sealer, Varnish
  • Sheet of black felt


 I have a few of these pretty frames that I brought from my local 5 Below discount store. It has a very vintage and distinguished look so I wanted to create a cameo piece and place it in the middle. I have always admired vintage cameo portraits and wanted to try to recreate one of my own.


***This is not a necessary step****, but I chose to create my own silhouette from an image I found online in Adobe Illustrator. You can just grab a silhouette from a quick Google search online or draw one by hand. 


I took the silhouette and made it to the size of the opening of the frame and cut it out. Again, you can just do this by hand and not get on the computer to do this step.


Once I cut out the silhouette, I used it as a guide to make sure that I create my piece to size.
I have a flat tool that I use to shape clay which allows me to cut pieces of the clay as needed to create fine details. You can use a pin or anything that allows you to shape those little details while the clay is still pliable. It's important to get you basic shape down at this point so that you don't have to do as much sanding and cutting into the clay later.


Keep building up the piece and focus on getting the profile just right. 


I wanted to add a braid to the hair of the piece. My clay was a bit dried out so it broke in a few places when I tried to rolled out thin pieces of it. If you use fresh paperclay, you won't run into this problem. If you do, it can easily be corrected by brushing a bit of water onto the pieces and blend them together.


I took the braid and pressed it into the piece with a wet brush to help it stick in place. I brushed the pieces on the braid with the damp brush to join some of the pieces that were splitting from each other. Set the piece aside and allow it to dry.


Once the piece dried, I did a light sanding to clean up the details and smooth it out.


Be sure to try the piece out in the opening of the frame to see if you are happy with the size. Adjust as necessary.


After I was done with sanding, I moved on to painting the piece with a black undercoat of acrylic paint.


After applying the undercoat, I painted gold acrylic paint onto the piece using the dry brush technique. The braid was fully painted in gold so that it could be the focal point. Set aside to dry and then seal it with varnish.


Take your felt sheet and cut it down to the size of the opening of the frame. After you cut it down to size, glue it onto the back of the frame with the the e6000 glue.


If your piece is dry, glue it onto the frame with the e6000 glue as well.


And this is how it turned out!


Thank you all once again for stopping by, and I hope that you enjoyed 
today's tutorial! You can find Creative Paperclay® at the following 

See more of my work at Melandolly.com, catch updates on 
my Instagram page and here is a link to my shop!


.  


Monday, July 24, 2017

Parisian Dream Cameo Card Featuring Delight™ Compound

Hi Friends:  I love to use Delight™ air dry modeling compound on my mixed media cards because the items that I make are so lightweight and easy to add to the cards.  You can use Delight™ with fondant molds to make some really beautiful embellishments.  For this project, I used some molds to create a Parisian-based card with a lovely cameo focal point.  I saw these Eiffel Tower inspired favor boxes on clearance in one of the big box stores and I just knew they would be great on cards.  And I knew that I had the ideal cameo and frame molds on hand to create the focal point to go with it.


Detail images:


Directions: Please see my video tutorial for full instructions for this project:


Supply List:
Delight™ air dry modeling compound
Prima Salvage District 6X6 Paper Pad (Amazon)
Ranger Adirondack Metallics Acrylic Paint Dabbers, Silver (Amazon)
Tim Holtz Ideology Quote Chips (Amazon)
Yunko Oval Lady Mirror Frames Silicone Mold (Amazon)
SK Frame Sugarcraft Oval Mirror Frames Silicone Mold (Amazon)
Prima Distress Tool (SSS)
Prima Chalk Fluid Edger - Black Coal (Amazon)
Aleene's Tacky Glue (Amazon)
Beacon 3-In-1 Advanced Craft Glue (Amazon)
Prima Marketing Memory Hardware Artisan Powder - Vausseroux (Amazon) Want 2 Scrap Couture Swirls - White Pearls
Scotch Advanced Tape Glider (Amazon)
Art Anthology Stone Effects Paint - Lava
Jolee's Boutique Favor Boxes - Parisian Collection
Other:  A7 Card Base, tulle, sewing machine/thread

I hope you enjoyed my project and learned some new ways to use Delight™ Modeling Compound on your mixed media cards. Thank you so much for stopping by the blog today. Have a great, creative day! -Patti


Wednesday, April 4, 2012

Making a ring and a Cameo

Hello all.
Wow, would you believe it?
This is the last post in this six month DT position I will post..... Good luck to all those that are applying.

Ring Tutorial:

The wire is from an old wire bracelet that snapped at the join.
Here is how to make a ring using Creative Paperclay® and Terri Sproul Mixers.


And the ring is finished.


Cameo Tutorial:

I have also been playing around with Cameo's. They tend to be making a come back....

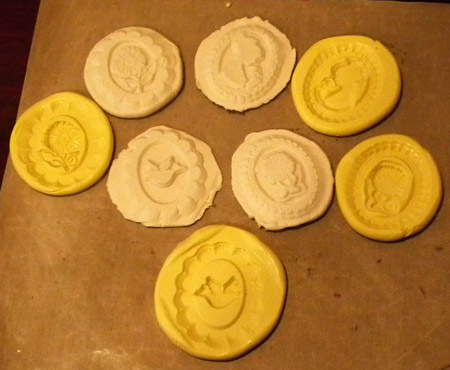
 First get some Amaizing Mold Putty and mold some Cameos with stamps.
Next put your Creative Paperclay® into the molds then carefully take them apart and wait for the clay to dry.


 Trim off the edges of the cameo
 Optional step:
if you are not confident enough to keep the white bits white then use a masking fluid.
 Paint on black ink to background (or Terri Sproul Mixers)
 Take off the Masking fluid if you used it.
Use a versamark pen to go around the frame of your Cameo and apply Gold embossing powder, heat to finish it off.


or alternatively paint on Gold Terri Sproul Mixers.


See you can actually do the background in any colour. And you can use these embellishments for cards, Scrapbooking or off the page project.

Well all the best to you, our awesome readers - please leave a comment.
Maybe this is farewell...... who knows?
I do know that I am re-applying, but be best assured that there will be more  Creative Paperclay® projects on my blog either I make it or not. Love this stuff to much to stop using it. Its been a pure pleasure being on this team. And I thank all my wonderful, friendly team members. So glad we could work together. Its been a pleasure.


Happy Crafting all
Debbie Buckland Signing off.... for now.
artycrafty.wordpress.com