Showing posts with label heart. Show all posts

Monday, February 3, 2020

A Valentine's Heart

Hello, I cannot believe it is February already! Where is the year going? We were just celebrating the holidays! For those of you who celebrate Valentine's day, I have a treat for you today! Look at this gorgeous heart that is so very easy to make! It is a great project for young and old and in between!


Supplies needed:

foil
rubber stamp
sculpting tools
2" craft wire and pliers
black gesso or black acrylic paint
mica powders
makeup sponge
spray varnish - gloss
raffia
glue gun and glue stick
water

Follow along in the video below:


Wasn't that easy? Now it's your turn to give it a try!


You can share your creations with us on our Facebook page. We would love to see them! For more inspiration have a look around the blog. There are tutorials for many levels using Creative Paperclay®. You can also visit my blog www.papermachepatch.com.

You can find Creative Paperclay® online at Creative Paperclay Co and also at Michaels, Hobby Lobby, Dickblick and Amazon. 

Thanks for stopping by!

Suzette


Friday, January 25, 2019

How to Mend a Broken Heart


Hello everyone! My name is Cinnamon Willis and I am going to walk you through the steps on how I created this mended broken heart sculpture. With 
Valentine's Day quickly approaching, I decided to create a broken heart for those who may be in need of some healing at this time. The gold split in the heart was inspired by the Japanese art of Kintsugi where broken pottery is repaired with lacquer that is dusted with powdered gold to join the pieces back together. These repair lines become a beautiful reminder of the item's resilience, the same can be said about the heart and the scars that are left on it by others. The scars will only add to your brilliance, learn from them, and wear them with pride.

Supplies:
  • Creative Paperclay®
  • Wooden skewer
  • Masking Tape
  • Newspaper
  • Acrylic paint
  • Pencil
  • Sanding paper
  • Exacto Knife
  • Aleene's Original Tacky Glue


I began this piece by balling up newspaper and taping it around my skewer. I start on one side of the heart and then get to work on the other side. I tape them together and wrap them until they begin to resemble the rough shape of a heart.


Once the shape of the newspaper is as close as I can get it to a heart, I began my first thin coat of paperclay around it. I allowed the clay to dry for about 24 hours and I begin to add more clay with a little dab of water until it gets to the shape that I would like it to be for the heart.


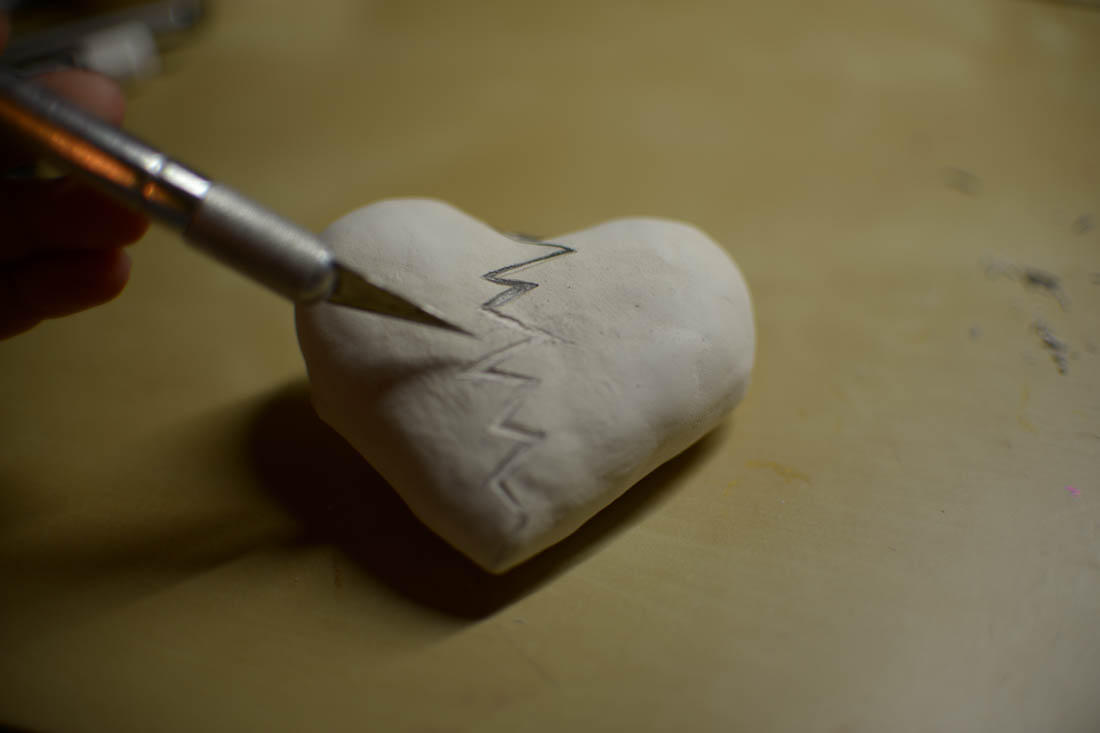
After allowing the second coat of clay to dry, I map out with a pencil where I would like for the split to be for my broken heart. I used a pencil because I always struggle with making zig zagged lines, it usually takes me a few tries.


I am just cutting out my lines with my excato knife here, a utility knife can work as well.


After the lines were cut out, I began to sculpt the front and back end of the arrow. I didn't do as much sanding down with this piece because I wanted the heart to be a little rough looking as if it had a rough journey. I also put a little bit of glue on both ends of the arrow where they join with the heart to keep it in place.


I painted the heart black so that I could blotch some red paint on it with a sponge as shown here. I didn't want the heart to have an even bright red coat of paint, I wanted it to look weathered.


I used gold paint here for the break in the heart to mimic that of the Kintsugi technique that I mentioned above.


I took a piece of nylon and tied it onto both ends of the arrow so that I could hang it on a nail. I sealed it with varnish so that the paint wouldn't chip off.


Here's the piece in it's new home on one of my walls with two of my favorite masks.

Thank you all once again for stopping by, and I hope that you enjoyed today's tutorial! You can find Creative Paperclay® at the following retailers Creative Paperclay® Online Store, Michael's, Amazon, Joann's.

See more of my work at Melandolly.com and be sure to catch updates on my Instagram page!


Tuesday, May 12, 2015

Love is ... Creative Paperclay 3D wall art Tutorial by Gloriann Irizarry

Love is ... Creative Paperclay 3D wall art Tutorial by Gloriann Irizarry


To all those wonderful mothers out there I wanted to wish them a Happy mothers day. May be a little late but I like to think of everyday is mothers day anyway. Mothers don't take a v364 days a vacation and we work 24/7 364 days of the year so Happy Mothers days to all.

Thinking of all the unconditional love these wonderful ladies do for their families inspired me to create a 3D wall art named Love is ...
Well for me love is KEY to all wonderful things in life that's why adding other metals elements to the piece besides Creative paperclay will enhance the beauty of any  3D Wall Art Canvas project.

So lets start with the materials used in this project


Creative Paperclay®
Walnut Hollow Clay Extruder
Aluminum foil
Acrylic Paints Colors
 (White, Tuscan red, Back,  Metallics in Black, pink, purple, blue)
Martha Stewart's Glitters in
(Sugar cube hearts, Rectangles in Sugars plum, Blueberry Slush, Bubble Gum and Sugar Cube)
Paint brushes
Paper towels
Black upholstery thread
Metal Key Findings
Metal Key Hole
Hot glue or Aleene's Fast Grab Tacky Glue 
Solid Cardboard paint canvas
Acrylic Spray sealer in Glossy and Matte.


Grab the aluminum foils and start to create the core for the 3D center piece in shape of a heart.

 
Roll the clay in shape of a snake to make it easier to insert it in the Walnut Hollow extruder.
I prefer this one due to be easier on the hands no need to press it out it works great and has an  Easy Crank Handle.

 
Place the circle face plate with multiple circles to create more than one Creative Paperclay®
strings. Make sure you work these gently so you will have a one continue string of Creative Paperclay to make the knit effect look more natural. Keep the clay moist (not to much water) so they don't break has easy I spray them with a water mist bottle.

 
Roll and twist  2 yarns together so they look like the photo and place them very carefully side by side. Moist them a little so they will stick and create the one piece heart. 

 
Moist them and apply light pressure so they stay together.  

 
Add any other details you want and set it aside to dry. It can be air dry or speed process by putting in the over to dry for one hour at 200 degrees.

 
While the 3D Knit Creative Paperclay® heart dries we can start to work on the canvas paint. 


Start the canvas with a solid coat of white acrylic paint.

 
While the white paint still wet add a few drops of blue paint on the top, purple in the middle and pink in the bottom and stoke it lightly with a flat soft brush. Start the strokes from the top to the bottom and no need to clean the brush. It is key that you do this lightly in one direction so you can get the blend effect. But feel free to practice and have fun since this is the background there is no wrong way to paint it has long your are having fun.

 
While the paint still wet add the Martha Stewart's Sugar Cube Heart Glitter all over.

 
On the purple portion of the wet paint sprinkle a few Martha Stewart's Sugar Plum Confetti glitter.


Add some Martha Stewart's Blueberry Slush Confetti glitter at the blue portion of the wet acrylic.

 
Add some Martha Stewart's Bubble Gum Confetti to the bottom of the canvas.

 
And to cover any empty spots use the Martha Stewart's Sugar Cube confetti glitter all over the rest.

 
You can have fun sprinkling the glitter all over and creating your own texture background this way.
Set the piece down so the paint will dry and secure the glitter in place.

 
Once the background colors are dry you can do the lettering with regular Black acrylic paint.
Paint it in layers if you want the words to be bold and pop nicely and set it aside to dry.
 
 
At this point you can seal it. Matte finish will be a great seal for this background.
 
 
Now the heart is dry let apply a coat of the rich Tuscan red and set it aside to dry.
 

Now you can make those nice knit effect pop right out of the Paperclay heart by adding a water down coat of the metallic black to the whole piece and using a wet paper towel removed some of the excess black paint off. This will make the red come up and the black will be deposited to create the shadows we are looking for on the yarn stitching.


Set is aside to dry then seal it with the Glossy Spray sealer.


Place the heart in to calculate the correct spacing for the Metal finding keys.


Use the upholstery thread to attach the keys to the heart.
 
 
Secure the keys in place with the black upholstery thread.
 

If you look you might not even need to drill holes since this sculpture style might have some holes you can use. If not feel free to drill some holes with a hand drill.


If you are in a hurry you can use Hot glue to add the Key hole and secure the heart to the canvas.


 I do recommend the Aleene's Fast Grab Tacky Glue for a better adhesion of your 3D Creative Paperclay® Knit heart it will be a little slower drying but it seems to hold better.

 
Once the glue dry your wall art is ready to be displayed.
 
Fun project to make and give that special someone that is the KEY in your heart.
Remember
 
 
Have a bless day and if you have any question feel free to visit our  Q&A Facebook Page.
Sincerely

 
Gloriann Irizarry