Showing posts with label kid friendly. Show all posts

Friday, February 19, 2016

Kid's Project: Whimsical Owl

Chloe and I have been having lots of fun creating this whimsical owl wall hanging.

We started by rolling out a ball of clay about 3/8" to 1/4" thick. We made the pieces in a variety of ways—some we molded, some we cut following a pattern, some we free hand cut. For the body and the tummy piece, we cut around mixing bowls that were the right size. For the wings, we used a tart mold as a cookie cutter, then cut the clay piece in half lengthwise for the two wings.

The two circles for her eyes were molded. The head, beak, and feet were cut free hand.
Eyes

Beak and feet

We added different textures to the head, wings, and body using embossing folders and clay texture sheets.

Here are all of our owl pieces laid out to dry.

When the pieces were completely dry, we painted them with acrylic paints and glued them together using E6000 adhesive. We added a jewelry bail to the back of the head for hanging and adding her bow.

This owl wall hanging brightens any place she perches.

Carole

Chloe

Table Cell Table Cell

Tuesday, June 9, 2015

Creative Paperclay Figure Pusheen The Cat Tutorial


Good Day everyone! Today I wanted to share with everyone a little project I made a very special little girl in my life. Yes!  My daughter Sam. She wanted a Pusheen The Cat figure for her birthday cake so why not make it out of Creative Paperclay®  instead of fondant so she can treasure it for ever. This is how my OOAK figure idea began . Now she was actually very specific and wanted the cute cat in the scooter like on the Book cover of I Am Pusheen The Cat By Claire Belton. The Fan art figure turned out so easy and cute I wanted to share with everyone. I hope you like it.


Materials
Creative Paperclay®
Sandits®
Roller
Water mist bottle
Brush
Acrylic paint
Acrylic glossy sealer
Printed Image


I like to cover the working area with a plastic sheet so you can remove the clay in one whole piece.


Use your roller and start rolling a clay sheet to a 1/4 even thickness. 


Print the image you have chosen to desired size.
Cut the image out and place it on top of the rolled out clay sheet.

 
Trace it with a needle to cut the base shape for your Creative Paperclay®  cat figure.


Smooth any rough edges out with a wet soft flat brush.

 
Add some more 3D details with the Creative Paperclay® like the little cat  paws, scooter chair, scooter wheels, eyes, mouth and cat markings. Set to dry over night or if in a hurry out it in the over tray for 170 degrees no more than 200 degrees for one hour.
 
 
You can sand any imperfections out. I found the use of Sandits® to be very
helpful to sand all the details out.  Sandits® give you  full control over the area your sanding.
Check them out you will wonder how your live with out them.
 
 
Once is dry we can do the base colors for the figure.
Use at least 2 coats for each color so the image will look nice and bright.
 
Cat and wheels was colored in Silver gray, Scooter in Aqua pearls, Seat and steering wheel in flat pink.  Let the paint fully dry in between each coat. I actually paint it the details in the front of the figure and the back too. Set aside and let it dry.


Now that is dry it will be easier to add the black detailed line with out messing the other colors.
It is more easier to do if you use a nice fine brush and thin the black paint a little so it will not cloth all over when your painting the lines.


I could not stop on the front so I also painted the details on the back of this piece.
 
Once the black paint dry your ready to protect your piece with the glossy acrylic paint sealer. Set it aside to dry and your piece will be done.
 
This can be use has a cake topper, Magnet or a tree ornament. The choice is all yours.
 
 
Now Todays OOAK Pusheen Creative Paperclay figure was a Fan Art inspire by my Sam's favorite book covers I Am Pusheen The Cat by Claire Belton 
 
 
 Have a bless fun day!


Sincerely,
Gloriann Irizarry


Friday, February 20, 2015

Kid's Project: Creative Paperclay® Leprechaun

All our Valentine's are done and delivered. Now, moving on to St. Patrick's Day. Chloe and I created a cute leprechaun to hang in our kitchen.

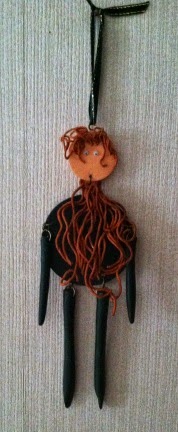
We started by making the individual pieces that we'd need—two legs and arms, a body, and a head. We used cookie cutters for the body and head. The arms and legs were long snakes of clay. We shaped the hand ends of the arms to form a cone. We flattened one end of the legs to form a foot.

Before our leprechaun was set aside to dry, I pierced five holes on the body piece where the head, arms, and legs would be attached. I also pierced holes through the tops of each arm and leg, and one at the bottom of the head for attaching to the body.

We decided that he needed something more to give him a bit of character, so we made hair and a beard using the clay extruder.

When the pieces were thoroughly dry and before painting, I coated each piece with an acrylic medium to seal them.

Chloe painted the green body, legs, and arms while I did the head, hair, and beard. Painting tip: Don't overwork the paint. Two thin coats are much better than one thick one.

When the paint was dry, we moved on to assembly. Depending on the age of the child you're working with, this could be an adult job, as it was in our case. Chloe handed me pieces and jump rings, but I did the assembly work. Assembly tip: When opening jump rings, use two pair of pliers—one is each hand—to grasp the jump ring on either side of the opening and use a twisting motion to open the ring.

A bit of a haircut and googly eyes completed the face. Here he is!! Hanging in our kitchen.

And here's Chloe admiring her work.


Carole

Chloe

Table Cell Table Cell