Tuesday, July 17, 2012

Edie's Quick Tip for July

Did you know you can add paint directly to your Creative Paperclay® and Delight® modeling material???  Simply mix in a bit of craft or acrylic paint and blend until no streaks remain. You can also add in mica powders or inks for cool effects!
For these starfish I added some Terri Sproul Mixers - Shimmer Rose to my Creative Paperclay® and worked the clay until the color was well blended. Next I fill an Amazing Mold Putty mold with my Creative Paperclay® and let it dry overnight. I now have some super cute SPARKLY Paperclay starfish to use in an upcoming mermaid painting!


Saturday, July 14, 2012

July tip-OUTSIDE THE BOX

Think outside the box with these products. Look around when you go to stores and see different things. Get inspiration from everything around you and make it work in your art. You will be so surprised at the things you come up with and can create instead of spending hundreds of dollars on items that you can make and personalize yourself! I love these products!

Thursday, July 12, 2012

Willy Wonka Inspired Decorative Tile


One of my favorite movies as a child was Willy Wonka and the Chocolate Factory.  The idea of living in such a weird world of imagination excited me.  My favorite scene in the movie was just after the characters entered the factory when Willy Wonka showed them the fruit wall paper that tasted like fruit.

As a child my Grandmother has wallpaper in her kitchen that was very similar to this:


Needless to say it did not taste like fruit.

Recently, I watched Willy Wonka and the Chocolate Factory with my girls.   As I watched the movie I remembered how much I loved this one scene.  I remembered how much it sparked my imagination as a child.  This is when I decided to see what I could create with Creative Paperclay based on my favorite scene from on of my favorite movies.

Here are the products I used for my project:
Creative Paperclay(R)
Acrylic Paint (various colors)
3D Crystal Lacquer
Terri Sproul Mixers in Bronze, Gold, and Shimmer Garnet


 I used about 1/3 of an 8 oz package of Creative Paperclay(R), rolled it out and cut it to measure approx. 5" x 4".
Then I started shaping the fruit.

 These are the finished pieces.
 I painted the tile with ivory acrylic paint.
 Then I painted the fruit in various colors.
 After the paint was dry I broke out my 3D Crystal Lacquer and Terri Sproul Mixers in Bronze, Gold, and Shimmer Garnet.
 I painted all of the pieces with the lacquer and mixers.
 Then I used the 3D Crystal Lacquer to adhere the pieces of fruit to the tile and gave the whole piece a top coat of lacquer.
This is the finished project:


Wednesday, July 11, 2012

Tip for July

This is going to be SHORT and SWEET! I have some creating to do! Creative Paperclay loves MARKERS! Its doesnt matter if its Crayola, Sharpies, or the more expensive Copics or Letraset, they work perfectly on Creative PaperClay! Think of the possibilities! Art on! ANg

Saturday, July 7, 2012

Creative Paperclay® and Paris!

Sakura Crystal Lacquer
Terri Sproul Mixers 
and 
Want2Scrap
This week I continued to work on my Want2Scrap Paris Chipboard Album. This week I have added a few pieces I made with Creative Paperclay® and painted with Sakura Crystal Lacquer and Terri Sproul Mixers!

I used my Articus Mold I used to make my Frozen Charlotte.

A small heart cookie cutter.

A mold I made from a dolls head.

I stamped Paris on a piece of Creative Paperclay®

I painted each piece with Sakura Crystal Lacquer and Terri Sproul Mixer, a little of Gold and Pink Sapphire Shimmer Pearl. The heart was painted with craft paint first, then clear crystal lacquer. The bottle cap has an image covered with crystal lacquer and trimmed with seed beads!


The finished page has a little bit of the Nestabling Silver Rhinstones that surround the picture of Gustave Eiffel himself and covered with a thin coating of Sakura Crystal Lacquer mixed with Terri Sproul Mixers - Gold. The image is from Magic Moonlight Studios Free Images.


Thursday, July 5, 2012

Canvas Creative Paperclay art

Hi all
I have done a lot of experimenting for this piece this month. Thought I'd go special since I'm 40 at the end of the month... ;)

For this tutorial you will need:
  • Amaizing mold putty - make a mold of something you love
  • Creative Paperclay(R)
  • Acrylic paint - your desired colours
  • Painting or palette knife
  • Canvas to the desired size
  • Terri Sproul mixers - your desired colours
  • Chipboard letters
  • Paper flowers
  • Fiskars texture plate or similar
  • Brushes
  • Fiskars paper boarder punch
  • Cardstock or papers
  • Sand paper


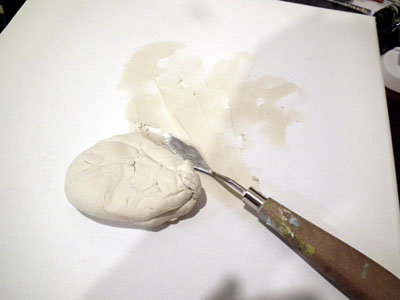
Step 1: apply paperclay directly to canvas with a painting or palette knife. Squishing it into the canvas.


Step 2: Next press a Fiskars texture plate into the clay on the canvas surface.

Now set canvas a-side to dry for about 24 hours.

Step 3: use the Fiskars texture plates to make your own mini boarders
 
 set them a-side to dry on a drying rack - my drying rack is an old microwave rack


Step 4:  With Amaizing Mold Putty I made a mold out of my sons eagle on his toy bow and arrow set.
All I had to do was mold an extra wing to put on the finished eagle. I painted it up with acrylic paints.


Step 5: then finished the Eagle off with bronze Terri Sproul Mixer and 3D crystal lacquer


Step 6: 
Once your clay is dry on the canvas..
Paint up your canvas. I used different yellow browns to dark browns.


Step 7: Let your paint dry and then sand your canvas down lightly

This shows up texture and white areas, its awesome.


Step 8: Punch out some paper with the Fiskars Boarder punch. Then stick it on the boarder of the canvas.


Step 9: add your flowers - i glued the boarders and flowers down with crystal lacquer


Step 10: when your boarder strips are finished drying paint with burnt umber or a dark colour.
Then when the paint is dry..... mix up TS Mixer - I used interference green here and paint it on lightly to the surface. Its so sparkly and awesome and this reminds me so much of Jade or NZ Pounamu (Po-na-moo)


Step 11: now add the Eagle and the boarder strips to the canvas with your lettering....


Congrats you have finished your Canvas! yipee!!!

The words are from a song that we sing at our church.
The flowers are hand made by me and are called "Kakabeak"

The swirl boarder strips of paperclay are very similar to the Maori carvings seen around New Zealand.

Stay tuned later on in the month for my tip and I'll be showing you how to make paperclay letters!!!

Yes the lettering you see here are also made out of Creative Paperclay (R). yipppe!!!


Happy Crafting
from Debbie Buckland
http://artycrafty.wordpress.com

Wednesday, July 4, 2012

Num Num Monster by Edie

Last week in my Art of Healthy Living Group on Facebook, we were talking about hunger and intense cravings during weight loss. During that conversation it was said that at certain times, it is like a ‘num num monster’ takes over complete control of your mind and makes you eat whether you are hungry or not! Since I am using art as a means to work through the emotional side of my weight loss journey, I decided to create my num num monster out of Delight® clay in an attempt to regain the control it seems to steal from me on occasion.

You can view the full video tutorial below.


First, I created my basic monster shape using aluminum foil, then I rolled out my Delight® air dry modeling material, covered the entire body and set it aside to dry completely. Next, I began shaping the feet of my monster with Delight. I cut spaces between the toes and shaped them before using a cuticle pusher to create the toenails.


Once the body and feet were dry, I gave everything a coat of purple craft paint. Next, I used red and blue metallic craft paint and dabbed spots all over my monster’s body.


I used tacky glue and two small pieces of wire to attach the feet to the body. While the glue and paint were drying I started working on the mouth of my monster. I imagined my num num monster to look all cute and fluffy, until it’s opens it’s mouth! I shaped another piece of Delight® clay into a rounded triangle, then using some small tools, I placed individual teeth in my monster’s mouth. Delight® easily sticks to it’s self with a little bit of water, so I kept the mouth and the teeth moist while I worked.


Once the mouth was dry I painted the inside with metallic red and the outside with metallic peridot. Delight® is a bright white clay, so I didn’t have to fuss with painting those tiny, little teeth. I also gave my monster’s toenails a coat of the metallic peridot while I was at it. While that was drying, I began working on the next part of the project. I took an old, ratty, Halloween wig and cut a section of hair off the back off of the wig. I sprayed the hair with homemade, red spray ink then separated the clump of hair into smaller sections. Next, I took a couple of the smaller sections and sprayed them with homemade, blue spray ink. It helps to work the paint into the hair a little bit before it dries. Once the hair was dry, I used tacky glue to attach the mouth and sprigs of hair all over the monster.


 I’m very happy with the way my monster turned out and I feel like bringing that negative aspect of my weight loss journey to light will help give me a little more control over my cravings and unhealthy eating in the future.

If you would like support on your weight loss journey, feel free to join my Art of Healthy Living Group on Facebook.

You can always find great ideas and projects on the Creative Paperclay® blog.

 http://www.youtube.com/watch?v=CX8c14hF788&feature=youtu.be