Friday, October 26, 2018

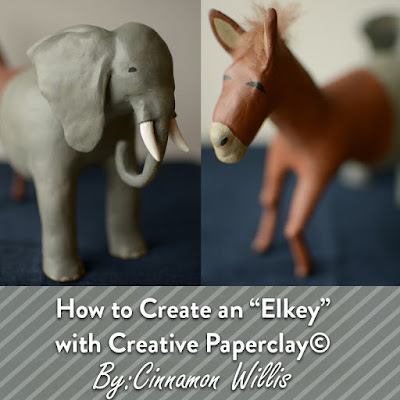
How to Create An "Elkey" Sculpture with Creative Paperclay


Hello everyone! Cinnamon here, I'm going to show you all how I created what I call "Elkey" with Creative Paperclay® (Scroll down to the bottom to see the piece in it's entirety!). With Election Day creeping up on us November 6th, I was inspired to create this donkey/elephant hybrid as a reminder for us to mark our calendars and get ready to go out and be heard! Below are the steps that I took to create this creature!

Here is what you will need:
  • Steel wire, 18 gauge and 22 gauge 
  • Pliers 
  • Creative Paperclay® 
  • Newspaper 
  • Masking tape 
  • Sand paper 
  • Wool 
  • Acrylic paint 
  • Sealer, Varnish 
  • E600 Craft Glue 
  • Reference photos for elephants, donkeys and horses 


I first started this project out by manipulating the 18 gauge wire and turning it into a rough frame for the piece. I needed the wire to be sturdy enough to be able to support all the added weight of the elephant.


I began to bulk out the body with newspaper and masking tape, in addition to building up a neck for the donkey half of the creature.


After studying my reference photos, I created the head for the elephant half. I made sure to keep it lower to the shoulders of the piece for accuracy.


I didn't want to fuss too much with the positioning of the ears and tusk at this stage so I decided to work on them separately with wire connecting them in the middle and attach them later. This way it would be much easier for me to figure out where they looked best after the piece has all of it's meat on it's bones.


Once I was done with working out the shape for the ears, I put them aside and started adding clay on the body of the creature. I bulked up the legs for the elephant and tried to go light on the legs for the donkey.


I had to study both the photos for a donkey and a horse to make sure that I wasn't sculpting a horse. They are very similar but there are small characteristics that stand out such as the short stubby neck, shorter legs and large ears that donkeys have in comparison to horses.


At this stage where I'm satisfied with how the body looks for both animals, I begin to work out the  placement of the ears. For the elephant, I carved a little indent where the wire could rest for the ears and put some e6000 glue to secure them to the head and used masking tape to keep them in place. For the tusk, I had wire protruding from the top of them and just stuck them into some moist clay that I put on the sides of the elephant's trunk. I then covered the tusk with more clay and let it dry in place. For the donkey, I placed the ears in the same way that I did for the elephant. I concealed the wire by covering it with clay. After allowing the piece to fully dry, I began the process of smoothing out the clay with sanding paper.


After things were all smoothed out, I applied a few coats of paint to the piece until I was happy with the color. There is no reason why I painted the whole piece grey here, I was just playing with paint application.


With the donkey, I wanted to place a few tufts of hair on to the top of it's head. I used some wool here and Aleene's Tacky glue to attach the hair.


I sprayed this piece with a varnish at this stage and here is what it looks like. I wish I would have turned both neck so that they would be facing the camera :D


Thank you for stopping by, and I hope that you all enjoyed today's tutorial! You can find Creative Paperclay® at the following retailers Creative Paperclay® Online Store, Michael'sAmazon, Joann's

See more of my work at Melandolly.com and be sure to catch updates on my Instagram page


Thursday, October 25, 2018

Delight™ Air Dry Modeling Compound Pumpkin Garland


                                       HAPPY HALLOWEEN!!


This tutorial is a really easy one and perfect for kids to make for Halloween decorations.   

Supplies

Silicone pumpkin mold from Michaels
Delight™ Air Dry Modeling Compound
Acrylic paints
Ribbon
Beacon 3-1 craft glue
Paint brushes


Step one 

Roll balls of clay big enough to fill each pumpkin mold. Let dry for a couple of hours so they don't squish when you pop them out of the mold. 
After they are out of the mold let dry overnight.


Step 2

Carefully break off or cut the extra clay around the edge of the pumpkins to have a smooth edge.
Paint each pumpkin with acrylic paints and let dry.


Step 3

Cut the ribbon as long as you want. Glue each pumpkin to the ribbon and you have your pumpkin garland. You can make it as long as you want and even do this for Thanksgiving or Christmas. 


Delight™ Air Dry Modeling Compound
Creative Paperclay®       
https://www.paperclay.com
Hobby Lobby, Michaels, Joann, Amazon


Thanks for checking out the tutorial.


Monday, October 22, 2018

A Little Piece of Christmas


I don't know why Christmas came to mind for this post but it did. I made a little piece that can be used as a piece of decor during the Christmas Holidays.

Supplies Needed For This Project:

Cookie Cutter
Beads and Sequins
Small canvas
Small easel
White Gesso
Powder or Cornstarch
Paint Brushes
Glue


I started out by painting my canvas with gesso.


Then I used my Plaid Paints to paint a background for my Christmas tree.


I then conditioned my clay and rolled it out. After using a little baby powder on my cookie cutter, I cut out a Christmas tree. 


I used my glue and glued the Christmas tree to the background on the canvas and let it dry overnight.
That was just to make sure that the clay was dry.


I brushed on some Plaid Glitterific around the tree to mimic twinkling stars. The tree was painted with green Plaid Paint and I used the Scribbles Paint to mimic snow. I had some odds and ends of beads and sequins, so I used them for the ornaments and the star at the top of the tree. This picture doesn't do the tree real justice. It's just amazing how the stars sparkle in the sky and the ornaments are so bright. This Creative Paperclay Christmas tree will set nicely on a shelf or table during the Christmas Holidays and brighten up the room quite nicely. It is so easy to work with Creative Paperclay and also with the Plaid Glitterific and Paints. The Glitterific has the glitter built right into the paint so you don't have to worry about big messes made from spilled glitter. I really think that stuff was created by a genius. I hope you will go to the Creative Paperclay site and check out all of their products and also to the Plaid store where you will find a lot of different product. You can find inspiration on both websites. Please leave me a comment below, as I do read them and  appreciate you taking the time to leave me a comment.

Thank you for visiting!
Barbara

Wednesday, October 10, 2018

Easy Peasy Sugar Skull designs with Delight™ Air Dry Modeling Compound


Hello all and welcome to my Halloween/Day of the Dead design preparations.  In my role as art teacher to grades K-8 I look for easy "filler" projects that the students can create.  Enter Delight™ Air Dry Modeling Compound and a silicone mold! 

Browsing around my favorite craft store I found a skull silicone mold on sale (woohoo!).  Of course I picked it up to experiment with.  As soon as I got home I pulled out my Delight™ clay and went to work.  I pulled off a bit of the clay, squeezed it in my hand, and then rolled it into a ball.  The ball was pressed firmly into one of the skull cavities in the mold until I was pretty sure the clay filled the space.  Then I repeated the process until all of the cavities were filled.
 

I tried to press the clay out of the mold, but it left a huge dent in the skull.  Not the look I was going for, so I placed the mold into my freezer and let it sit for about 15 minutes.  BINGO!  The skulls popped out easily and without distortion.  I repeated the process with the rest of the package of Delight™ (NOTE:  I was able to create 16 skulls [each about 1/2" thick] from one package of clay.  If creating thinner skulls then of course more could be made).
(NOTE: If you are a patient soul, the clay can be left in the mold to dry.  As noted, I am not the most patient of souls when it comes to crafting 😉)

I placed all of the skulls onto a paper towel and set them aside to dry overnight.  In the morning I turned the skulls over to make sure they were dry all the way through. 
An optional drying technique: Place them on a drying rack, so air circulates and speeds the process. Plus, no need to turn the pieces over!

Once dry I went to work with Prismacolor® markers (NOTE: Sharpie® markers would also work for this part).  I Googled "sugar skull designs" and found quite a few ideas for decorations.  I went to work.  

I used the fine tip for the bulk of the coloring process.  The clay took the colors beautifully and didn't seem to "bleed".  Glitter could be added or crystals or paint...if you can imagine it, I am sure it can be done!  I have a few left that I may use nail polish to give dimensional details.


I hope you have enjoyed this quick and easy craft.  Completed skulls can be used in many ways: pins, magnets, table decorations, wreaths, or shadow boxes...they are even lightweight enough to be made into earrings!

Friday, October 5, 2018

October 2018 First Friday Fan Day


Need some inspiration for your next Creative Paperclay® project? Check out what folks are making with Creative Paperclay™.


/>
Quirky Halloween Decoration
Halloween Bottles
Severed Finger Pens
Candy Corns
Ghost Tea Light
Scary Halloween Tree

Heart Shaped Box

HELP US FIND YOU!!
  1. Use the hashtag #CreativePaperclay on all your social networks.
  2. When using Facebook, be sure the your posts and images using the #Creative Paperclay hashtag are set to public, otherwise we won't be able to find you.
  3. Share your projects on the Creative PaperClay® Facebook page.
I'm always trolling the web, looking for great Creative Paperclay® projects. If you find something, post it on our Facebook page.

GOT QUESTIONS???

Find the answers to your paperclay questions. See what other folks are creating. Stop by our Facebook group and say, "Hi!" Creative Paperclay Q&A
Carole

Monday, October 1, 2018

A Scary Pumpkin!

 Hello everyone! I have a Halloween blog post for you today, a scary pumpkin!


How cute is he? Does he look scary enough? This is a great tutorial for everyone. The supply list is below and a video for you to follow along. Have fun making him!

Supplies Needed

  •  styrofoam ball
  • foil
  • Creative Paperclay®
  • glue gun and stick
  • acrylic paint
  • glaze
  • sculpting tools
  • water
  • white glue
  • paintbrushes
Follow along in the video below:


You can share your creations with us on our Facebook page. We would love to see them! For more inspiration have a look around the blog. There are tutorials for many levels using Creative Paperclay®. You can also visit my blog www.papermachepatch.com.