Tuesday, November 29, 2011

Christmas crafting with Creative Paperclay®!!

Hello everyone! I know it's been a little while since my last post but I have a husband who has had back surgery and for the past three weeks I've been the nurse and gopher around here. I finally made the time to work with my Creative Paperclay® though. Yay! My thoughts as I'm sure many others has turned to the Christmas Season. I saw a picture a week or so ago of a Santa that just really appealed to me, so I thought I would try to make my own version of that jolly old Elf! I started out with Creative Paperclay®, some styrofoam (a cone and a ball) and a piece of dowel. Something I didn't show in the original picture is some aluminum foil which I used for the base of the hat.

I took many pictures but had a hard time saving them and uploading them, this go round. But essentially what I did was attach the ball to the cone using the piece of dowel and some glue. I then rolled out my clay and molded it around the cone and then the ball. This was the base to which I added the facial features. I molded a hat out of aluminum foil and glued it to the head and covered it with clay. After I added all the little details it looked like this:
I do need to add that I used glue under each piece of clay that I adhered to something beside itself. He's already looking cute isn't he? After I got him to this point and he had dried, all he required was painting and sealing. Voila', now here's a super cute Santa Claus!


I would love to hear what you think of my Santa!! I also welcome any questions that you might have.

Sunday, November 27, 2011

Creative Paperclay Verdi Angel Ornament

Do you like making your own Christmas ornaments? Here's one that I made using Creative Paperclay® modeling material. I had a pair of antique cherubs that I love, and thought they would be perfect as my model.

I made a mold of my angel using Amazing Mold Putty. Through trial and error, I figured out that my original angel had too many undercuts, and to make a cast of the full original just didn't work out how I had planned. But, my angel head, was perfect. So I just added the modeling material to that portion of the mold - making sure to press it firmly into all the details. I let it dry completely and then removed it.


I painted an undercoat of Creative Inspirations Paint in Emerald all over the cherub and let this dry.

Next, I rubbed Viva Decor Inka Gold (which is kind of waxy) all over the angel. Only little bits of the green base showed after I did this - and really helped to accentuate the fine details. I cut some wings using a Tim Holtz die and glued them to the back of the ornament.

I added a loop and bow to hang the finished piece, and now it's ready for my tree (although I'm not ready for my tree!)

Thanks for looking!

Friday, November 25, 2011

A Thankful Weekend

Happy Thanksgiving weekend!  I hope everyone is having a blessed weekend with family and friends.  I'm so excited to share my first project with you for our amazing design team. 

This is a little frame I created that I took as a hostess gift for my mother for Thanksgiving dinner.  The shining star of this project is the acorns and yeap they were created with Paperclay®. 


 They actually were so easy to create.  I used a muffin tin I had and just pressed Paperclay® into the mold.  I let it set up overnight and the released it from the mold.  I left the acorns to dry a few day then spray painted them brown.  Once the paint was dried I rub with a bit of Inka Gold rub to highlight and they were ready to adhere to my frame. 


I look forward to see you next month...and until then keep creating.


Hugs,

Wednesday, November 23, 2011

It Would Take a Man 600 Years...

By Amanda Marks

If you did not get the quote you have never seen the movie Shawshank Redemption with Tim Robbins and Morgan Freeman (highly recommended if you have not seen it).  Christmas is just around the corner and I have been working frantically on Christmas gifts for friends and family which leads me to this design team project.  I can not guarantee that there won't be Shawshank quotes throughout this posts.

What do you get for guy friend who has everything?  My husband said it would be cool if you could replicate something from a movie.  The wheels instantly started turning because I have already made him the TIME Man of the Year Mirror from The Big Lebowski.  My husband started to quote Shawshank, which is not uncommon in my house and I knew I had to make the "Bible" with the rock hammer cut out.  Don't worry I did not cut a Bible (my husband would not let me buy a bible to cut up).  So I had to go to plan B which was taking an old Thesaurus and cutting the shape of a rock hammer into the Thesaurus.  I had no idea that cutting the same shape into repeated pages would be this time consuming (I went through 6 Exacto Knife Blades).  It took me close to 3 hours to cut all of the pages I needed.  I will say disposing of my evidence was much easier than toting it out to the yard a handful at a time.

Since the rock hammer would not work without the altered "bible" the pictures of the "Faux" Bible are first.
Not mine but what I wanted mine to look like.
 The Thesaurus as you can see I spilled coffee on it when I was in college so it was well used.


 Three hours worth of work and a huge mess.

I distressed the book with sand paper and paint.  I added a little Tim Holtz Tea Dye Ink to the outside to really age the book cover.

I needed a rock hammer to go on the inside of the book and removable but not change the weight of the book.    What better way to show off the versatility of Creative Paperclay® Modeling Material than to make a rock hammer for my book (I am hoping the people at Creative Paperclay® are Shawshank fans).  The rock hammer was actually really easy took more time to dry than to create and paint.  I also forged the inside message Andy wrote to the Warden (I am actually quite proud of that) because honestly it would not work with out that message.
Once again not mine but my inspiration

Materials:
Styrofoam (I used flower Styrofoam)
Dowel Rod
Exacto Knife
Sharpie® Marker
Aluminum Foil
Creative Paperclay® Modeling Material
Fondant Roller
Sculpting Tool
End of an unsharpened pencil
Paint
1.  Cut foam in shape of a rock hammer.  If you use the template for the book keep in mind the foam should be at least 1/4" smaller than the template.

2.  Cut dowel to fit in book and also have about 1" inside the foam.  Push dowel inside the foam.

3.  Cover the foam and dowel with tinfoil.  This will help adhere the clay to the base without seperation.
4.  Roll out clay.  Cover the base with clay.  Refine add detail - to recreate the nails in the rock hammer take an unsharpened pencil end and push down, repeat on the other side trying to line up as closely as possible.  Allow to dry for 24 hours.


5.  Paint rock hammer to resemble the rock hammer in the movie. 


I guess really you do need one of these in order for it to work...


Monday, November 21, 2011

Creative Paperclay® Charms


I am really excited to be a part of this amazing Creative Paperclay® design team.  With the holidays approaching it is time for celebrations, parties and gift giving.  I thought I would share a few of my tricks while making holiday charms that could be used at your own party drink charms, given as a gift, decorate a gift bottle or gift.  Be sure to give yourself plenty of time to make these to allow for drying times. 


CUTTING CHARMS
To start gather supplies: See list at the end of this post. Note: Once you use items from the kitchen with clay the tools should be used exclusive for clay or other craft projects in the future!


Work on a flat surface, a glass surface seems to work the best. Tip: I place a transparency on the glass surface to allow easy moving.  Sorry you can't see the transparency, believe me it is there! Work with small amounts of Creative Paperclay®, first roll it into a smooth ball, then between the spacers roll out the clay.   For spacers I used 3 pieces of chip board taped together with Miracle Tape, making them about a 1/4 of an inch thick. The spacers help keep my clay a consistent thickness.  While working with Creative Paperclay® be sure to keep the unused portion of the clay sealed or covered in plastic so it doesn’t dry out!


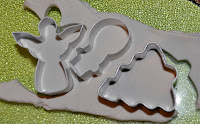
Cut your charms, press hard so that you feel the glass surface below the cutters.  Tip: Gently pull the extra clay from around the cutters while the cutter is still in the clay.
Repeat the cutting process.  
  
Add dimension to your charms with really small cutters.  For the Christmas tree add ornaments and star topper. 

Using an inexpensive paint brush add water to the surface of the charm and to the back of the piece being added to the charm.  This creates an area that the clay will adhere to itself.  You can use glue if you prefer. 

If it is difficult to remove the small pieces from your surface, use a tool to remove them.  Tip: Leave the cutter imbedded in the clay while lifting from the surface.  This helps the clay keep its form.
Using the end of the paint brush put a hole in each charm.

Set aside to dry, this could take from 24 to 48 hours depending on the humidity and temperature. Mine took 48 hours as we do not turn up the heat in our house.  I like to let it dry naturally.  If you're in a hurry, you may put your unpainted pieces in a 200 degree oven for 20 minutes or until dry.  Watch CLOSELY!

Halfway through the drying time turn your charms over.  
PREPARE CHARMS FOR PAINTING

Sand the rough edges gently with an emery board.  For a sealed surface paint charms with a matte medium or gesso and set aside to dry.
PAINTING

Paint your charms with acrylic paints.  Gold was used here. The  acrylic paints can be  any that you may have around.  Set aside to dry.

For a little sparkle, add glitter using Ice Stickles and a bit of red Stickles for a splash of color.  Seal the paint and glitter with 3D Crystal Lacquer set aside to dry overnight.

WIRE WRAP
Prepare the wire wrap for the charm using jewelry wire and beads for added bling. 


Check out the TIPS FOR CREATING WITH CREATIVE PAPERCLAY® 
by clicking HERE! 
Have fun working with Creative Paperclay®
The sky is the limit 
with what you can create using this amazing product.  


Visit my blog HERE 
to see what other projects I am up to!
Until next time.... Lyneen
Supplies:
Creative Paperclay®, 
Small cookie cutters, 
Cutting surface-Glass cutting board 
Transparencies
Roller 
Spacers
Thin tool to lift 
Paint brush
Water
Emery-board
Gesso or Matt medium
Acrylic Paints
Stickles - Ice and Red
Sealer - 3D Crystal Lacquer
Wire
Wire tools
Beads