I get a lot of my project ideas from new movies. Today's project is everyone's favorite forgetful fish... Dory!
If you read my All About Armatures post, you might remember I make it a priority to try to include recyclable objects into my armatures that would otherwise go into the recycling bin. This Dory project is no exception.
I start with a jar lid and some aluminum foil which I wrap with a thin layer of Paperclay. I allow this to harden overnight before roughing in my details.
Next, I add fresh Paperclay to the dried form. By working in wet layers over dry layers, I experience less cracking than I would if I worked the full sculpture in wet clay.
I continue refining the piece by building up details with wet clay over dry clay until I get a nearly smooth piece.
To smooth imperfections, I add a layer of Paperclay slurry.
Once the piece has dried completely, I sand the base piece and prepare the fins.
I attach the fins by building up wet Paperclay between the dry pieces. I'll sand these areas back once the piece is dry.
Sand, gesso, paint, and varnish, and you're done!
About Kerrie
I am a mixed media sculptor working primary in clay. Though clay is my passion, at the core, I'm simply a maker, a builder, a creator. Making things makes me happy. I make videos about making things and post them on my channel KerrieLee:DreamUp on YouTube and on my website KerrieLee.com.
Creative Paperclay® slurry allows me to paint much thicker.
What
is a slurry and how do I make it? Slurry has the consistency of
porridge. I make it by putting all the dried out little pieces of paper
clay in a sealed container with water. It reactivates the paper clay.
This mixture also allows me to stencil with it or add it to paint for a
thick paint look.
SUPPLIES
Creative Paperclay®
Palette knife
Acrylic paint.
I
start by mixing acrylic paint into the slurry. It actually takes a
small amount of paint to color it. Not only do you end up with a thick
paint but you save money by doing this.
I applied the colored slurry to my piece of art. The background was a dark grey which I allowed to show through in areas.
Next, I mixed a lighter version of the colored slurry. I applied it in broad strokes—the bravura
stroke, the grand gesture, is an expressive application of paint on
your surface. There is something freeing about doing large strokes
rather than small precise ones. Play with Art and Dream in Color. Darlene Olivia McElroy
As you can see in the photo, I'm working on a little house. Next month I'll be showing you how I converted an off-the-shelf paper maché house box into something a little more fun with Creative Paperclay® modeling material. For now, I thought I would share some helpful tips for sculpting projects:
Elevate your work to eye level or slightly below eye level
Use a turntable - don't really need anything fancy, an old box and a "lazy Susan" or turntable (an inexpensive one generally used to hold small items in the cupboard) will work just as well as a commercial sculpting stand in most cases. I've taped a piece of cardboard, which was covered with adhesive plastic wrap, to the top of the turntable to make the surface flat.
Have adequate lighting
Keep a container of water on hand to dip sculpting tools and fingers into while working with the clay
Keep a spritzer or small spray bottle of water and plastic bags or plastic wrap on hand. If you need to re-wet the clay while working on it,give it a light spritz. If you need to stop working for a bit and don't want the clay to dry out yet, spritz the sculpture with water and place the plastic bag gently over it.
Thanks for joining me here again! As always, play, experiment, and have fun!
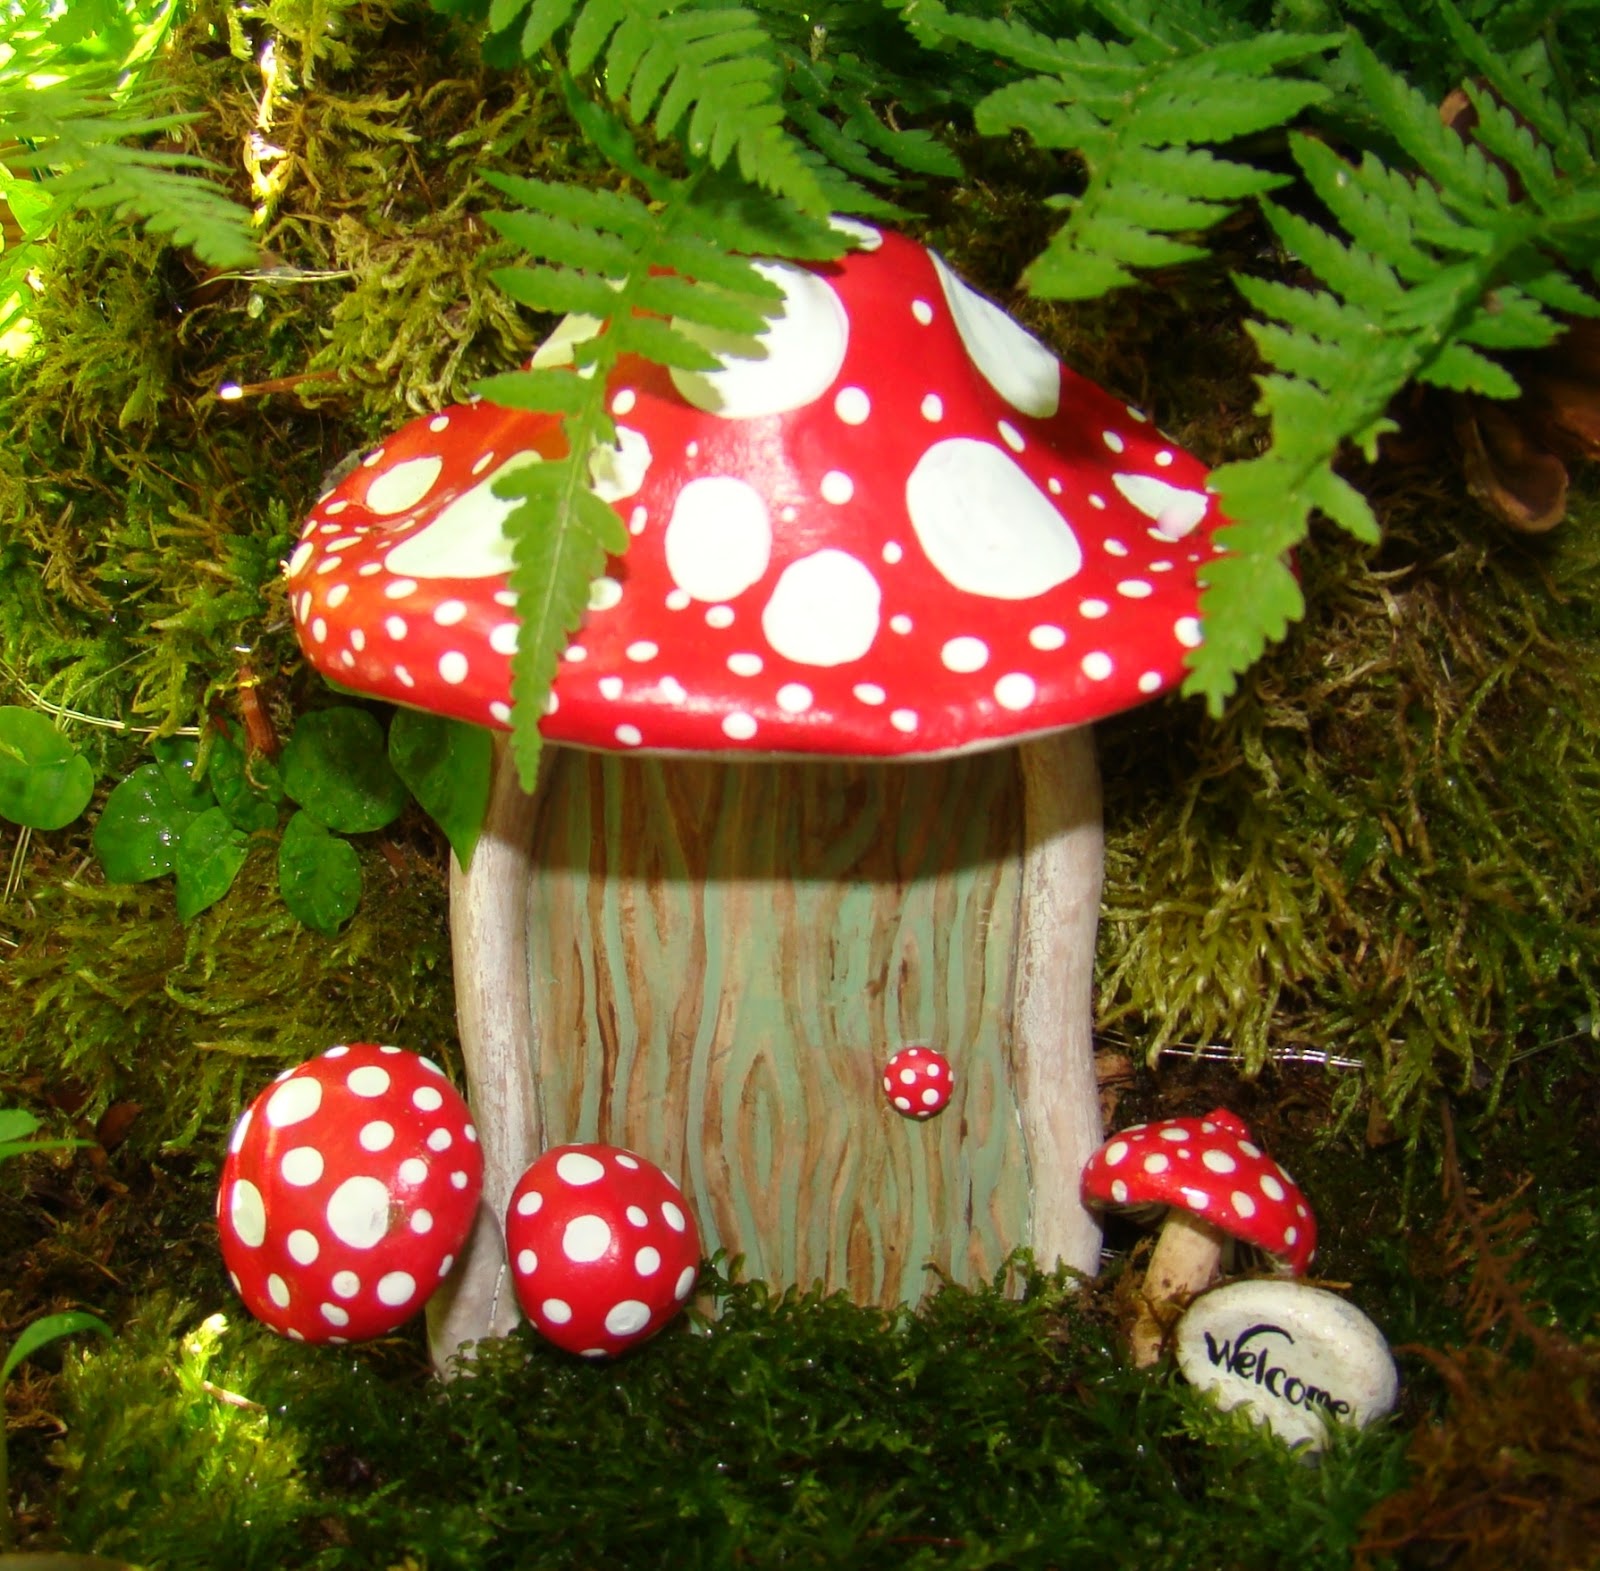
Pre-poke all your holes while the clay is still damp and then remove the objects before baking. After they have dried and cooled off you can re-reinsert pieces back into the clay with a touch of glue and you won't have to worry about anything cracking.
Reinforce heavy parts with a sturdy wire to make sure pieces don't fall over if they are not balanced like the top of the mushroom cap; which by the way, as thick as this piece was I had no cracking what so ever in it when it was dry.
If you want to have a curve to something you can use all sorts of items to set the curvature, just make sure to let the piece air dry and then remove said items before baking.
You might notice that all my pieces are on the baking tray, that's because I go ahead and move them over to the tray when I am adding the finishing touches so I have less of a chance damaging anything when they are ready to be baked.
For those of you who love to stamp - and happen to have stamps available to you, I have the perfect fun project for you to recreate, using basic stamping supplies and Creative Paperclay and Delight products!
**Tips** I have had a tip I always share - this time is PERFECT example as to why!!! If you have molds you like to use - grab some product, and make up a bunch of items ahead of time! That way, when you are working on a project - you don't have to wait for things to dry!
And - using the Delight product on your smaller items (such as the flowers and buttons) - helps so they do dry quickly if you are working on something at the moment!
Supply list - Various stamps Rolled out product (for the bases) Paint Bakers twine and ribbon 3D flowers Molded flowers and buttons
Directions: Step one: Flatten out the Creative Paperclay product so you can cut out what you need and stamp the images on the product. If you need directions for stamping on the product, check out the video I have made here!
Step two: After the images have dried fully, you will need to sand each of the pieces you are working on - to make each piece smooth.
Step three: After you have sanded down each of the pieces, start to paint each of them! I started with a white background on the squares.
Step four: For the square magnets - start to paint the blue for the clouds using a template! Let it dry, then using green paint, paint the grass as well! Set aside to let dry!
Step five: Paint the flower pot - after dried, make sure to add the bakers twine and a small bow.
Step six: After everything has dried - start to put together the flowers for the flower pot - adding flowers or buttons to the middle of the flowers! Set aside and let dry!
Step seven: Paint the basket, and allow to dry.
Step eight: After baskets are dried - add the flowers to them, with a bow on the handle.
Step nine: Make sure to add the magnet pieces to the backs of each of the items created!
I had a LOT of fun creating these magnets - and they have inspired me to create even more! I can't wait to get them done -and next up - a fun project made out of Creative Paperclay - flattened out product - an insert from Project Life and creativity! I can't wait to share with you what I am working on NOW!!! Thanks for stopping by,
These goddess dolls each start with just three balls of Creative Paperclay®.
Here are the three balls that I started with. The grids on my work table are 1/2", so you can get an idea of the size that I used. Of course, different size balls of clay will give you a variety of different sized dolls.
The smallest ball will be the head; the medium one the arms; and the largest one becomes the body and legs. Begin by rolling the ball for the arms into a long rope. Drape it over the top of the head.
Next, determine how long you want the arms to be. Remove any extra length, and form the tips into cones.
Determine arm length
Reshape hands
Next, form the body and legs by making this shape.
Bring the two ends together, forming the legs. Add a support pin (I used a short piece of a coffee stir) at the top of the body that will connect with the head.
Add the head and arms, smoothing the pieces together. Pose your goddess, and embellish as desired. Note: You may need to dab a bit of water or slip between the pieces to insure that they adhere to one another.
Add the head
Pose and embellish the doll
Let the doll dry thoroughly before painting. You can use any acrylic paint. I mixed Terri Sproul's Mixers—a mica powder—with the paint to achieve a metallic look.
When the paint was totally dry, I coated the goddesses with a two-part resin to completely seal them.
Be sure to check out my next post to see what I created with one of my goddesses.
Creative Paperclay is one of my favorite mediums for modelling figurative free-standing sculpture. Like many artists, I almost always use an armature to give my figures support. I've experimented with many different types of armatures during my clay journey, so I've put together this guide to lend some tips to getting started with armatures for figurative sculpting.
Armature Wire
When selecting a type of armature wire, it's important to consider the properties of the wire and type of sculpting material you're using. Creative Paperclay is an air dry waterbase clay. (While I am familiar with various processes used to accelerate the drying time of Paperclay, I am a staunch believer in allowing the clay to dry naturally when using any type of armature. Safety first!) Aluminum wire: My preferred choice for Paperclay sculptures. It's easy to bend and does not rust, making it an ideal choice for wet clay. Galvanized steel and craft wire: Readily available. While they are prone to rusting, they can still make usable armatures for waterbase clays if they're coated with a protective skin to prevent direct contact with the clay. Copper tubing, bamboo skewers, toothpicks, and chenille stems (pipe cleaners): While not "wire", I've had a lot of success with these thingsas armatures.
Bulking Up
With the armature wire "skeleton" built, I next focus my attention to the type of material I want to use to bulk up my sculpture. Creative Paperclay: Yes, you can build a solid sculpture using nothing more than Paperclay. To prevent cracking in a solid sculpture, you'll want to build your sculpture up in thin layers (no more than 1/4 - 1/2" thick), allowing each layer to dry completely before moving on to the next layer. Another way to use Paperclay to bulk up a sculpture is to create strips of Paperclay and allow them to dry completely. Once dry, use the strips as supports within your sculpture. Air: A hollow sculpture is very lightweight, uses very little material, and can be used as a container (think piggy bank!) This method is probably unsuitable for anything large or complex. Newspaper: Lightweight, readily available, and inexpensive, newspaper is a great bulking up material for Paperclay sculptures. But because it deteriorates when wet, you'll want to coat it with a protective skin to prevent direct contact with the clay. Plastic bags: Like newspaper, plastic bags are lightweight, readily available and inexpensive. But unlike newspaper, it won't deteriorate when wet. Aluminum foil: My preferred choice for Paperclay sculptures. Foil can be easily compressed and shaped, it is non-corrosive, and Paperclay sticks beautifully to all the little grooves and wrinkles. Foam (styrofoam, spray foam, upholstery foam): Another lightweight material, foam is very easy to shape as an armature. Paperclay can be tricky to add to different foams, so I usually add a layer of aluminum foil to the foam before adding Paperclay. Old plastic: Plastic containers, water bottles, plastic cutlery, plastic hangers, medicine bottles... etc. I make it a priority to try to reuse as much recyclable plastic as possible in my sculptures. It's a great way to bulk up my pieces for free while making me feel good about helping to protect our environment.
Protective Skin
The protective skin I keep mentioning is the layer between any material that deteriorates with water and the Paperclay itself. My favorite skins include: aluminum foil, aluminum tape, masking tape, and floral tape. Chenille stems (pipe cleaners) are fun to use sometimes because the wire is already coated, and the chenille already bulks up the wire a bit. Chenille stems are great armatures for chubby fingers. What is your favorite armature material? Do you use something I didn't mention here? Let me know in the comments! ---
About Kerrie
I am a mixed media sculptor working primary in clay. Though clay is my passion, at the core, I'm simply a maker, a builder, a creator. Making things makes me happy. I make videos about making things and post them on my channel KerrieLee:DreamUp on YouTube and on my website KerrieLee.com.
As
a narrative artist I find that I am always adjusting the stories around
me. This clay mask has been hanging around the studio for years. It has
been cast, been in videos and I felt it was time for a facelift.
Because it was clay, I knew it would take Creative Paperclay® very well.
SUPPLIES
Object
Creative Paperclay®
Acrylic Paint
I started by slightly dampening the surface with water then building up the butterfly shapes with the clay.
Next
I added texture with a variety of tools from a wood skewer, ceramic
mark making tools and something I do not know the name of. Maybe for
cooking (not my specialty). Finished by smoothing the edges with a
little water.
Next I applied a wet brown paint, I immediately blotted it for a stained effect. This was just my base color.
Since
I wanted it to look like it was part of the original mask I added a
wash of titan buff and grey paint. While wet I salted the paint to give
it the feel of the mask.
Here's something to do with the kids on a hot summer day - make a marble run! It's fun to make, and fun to use, very relaxing, and a good "tilt table" for fidgeters. You can use my pattern or create your own, make a maze, or try writing out a name.
For this project you will need:
Creative Paperclay® modeling material
foam core, wood, or cardboard in the size and shape you want (my pattern calls for a 16" x 16" square)
a marble
pattern
pencils
tracing paper for transferring pattern
stiff round brush; a stencil brush will work well
rolling pin
plastic wrap
paint
If you are making your own pattern, you will also need
dial calipers - OR circle gauge - OR toothpicks, tape, and a ruler
paper large enough to draw out your pattern
If you are using my pattern, skip ahead to the pattern transfer picture.
If you are going to make your own pattern, first measure the size of your marble. Use either the gauge, calipers, or toothpicks taped to a ruler lifted to the midway point of the marble as shown,
Write down that measurement, then tape two sharpened pencils to a scrap of cardboard so that they match that distance. I'm using two different colored pencils in the photo so you can more clearly see how drawing the pattern works out.
Draw your pattern either freehand or over a sketch, using these two pencils as a guide to indicate how much room the marble will need. Try to hold them straight up and down while drawing, to keep the lines the same distance apart.
This would be the first step for a maze - beginning, squiggly path, and end.
Add more lines, without crossing over any of the ones previously drawn
Once you are happy with your pattern, cut a piece of cardboard, foamcore or wood to the desired size.
Cover board with a thin layer of clay on both sides and on the edge; set aside to dry. When the clay is dry, sand if necessary and then transfer the pattern you've chosen.
Roll clay out to about 1/8" thickness and cut into 1/2" wide strips. If you have a strip of wood or cardboard in that thickness, you can use that as a guide.
Leave the strips in place and only work with one at a time, keeping the remainder under wraps so it will stay moist until needed.
Brush water a few inches along one of the pattern lines, then brush some water onto the edge of one strip of clay. Apply that edge of the clay strip to the moistened pattern line by holding it in place then pushing down with your thumb and forefinger as shown. Repeat this process a little bit at a time along your pattern line until you have about 6" applied then, using a wet brush, blend both sides of the clay onto the board.
Use your marble as a guide to make sure you have applied the clay walls properly. Smooth clay with wet finger or sculpting tool to make a smooth path for the marble.
When you've finished adding clay to your pattern, allow the marble run to dry completely, then test it out, sand or add clay as necessary until the marble rolls smoothly, then paint as desired.
Thanks for joining me here again! As always, play, experiment, and have fun!


