Thursday, December 29, 2011

A New Project with Creative Paperclay® and Viva Las Vegas Stamps!


I hope that everyone had a Very Merry Christmas and got to enjoy special time with loved ones. I had a wonderful Christmas and still have one of our sons and his wife and one of the children still visiting with us. I did however take a little time out to make a couple of pieces today using Creative Paperclay® and Viva Las Vegas Stamps. I lost a couple of pictures along the way but I think you’ll get the idea. To start with I used:

AMP MOLD PUTTY VLVS PAPERCLAY 005

Yep, Creative Paperclay® and Viva Las Vegas Stamps. After kneading the clay a bit to condition it, I rolled it out pretty thin(1/4 inch) with a fondant roller that I use. I then dusted my stamp with powder and placed it over the clay. I used my roller to roll the stamp into the clay and then lifted it off of the clay. Using an X acto knife I trimmed the excess clay from around the stamped image and set the clay aside to dry.

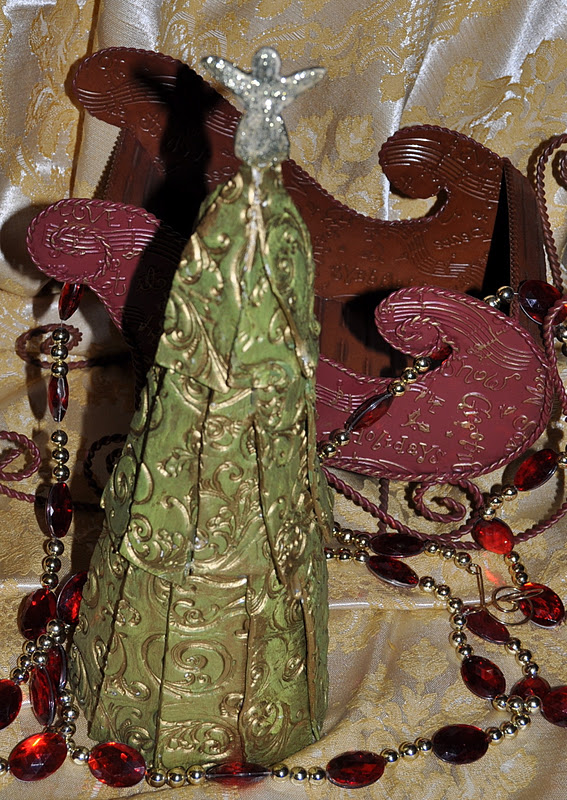
Once the clay was dry I used acrylic paints and glitter to color and enhance it and here’s what I ended up with:

AMP MOLD PUTTY VLVS PAPERCLAY 009

AMP MOLD PUTTY VLVS PAPERCLAY 014

Didn’t that turn out just beautiful? Trust me, the pictures don’t do it justice. While I was working on this combo of Creative Paperclay® and Viva Las Vegas Stamps I also used the same process to create another piece:

AMP MOLD PUTTY VLVS PAPERCLAY 015

AMP MOLD PUTTY VLVS PAPERCLAY 017

Isn’t this second stamp unusual? I love it! I’m going to use this in a mixed media piece. Please leave me a comment and let me know how you like these projects. Isn’t it great how you can use stamps to create something totally new with the paperclay? Stay tuned in for an upcoming blog hop that’s going to be coming up!

Hugs to you, Barbara

Tuesday, December 27, 2011

Delightful Eggs with Viva Las Vegastamps!


Link
This month, Creative Paperclay® Modeling Material has had the chance to play with Viva Las Vegastamps! When I was picking out my stamps, I had a mixed media piece in mind, with a chicken theme. I have to admit, it just didn't turn out how I planned, so I made a fun card with my own egg embellishments.

I used the Children with Cat and Chickens stamp. I love how it looks like a vintage photo, but it really is a stamp! To make my eggs, I rolled out some Delight™ Air Dry Modeling Compound into an egg shape, let it dry a little bit, and then, sliced the back off so it would lie flat on my card.
I colored the eggs with Distress Stains, and after that was dry, covered them with Sakura Crystal Lacquer. These eggs could be really fun for your spring and Easter projects too! The Delight™ really is a delight to work with - it's very light weight, snow white and clean to mold. I love working with it!

I think it's cool when one idea doesn't work out the way that you think it will, but it leads you to something new on your creative journey.

Sunday, December 25, 2011

Christmas Wishes


Merry Christmas Everyone.  Today I couldn't imagine doing anything but a Christmas tag...so with the help of my Paperclay® and Viva Las Vegas Stamps I was able to create this three dimensional tag.  The Basket is molded from Paperclay® and then layered over a roll of paper to bow it out at the lip.


The adorable little gnome nestled down in the arrangement is from Viva Las Vegas Stamps...isn't he just perfect for the holidays?

Have a wonderful holiday and I hope you are all able to enjoy it with friends and family.

Hugs

Friday, December 23, 2011

Christmas Collage Using VLVS

By Amanda Marks


Materials:
Frame
Brown Spray Paint (Rustoleum)
Creative Paperclay® Modeling Material
Cereal Box
Viva Las Vegas Christmas Collage Stamp #5157
Fabric Ribbon
Red Awning Red Glitter Robin's Nest Paper
Acetate
Gold Metallic Mica Powder
Paint
Brushes
Gold String
Snowflake Embellishment
Irridscent Gel Medium
Snowflake Stencil


1.  Roll out and create petals for the poinsettia (7 for the base - 5 for the 2 layer - 2 for the top).  Put the petals together one layer at a time.  Add little balls of clay for the center.  Allow to dry for 24 hours.

 2.  Spray paint frame Brown.  Use spray mount to adhere paper to the glossy side of the cereal box.

 3.  Add ribbon with Tacky Glue® to the frame.  Cut Acetate to fit inside the frame.


4.  Roll out more Creative Paperclay® and stamp into the clay.  Allow to dry for 24 hours.

  5.  Add gold Mica Powder while the clay is still wet.  It can also be added after the piece is dry.  Add Paint.

 6.  Use stencil and stamp the snowflakes on the background paper.

 7.  Add ribbon and music notes with the mica powder.  Using a gold string I attached the stamped piece to the background.  Using Tacky Glue®  everything else was mounted together.


Wednesday, December 21, 2011

Making Memories at Christmas

By Amanda Marks (well her children)

I make ornaments every year and this year I wanted to get my children involved in the act this year.  My daughter created homemade ornaments for each of her teachers and a special one for daddy.

I wanted to show that little kids love clay as much as the big kids and I hope you take the time to create Family Traditions this Holiday Season.

Materials:
Delight™ Modeling Clay
Cookie cutters
Scissors
Rolling Pins
Paint
Brushes
Googly Eyes

 Concentration is the key to making Gingerbread.

 The Booga watching his big sister making an ornament.

 Booga using his skills to make a special ornament.

 Santa Hand for Daddy and Booga's Wreath

 Painting the ornaments - Booga did not want to paint his ornament so his is just white on the tree.

Santa Ornament completed!

Creative Paperclay® Christmas Tree with Viva Las Vegastamps!

You may have noticed our team was challenged this month to use Creative Paperclay® with Viva Las Vegastamps!  I love rubber stamping so this was a fun challenge for me. 
Here is the Christmas tree I created using both Creative Paperclay® and Viva Las Vegastamps! The stamps I used are from the Swirl Plate #1333!
I gathered my supplies (see list below).  The base of my tree is a Styrofoam cone. To plan the sizes I needed I precut paper into three layers for the size of cone I was using. Using straight pins to help, I pinned each player to the cone. Make sure to have a little extra length on the top layer to create the point at the top.


I roll my clay out on transparencies, this way I can leave them on the sheet and move them around easily. The Creative Paperclay® was rolled between spacers, about 1/8th of an inch thick and cut to a 4-1/2 inch strip for the bottom of the tree (depends on the layer working on). Then carefully stamped with swirls over and over until the piece of clay is filled with swirls. Then cut the clay into strips.  There are: eleven 4-1/2 x 1-1/2, nine 4 x 1 and seven 3 x 1, finally on angel. Set aside the clay to dry, usually 24 hours, maybe more depending on humidity.  
While waiting for the clay to dry give the Styrofoam cone a quick coat of paint.  Once all the clay pieces have dried paint each one green. Set aside to dry.
After the first coat of paint is dry cover with gold paint be sure to get it in all the crevasses, then wipe the excess with a rag or paper towel. Set aside to dry.
Now liberally apply tacky glue to the back of each strip of Creative Paperclay® attach to the Styrofoam cone, overlapping the strips and  holding in place with straight pins.  When you get to the top layer you will need to trim the top so the strips are tapered.  Use a rubber band or twist tie to hold the top together at a point. Add the angel, cover with gold Stickles. Allow to dry overnight or longer.
Touch up an edges that may be exposed with gold paint. Now you are ready to add your tree to your holiday decor.

Supplies:
Styrofoam cone - 10 inch
Roller
Transparencies
Craft Paint - green and gold
Paint Brush
Tacky Glue
Ruler
Paper to create demo
Angel Cookie cutter
Straight pins
Stickles for Angel - Gold


Visit me at Dreaming of Castles!

Here is 
wishing you and yours a 
VERY MERRY CHRISTMAS!
Lyneen

Monday, December 19, 2011

Ornament Card

Hi everybody, It's Edie,
I have been looking forward to December all year! Not only is it Christmas/Yule time, but this December meant my husband got to come HOME!!!!!!

He is in the Navy and has been stationed in Bahrain (unaccompanied) for the past two years. We have been separated for much of that time, but he came home for good on December 2, and I am THRILLED!!!!

I normally handle deployments very well and I have learned to cope with him being gone most of the time. This time, however, I have felt like my life has been split in half and like I have been on hold waiting for his return. I'm not sure if it is because this separation was so long or because of the unexpected, unhappy way I had to leave Bahrain. I felt like my life was ripped in half and I have been on hold waiting for the other half to catch up.

Now that he is home, at least for the time being, I FINALLY feel whole and like my house is a home again. He really does complete me, LOL :D

All of these thoughts about home and the upcoming holidays inspired me to create a holiday card and ornament that can be given as a gift or displayed in your own home. It would be perfect as a Holiday card for someone special on your mailing list but it would also be great to keep on hand for unexpected guests or for those people you want to give a little something to, but not spend alot.

For this project I used Creative Paperclay® Modeling Material to create the ornament and I incorporated Viva Las Vegas Stamps on the card. I used the brick wall stamp for the chimney's as well as the large pocket chimney on the inside of the card.


To make the ornament I rolled out my Creative Paperclay® and cut the shapes out using a template I cut from basic printer paper. I poked holes at each joint, painted all of the parts and used jump rings to connect all of the pieces. It is important to use THREE jump rings at each joint, otherwise your pieces will not hang straight. You can view the full video tutorial below.


The 'fur' trim on the coat, hat, boots and the beard was made using a cotton ball and don't forget to add plenty of GLITTER :D

For the card I painted the background and the houses using Neocolor II watercolor crayons and the Viva Las Vegas brickwall stamp and archival ink for the chimneys.


Once the card is complete, tuck your ornament into to pocket and viola'! It's ready to go. Don't forget to poke a hole in the top of the ornament so it can be hung on the tree :D


I loved this ornament so much, I decided to keep it and hang it on my tree, LOL, but I DID make some to give as gifts as well :D

I hope you enjoy this project as much as I did and I would love to see your creations.

I hope you have a safe and happy holiday season and a wonderful new year.

From my home to yours, Happy Holidays!!!

For some reason the video is playing off center here on the blog. It does play correctly on Youtube, so click the video link to see the full screen :D