Sunday, November 30, 2014

Do You Want To Build A Snowman....?

Hi everyone!

It's Donna from Memes Art Place.  Thanks for joining me today!

Do you want to build a snowman?


That's is what I am sharing with you today!

Let's get started.............

 Start with some Styrofoam shapes to make your snowman. You could also use tin foil.


I use a dowel to stick into the Styrofoam and into the wood. So drill a hole into your base and stick the dowel into the base adding some glue to the hole.


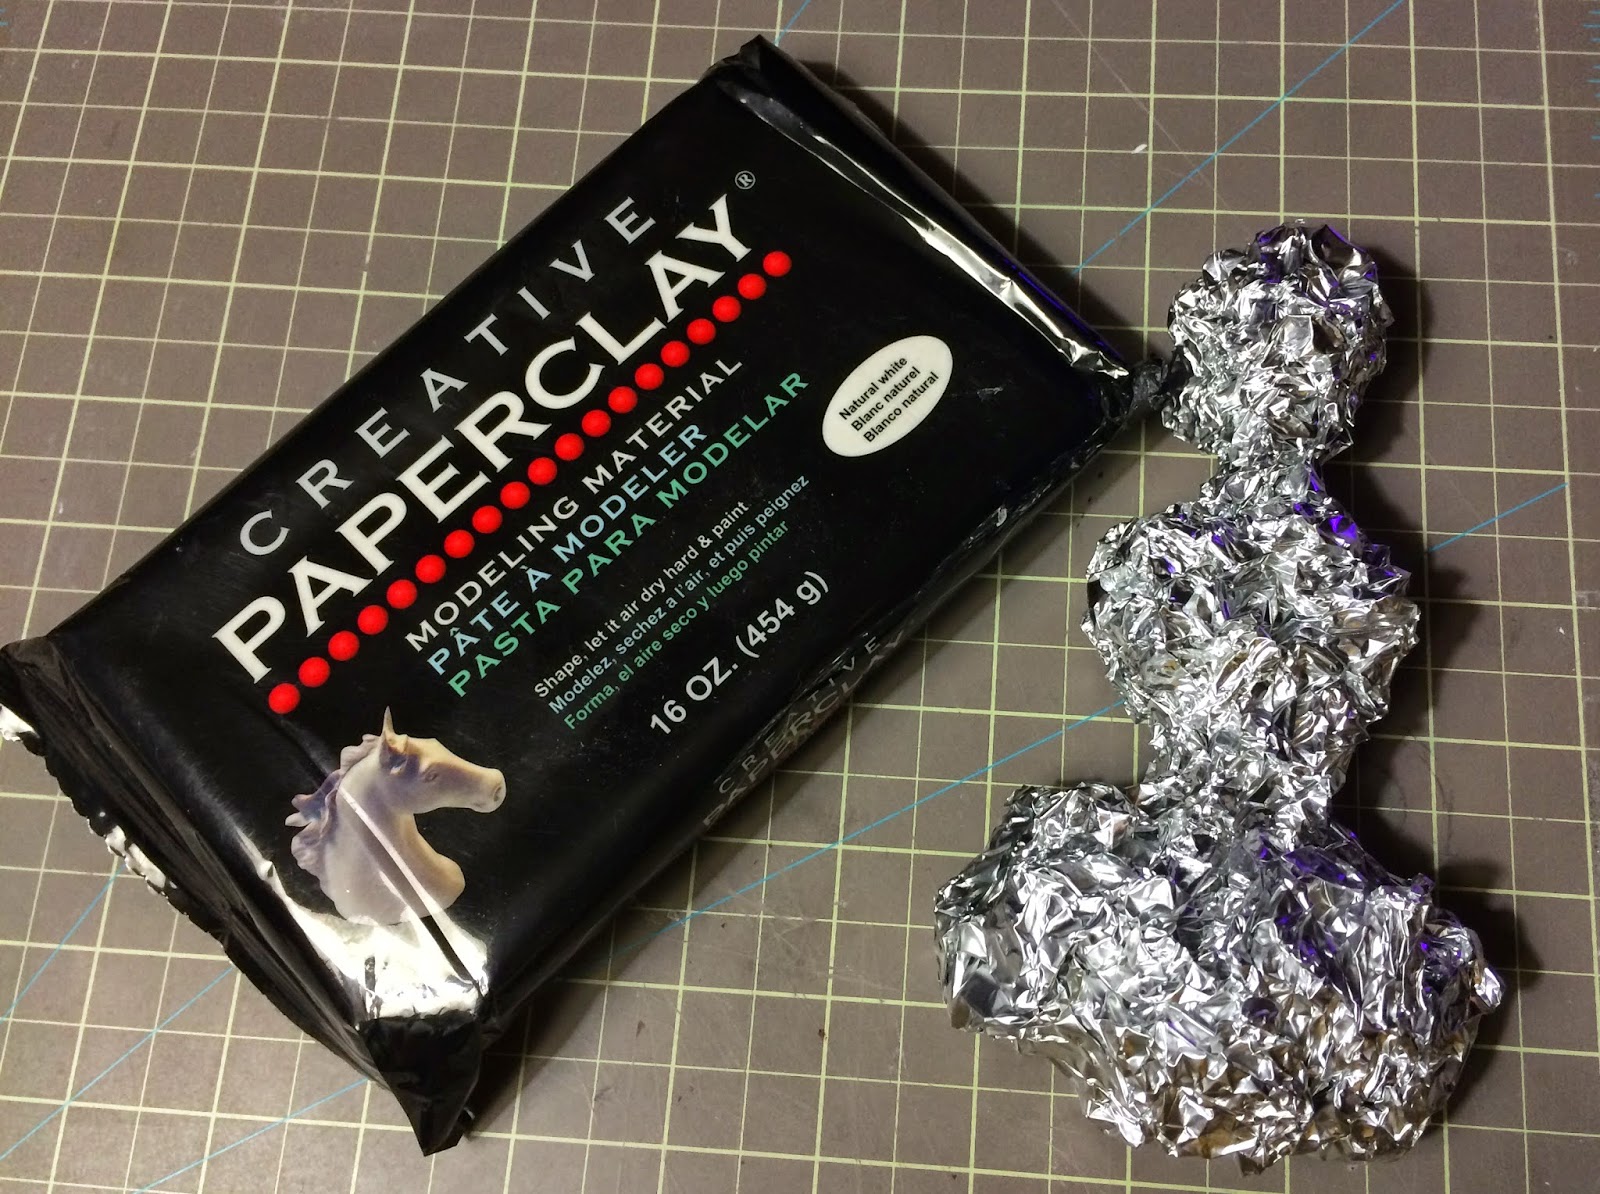
Roll out your Creative Paperclay® and wrap around your Styrofoam.
Smooth out your Creative Paperclay® with plenty of water.


Form your nose and add a toothpick and insert onto the face of the snowman.
 I use these bendy strips for the arms.
 Form you arms and attach to the snowman.
 Let dry. I let this dry for a couple days.
 Then sand.
I put a coat of Gesso on before I start to paint. Let dry and then paint your snowman as you like.
I use acrylic paints and a vanish when paints are dry.

I decided the snowman needed a wool scarf. I look for old wool sweaters at thrift stores and bring them home and wash them in hot water and dry them. I can then cut them without them unraveling.

 I think he turned out pretty cute!
 He would make a GREAT gift...or would be great for your holiday display!

He was easy to make and you will have fun playing with the Creative Paperclay®!

Thanks for joining me today and I hope you will be back soon to see what the rest of the team has for you!


Friday, November 28, 2014

Christmas Gift Tags

Thanksgiving is a memory. Now it's on to Christmas, far and away Chloe's favorite holiday. She loves being part of the gift scene—from shopping to wrapping to giving. So this year we decided to make gift tags just for Chloe to use.

I selected Delight™ because it is so light weight and its pure white color. We rolled out a ball of Delight™ very thin—less than 1/16 inch—and cut rounds. You could use any shape. Cookie cutters are great for this step. However, I don't have any Christmas themed cookie cutters, so I cut the bottom of a water bottle. Worked great!! The plastic is thin so cuts cleanly through the Delight™.


After the blank rounds were dry Chloe and I began decorating them. There are so many ways to decorate these!! Here are our favorites.

For this tag we cut the word and holly leaf motif out of vinyl. Chloe selected the design; I cut the vinyl. The edge was heat embossed with silver embossing powder. Chloe embossed; I operated the heat gun.

The star on this tag was dry embossed and the gold edging was added with a gold Krylon leafing pen.

The third tag was stamped using dye ink and a rubber stamp. Chloe did the stamping; I inked the edge. We found that dye ink delivers a crisper design on the Delight™ than pigment inks, which tend to blur. The edge was inked by rolling the tag directly on the surface of the stamp pad.

Our last tag was made by pressing the Delight™ into a clay mold. The design features and edges were colored with water-based markers. Chloe did the berries; I did the holly leaves.


We punched the ribbon holes with a Crop-a-dile after the rounds were dry, but you could also pierce the blanks before drying. We're planning to use the reverse side of the tag to write the to/from information. It's so easy to write on these with markers!!

So, here's our finished collection. Hope Chloe puts one of these on my Christmas gift. 


Design Note: I love the whimsical, curvy way these tags dried, but if you prefer flat tags, you can dry them under a weight. The drying time will be longer, but the tags will be flatter :)
Carole

Chloe

Table Cell Table Cell

Thursday, November 27, 2014

Creating Sample Tests for Big Paintings

Before I go blindly into creating a big painting, I will do sample tests to see if what I am thinking about will actually look good. It saves a lot of time and may take you off in another direction. I keep the samples around because they may work perfectly in a project down the road or as a collage element in another painting.

Supplies
Creaive PaperClay®
Gesso
Matte Medium
Raw Umber

On a lightly dampened masonite panel, I laid out coils of paperclay in lines and brayered them down flat.
I then laid coils in the opposite direction and brayered them flat creating a cross hatched pattern. You could leave the coils as lines or make circular shapes. The beauty is that you are the master of your universe.

I then added some (patterned) lines to the background for interest plus I wanted these to show up when I stained the piece later.

When it was dry I then coated it with white gesso.

After the gesso had dried it was coated with a layer of matte medium. This gives me more control with the staining.

When the medium has dried, I applied raw umber acrylic paint and immediate wiped off so it was only left in the recesses.

My next step will be to add resin into the holes as a test but that is for another day.

There is so much joy in experimenting — Darlene Olivia McElroy

Monday, November 24, 2014

Creative Paperclay Material® Armature wire contruction helping guide


Hi and welcome back to Creative Paperclay Material® blog page.

It is a beautiful winter day. It is kind of cold and stormy but watching the snow falling sure reminds you how strong and beautiful nature can be. Now on this cold winter day  I will show you a couple of tips to help you choose the right kind of  wire to construct the armature for your one of a kind Creative Paperclay Material® sculpting creation.  Check the detailed options listed below.
Have in mind that all metals will eventually oxidize (some just a little slower than others and some just not so visibly). This article will include some helpful information to help you choose the best one for you to use.

The wires choices are listed from softer to harder strength.

Strongest is the Steel Wire Option


Be careful with steel and iron. These can be the worst as the oxide for these is red. It is very important you choose a Stainless Steel. Stainless Steel is resistant to rust and corrosion because it is impregnated with nickel, chromium, niobium, molybdenum, or titanium. It is the best suitable for larger pieces because it is a lot harder to bend and it is a lot stronger. Steel also comes in many gauges and can be found at your local Hardware store wire section or at your favorite Craft Store in the floral or jewelry section.  Make sure it is water resistant because there is nothing worse than after you spend so much time sculpting you come back to a big rust stain on your final painted piece.


Medium Strength is Copper Wire Option


You can easily find Copper wire right at your favorite Crafts Store (check the jewelry making section). It can be also be found at your local Hardware Store in the electric wiring section . Now  they have many colors and gauges to choose from, and it will be the project that will usually determine the size you will need.  Not to worry:  I will include a very useful chart to help you choose the best wire at the end of this post.


Copper is very hardy and  rust free. It is very important that the wire is rust resistant because working with paperclay requires water and the clay is rich and moist. That can get the wire to rust and those stains will surface and damage your final sculpture. Keep in mind that copper metal is  a lot softer than the stainless steel, so for that reason I recommend copper wire for smaller armature figurines. Because copper is easy to bend, this will help you to create intricate patterns and bend it into shape.
I love this metal for sculpting small figures.


Softer Aluminum Option


Now one of my personal favorites is Aluminum.  It is my favorite because this metal is both malleable and sturdy. In fact aluminum is the 2nd most  malleable metal.  Available in wire or paper, this metal is one of the most useful in armature construction.. It is water resistant and very easy to bend. It also comes in different gauges and can be found at your favorite Craft Store in the floral or jewelry-making sections. This wire  can be also be found at your local Dollar Tree. Remember this wire is soft so if you need a stronger hold (for example a doll leg or arm) it is not recommended, But it is good for filler! Aluminum foil paper is well recommended for hollow pieces like 3D Wall Art and many other pieces that are required to be a lighter weight.

Having this information on hand, do feel free to have fun experimenting with the various qualities of all these metals. Keep in mind their unique properties before using them in your future crafting projects .

Now I will leave you with a very useful chart so you can get the right size for your next project.


Have a blessed day and remember


Stay tuned for more tips and tutorials here at your Creative Paperclay® Material blog.

Sincerely,
Gloriann Irizarry


Friday, November 21, 2014

Winter Skeleton Snowball Snowman by Rachel Whetzel

It's been CHILLY out in the world, Creatives!! Rachel Whetzel here! All the snow talk on line is making me feel very Wintery, so today, I'm sharing a little twist on a classic Winter icon, using Creative PaperClay® and a LOT of glitter.
I have made a few Skeletons using Creative Paperclay®, but never (I'm not sure WHY...?) any SNOWMEN... so I got started the other day, with a vague snowman/snowball idea in my head. As I worked, I changed directions a little bit, and ended up creating a Skull snowball. I may be a bit partial, but I really REALLY like how she turned out!


WHAT YOU'LL NEED to make your own Snowball Skeleton:
  • Scrap Paper and Tape (I used some old homework from the boys, and some Washi that isn't my favorite) 
  • Creative Paperclay®
  • Paints and Brushes I use Folk Art acrylic craft paints and Krylon Spray paints
  • Pastels 
  • A 3X3 inch (or so) piece of patterned paper. 
  • Yarn or metal pipe cleaners
  • Glue. I used E600 and Crafter's Pick the Ultimate
  • Glitter. I used an old jar of clear glitter I purchased at the thrift store, but you can get it at any crafting or school supply store.
  • Fake Holly or other collar decorations
To start, I create a core for my snowball. Using a core helps me use less clay, and also speeds up dry time, because innards don't need to dry! To create my core, I used a couple pages of old homework from my boys, and rolled them up into a ball. Then, to keep the shape, I wrapped the papers up in some of my less favorite Washi tape. Not because it needs to be Washi, but because that's what was close, and I was lazy. Any tape will do. Masking is nice too, because it's easy to shape as you tape. 


Once I had a good basic shape, I pressed Creative Paperclay® over the top, and created a more uniform roundness to the snowball.


When my shape was satisfactory, and while my clay was still wet, I layered on some more clay and shaped it into a face. You can add fresh clay to dry also. In both cases, you should use a bit of water on your finger tips and wiped onto the location you're adding new clay. This helps the two surfaces join well. Some rolled clay for the eyebrow bone, a rolled piece for the nose, and balls at the cheek and chin. Blend all the edges, and shape. I used my fingers for the whole process.


I also added a small round of clay at the bottom of the ball, to help the piece sit in one direction when it's resting on a counter or shelf.


I popped my piece into the oven at a VERY low temp (190 degrees) to speed up my drying time. Then I painted it with white gesso, and added the face of my piece. When I was working on the mouth, I originally tried to make an actual skeleton mouth, but I realized the piece would look more like a snowman if I used "coal" dots instead, so that's what I ended up with. For the eyes, the skeleton look is achieved by painting the black for the hollow eye sockets, and then painting eyes in over that. Notice that the nose is also similar to a skelton's. I think that is key to letting people know this isn't your ordinary snowman. Last, use your pastels to add a rosy glow to your skeleton's cheeks, brow bones, "nose" and chin.


Blend the eye socket area where the white meets the black with some shading. You can use your pastels for this area too. 


Now you're ready for your GLITTER!! I used Crafter's Pick, the Ultimate for this part. I kept the glue thin at the front of the face, and made it thicker around the sides and forehead.  I didn't put any glue on the eye area.


Sprinkle your glitter on, and while it's drying, get to work on your HAT! To make my hat, I used a large glass to draw a circle, and cut it out of my patterned paper. Then I folded it in 1/2, and rolled it into a cone. I cut a little of the excess off, and taped the inside seam of my cone to hold the shape. Then I glued the outside seam. I tied some yarn, cut the tip of the cone to create a hole the strings would fit through, and pulled the "pom" into the top of the hat. Then I glued the same yarn around the "bottom" of the hat, on the outside of the paper. Once that was dry enough, I glued the whole thing down onto my snowball snowman's head. I also added some glue and glitter to the top to make the hat look a little frosty! All of this gluing was done using Crafter's Pick. 


To create the "collar" on my snowball, I used some vintage Holly leaves and berries that I had saved from a thrift store find I have had stashed for years. For this part, I used my E6000 glue, because I wanted to make sure the plastic holly leaves and berries stayed in place well. 


Once that glue was also dry, I painted just a bit more glue (Crafter's Pick) onto the leaves and berries, and frosted them with some glitter! 


Here she is again! I feel like she needs a name... IDEAS!? 


Thanks for reading! If you'd like to keep up with me, and see more of what I'm up to, I'd also love it if you'd visit MY BLOG and Subscribe! You can also find me on FACEBOOK!

Wednesday, November 19, 2014

Decorated Holiday Faux Layer Cake Project made with Creative PaperClay® by LuLu Lancaster


Hello and Welcome to the Faux Bakery! ;) This is part 2 of my Faux cake Project. You can Find part 1 here Faux Cake Part 1
Part 1 walks you through the basic cake and borders. 

Let's Decorate! For this part you will need the following
The basic cake
a package of Creative PaperClay®
spray adhesive
 I use 3M Super 77 environmentally Friendly Spray adhesive which can be found at most home improvement stores.
Fake snow
assorted plastic mini Christmas Decorations

 
See my pic for ideas :)
and Tacky Glue

I started by creating some mounds on the top of the cake with the clay.

To create height for your decorations, just continue halfway around the top.

Next I took the cake round outside and sprayed it with the adhesive. 
Be sure to read the precautions on the spray can. You may need to wear a face mask.

Place your cake back on the cardboard cake round and you can affix it at this point with some tacky glue to the cardboard.
It is easiest to do this next part on a surface that has been covered in newspaper or Kraft paper.

Now that your round is sprayed, you can take the fake snow and sprinkle it generously all over your cake. Tap off the excess onto the paper covering your table.


For this next step I took small amounts of clay and created mounds at the base.
Use the tacky glue on the backsides of the decorations and set them into the clay mounds.


Continuing around your cake use small decorations to create a border. I tied wireless chenille around the cake and used mini garlands. Using the small decorations create a focal point for the top.

You can sprinkle more fake snow on the top if needed and there you go!


Fresh from the Bakery a cake that will last all season and beyond  :)

Thank you for following along, I hope you have enjoyed
this project.

LuLu Lancaster
LuLusApple Dolls