Friday, November 24, 2017
Bejeweled Creative Paperclay® Painting
I have been working on a series of 48" x 48" paintings using Creative Paperclay® as part of my narrative. This piece is in its early stages and is just blocked in at this point. I loved combining the old with new in my work so I started with a traditional pose from the 1500's combined with highly decorated clay hearts.
SUPPLIES
Creative Paperclay®
Silicone mold
Found objects
Acrylic paint
Amazing Molding Putty
E6000 glue
Soft gel gloss
I started by casting a series of hearts. The mold was made from my collection of milagros and exvotos using Amazing Molding Putty.
While this was drying I gathered beads, found objects and E6000 glue.
The dried hearts were attached to my painting with soft gel gloss. BTW I work on wood panels.
People leave me bags of broken jewelry and other goodies at my door step. Last week I received three bags from three different people. It is like Christmas when I get these.
At a thrift door the last week, I found large bags of broken jewelry and odds and ends for a cheap price and I didn't pick them up. When I went back they were gone. Still kicking myself.
This piece has faux pearls from the 30's, old bracelet and small charm.
I definitely have a baroque heart in this body that keeps trying to come out. Decorated with faux pearl, salt water pears, micro beads and vintage broach.
Old beaded necklace, broach and some mica flakes finished off this heart.
The finished piece will be posted on my facebook page when done - https://www.facebook.com/darleneoliviamcelroy
Dream in Color and throw nothing out.
Darlene Olivia McElroy
Tuesday, November 21, 2017
Sculpting a Sea Turtle..... by Cindy Porter
Hi Creative Paperclay® fans, it's Cindy here, I am excited to share with you my latest project....
A Sea Turtle
keep reading to see how to create your own...


Supplies:
water
silicone and sculpting tools
Now onto a video demonstration .... enjoy
thank you for stopping by and joining me here today,
Till next time
Happy Creating
xC

Monday, November 20, 2017
Making a Santa Gnome with Creative Paperclay®
Hi! Are you ready for another Christmas decoration tutorial? Today I will show you how to make a Santa Gnome using Creative Paperclay®.
Supplies needed:
Large styrofoam egg
Creative Paperclay®
Gesso
Martha Stewart Beetle Black
Delta Ceramcoat Santas Flesh
Crafters Acrylic White
White Glitter
Knife to cut Styrofoam
Aluminium foil
Glue gun and glue Sticks
Sculpting tools
Sand paper
Glue
Follow along in my step by step video tutorial.
Supplies needed:
Large styrofoam egg
Creative Paperclay®
Gesso
Acrylic Paint
Martha Stewart Tartan RedMartha Stewart Beetle Black
Delta Ceramcoat Santas Flesh
Crafters Acrylic White
White Glitter
Knife to cut Styrofoam
Aluminium foil
Glue gun and glue Sticks
Sculpting tools
Sand paper
Glue
Follow along in my step by step video tutorial.
Please be sure to share your creations with us on our Facebook page.
Thanks for stopping by!
Happy crafting,
Suzette
Blog: https://papermachepatch.com
Instagram: https://www.instagram.com/papermachepatch/
Pinterest: https://www.pinterest.com/suzettehussey/
Thursday, November 16, 2017
Use Your Scraps!
Hello, Creatives! So, If you are like most crafters you probably find yourself creating things and then setting them aside at times. I do this all the time! I create many many embellishments using molds and Creative Paperclay® and then I do not always use them. I let them dry and they end up in a bin for later use. Today I want to show you how to create a quick little project to use your scraps!
First gather up your scraps and bits that you have created with Creative Paperclay® and paint them all with gesso to prime them. While they are drying grab a canvas board and paint it with black acrylic or any color you wish.
Take a long piece of jute, doubled to create a loop at the top. Next, carefully glue the pieces you have chosen to the jute. be sure to straighten the jute as you glue each piece to it.
Finally, Glue the piece to the canvas board, leaving the bottom scrap loose. Now it is ready for painting and embellishing however you like!
I hate to waste things and this is just one way to utilize all of your scraps and make something unique and beautiful!
Thanks so much for viewing my post and I hope that you are inspired to use those scraps! Once I embellish and paint mine I will share on our Creative Paperclay® Facebook page so be watching for that and also please share what you do with your scraps!
Creative Paperclay® has many products available online HERE.
Creative Paperclay® Modeling Materials are also available at Michaels, Joanns, and Hobby Lobby stores.
Tuesday, November 7, 2017
November tip ..... by Cindy Porter
Hi Creative Paperclay® fans, it's Cindy here, I am excited to share with you my tip for November... How to create a Sea Turtle Armature ready for sculpting with Creative Paperclay®..
Creating an armature prior to sculpting with Creative Paperclay® saves you drying time with your clay as it is not as dense... and of course it saves you clay itself, as you are only having to cover over the armature not use a whole lump of clay...
Supplies:
Aluminium Foil
tape
Now onto a video demonstration .... enjoy
Hope you enjoyed this video and found it helpful...
till next time
Happy Creating
xC
Monday, November 6, 2017
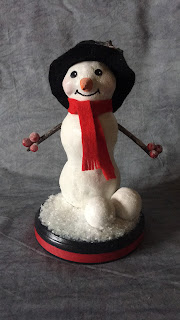
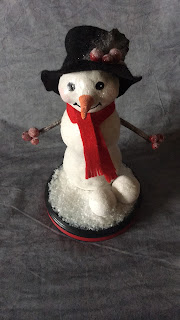
How to Make a Snowman Using Creative Paperclay®
Hi! Christmas is just around the corner and as promised I am doing Christmas decoration tutorials for the rest of the year! Today I will show you how to make a snowman using Creative Paperclay®. Isn't he adorable?
3 - Styrofoam balls in different sizes. I used 1.85” (4.7cm), 2.4” (6cm) and 2.8” (7cm)
2 - 1” (2.5cm) Styrofoam balls
toothpicks
glue gun and glue sticks
Knife to cut styrofoam ball
Acrylic paint in white, orange, black, light pink and brown (optional)
2- sticks approximately 3 1/2” long
Decoupage glue to stick on glitter. Modpodge is good.
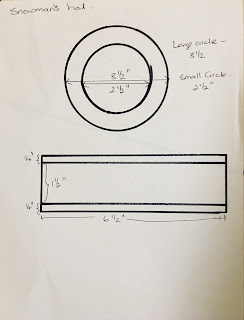
Black Felt to make the hat
Black thread
needle
pins
Red berries to decorate (optional)
Sculpting tools
Scissors
Paint brushes
Happy crafting!
Suzette
Friday, November 3, 2017
November First Friday Fan Day
Need some inspiration for your next Creative Paperclay® project? Check out what folks are making with Creative Paperclay™.
| Paperclay Leaves Snowman Holiday Decoration |
|
| Clay Feathers Paperclay Ornaments Christmas Folk Art |
|
|
|
Paperclay Ornaments Paperclay Rose |
| Blues Brothers succulent planters |
HELP US FIND YOU!!
- Use the hashtag #CreativePaperclay on all your social networks.
- When using Facebook, be sure the your posts and images using the #Creative Paperclay hashtag are set to public, otherwise we won't be able to find you.
- Share your projects on the Creative PaperClay® Facebook page.
I'm always trolling the web, looking for great Creative Paperclay® projects. If you find something, post it on our Facebook page.
GOT QUESTIONS???
Find the answers to your paperclay questions. See what other folks are creating. Stop by our Facebook group and say, "Hi!" Creative Paperclay Q&A
 |
| Carole |
Thursday, November 2, 2017
In the Garden with Creative Paperclay®
Hi Everyone! Jenn here to show you how I created this cheery canvas with Creative Paperclay®.
Paperclay is amazing for making all types of embellishments and it is also very easy to work with. The best part is that it's an air dry compound so no baking is required!
Here is how I created this bright Garden scene on canvas!
First coat a 5X7 canvas with a layer of heavy white Gesso. Allow to dry and add some leaves with texture paste through a stencil. Add colors and allow to dry. Set aside while creating embellishments.
Using cookie cutters and molds and Creative Paperclay® create all of your pieces and allow them to dry overnight.
Use a strong adhesive to adhere the pieces together and onto your canvas board.
Use bright colored inks in yellow and orange to paint the flowers embellishments.
Add some stems cut from silk flowers and paint them to match and a little sentiment and there you go! A cheery little plaque!
Thanks so much for stopping by and viewing my post! Be sure to keep an eye on the blog for more inspiration from our amazing Design Team!
Creative Paperclay® is available to purchase online HERE. You can also purchase at the following retail stores.
Subscribe to:
Posts (Atom)


