Tuesday, February 28, 2017

Holographic Foil & Creative Paperclay®

I wanted to make party decorations for a friend for either her gift ornaments or for the place settings.  I started by casting baby heads and shells from my collection of silicone molds. I only wanted partial baby faces so after casting I tore the top of the heads off. Am I cruel or what? Next, I let them dry overnight.

SUPPLIES
Creative Paperclay®
Gold Paint
Adhesive size
Holographic foil
E6000 glue


When the cast shapes were dry, I glued them together with E6000. I could have glued them together with a piece of clay but, as usual, I was in a hurry and E6000 sets quickly.


After painting them a matte gold acrylic by Holbein and letting the paint dry, I applied the adhesive size. This is a special glue made for metal leaf and foils. It goes on white and when it becomes clear, it is tacky and ready for the foil application. I prefer Wunda Size as it is water soluble.

As I am looking at these, I realize they look a little Mayan. All they need is big earrings. Always love it when I am surprised by something I had missed.


The holographic foil is then rubbed on to the tacky adhesive size. This is then lifted off. Because it has a very thin layer of plastic over it, the foil not used will remain attached to the plastic.

My apologies that this is so hard to photograph In person it looks great.

FYI. I get my holographic foils at Royal Design Studio. They have a great range of holographic and regular foils plus you can order it by the foot, yard or roll.

Dream in Color!

Darlene Olivia McElroy

Monday, February 27, 2017

Shari's February Tip of the Month - Holding It All Together

Hi!
 I like to call my February tip of the month, Holding It All Together.

My recent project involved a lot of pre-made pieces that needed attaching to a clay slab.


You can make use a multi purpose glue, hot glue, or a clay slip. Clay slip is basically water and clay mixed together to form a paste. The Creative Paperclay Design Team was supplied with a pre-made bottle of slip.

 The squeeze bottle can be a quick and easy alternative to making your own and it will not dry out.
Squeeze a small amount on both pieces and press in place.  Let your piece dry completely before adding any paint.


Thanks for stopping by!

Happy Creating,
Shari


Tuesday, February 21, 2017

Making Magic!


Earlier this month one of my crafty friends sent pictures of some wands she created.
I was so inspired that I thought I'd try making my own wand with clay.

To make the wand you will need:

Creative Paperclay®modeling material
3/16" x 12" wooden dowel
small screw-eye
drill
white glue
trinkets, yarn, or other embellishments
acrylic paint
sandpaper
rolling pin
craft knife


Start by drilling a small hole in the center of one end of the dowel and inserting a screw-eye just far enough to hold it firmly.  This will be what you hold on to while sculpting, and what enables you to hang your wand to dry.


Using sandpaper, taper the other end of the dowel and round off the tip


Coat the entire dowel with white glue, thread a piece of string through the screw-eye and hang the wand to dry.


Roll clay slab to approximately 22" x 14" and 1/16" thickness.  The dowel should be able to fit as shown.


Cut clay along the edge of wand, then into a triangle with curved edge as shown.


Dampen the dowel and place it at the edge of the triangle.  Pull clay up and smooth/attach it to the dowel.  Roll the clay around the dowel.  When the triangle is rolled onto the dowel, wet fingers and smooth as desired.  I chose to leave mine with an irregular spiral along the length.


Hang wand to dry.


While the wand is drying, gather up some embellishments you might want to use for your wand!


After my wand dried, I decided to add another spiral of clay wrapped around the wand with runes drawn into it.

If you choose to do this, cut the strip of clay, attach one end to or near the bottom of the wand by wetting the dry clay then pressing the wet clay onto it.  Continue wetting the dry clay and adding the strip a little bit at a time all the way up to the tip.  The runes were pressed/drawn into with a toothpick AFTER the strip had been attached to the wand.


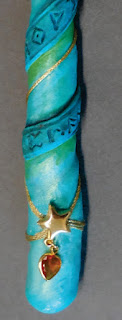
Paint and embellish as desired.


I used layers and washes in several shades of blue & green, walnut, and iridescent blue, then added a simple gold cord and star drop earring.


Thanks for joining me here again!  As always, play, experiment, and have fun


Tori
Find me on Facebook, or peruse & ponder pics with me on Pinterest


Sunday, February 19, 2017

Working with Creative Paperclay and Delight Products


I have been on the design team for the past 3 years, and simply have learned so much working with everyone that has been on this incredible team!  I scrapbook and stamp, so I use both Creative Paperclay and Delight in various ways for my scrapbook pages, my cards, and paper crafts galore!  I am working on organizing my space, Creative Paperclay is a part of the spaces I am organizing!  Magnets made with stamps and molds, make my space look inviting and happy!!!
Yet part of working with this incredible stuff, is being able to learn from others on my team and the things they have done as well!  Going in to the next few months, here are a few tips whether you are working on a gift, your own creative space, or your space outside:

  • Take a look at the past projects -we have Easter coming up, Mothers Day, outdoor projects - find something you want to do and get the supplies started for it!  Planning things out a bit, really helps to make sure the
    finished project is PERFECT!  
  • If you want your project to be a bit heavier, use Creative Paperclay!  It hangs better on with a magnet on the back, than does the Delight!  
  • Plan your projects out on paper - before you start to tackle them in real life!  This way, those larger projects you want to be "perfect" will be PERFECT!  
  • If something is simply not working the way you want it to be - start over!  The best part of working with the Creative Paperclay and Delight products - is being able to reuse it if you don't wait too long!!!  
I am working on my designs for a fun fairy garden (thanks to the design team), and a fun angel girl that will sit by my desk (thanks to a past blog post)!  I am designing on paper first - finding the items I need to recycle...(boy do I use a lot of creamer), and by the time May hits - I will have a fun fairy garden for my patio, my angel girl done, and more magnets made for my creative space!  
Lynda Jeffs
2017 Creative Paperclay Design Team


Tuesday, February 14, 2017

Creative Paperclay Heart Bowl


You need so little to create a Valentine bowl that has so many uses. It could hold a ring, valentine candies or incense. It just depends what you come up with.

SUPPLIES

Creative Paperclay®
Orange
Stamps
Acrylic paint
Polymer Medium

Cover the orange with the clay, trim to heart shape and stamp. The most difficult part is to wait until it dries.
When dry, just pop it off the orange.


When you turn it over, you can see the wonderful dimpled texture from the orange. Now it's time to sand the edges smooth. Once that is done, I seal the heart with polymer medium.


Now the heart is painted with various shades of red and pink.


The back side is painted dark rose gold and highlighted with a lighter, brighter gold.


Great as a gift or to keep.

Dream in Color!

Darlene Olivia McElroy

Monday, February 13, 2017

Creativity Inspired by Paint Brush Muses

Hi!
We all could use a little inspiration from time to time to stir the creativity from within. I created this set of paint brush muses to help me out.

The largest one screams for me to not be afraid to use color. The second one  reminds me that my art is beautiful and to create from my heart. The third one says for me to think outside the box, not all art needs to be so black and white.

Here's how I made these fun little muses out of used paintbrushes, acrylic paint, and Creative Paperclay®.

Supplies
Creative Paperclay®
Paintbrushes for muses
Multiple colors of acrylic paint
Gesso
Tacky glue
Palette knife
Clay carving tolls
Clay sanding tools
Matt acrylic sealer

Instructions
1. Take a ball of clay large enough to fit on the flat of the brush just below the bristles.You are making your face on the brush.


2. Form the shape of a face. Now you can carve the details of your face into the clay, make 3-d facial features, or paint the facial features on.

3. Remove your face from the brush using a pallet knife slipped gently between the clay and the brush.

4. Lay flat to dry or dry in a 180 oven till the clay turns white.

5. Sand your faces.

6. Paint your brushes and clay faces with gesso.


7. Use tacky glue to adhere the faces to the brushes and let dry.

8. Here's where the real fun begins! Use any colors or patterns on your muses. Let your muse's personality form with each addition of paint. Finish with a matt sealer when your paint is dry.


 I hope my muses inspired you to make your own creative posse. Thank you for visiting!

Happy Creating,
Shari


Tuesday, February 7, 2017

Tori's Tip - Stencils Aren't Just for Painting


I was recently looking through some of the stencils in my file and found this old and well-used heart stencil that I cut from card stock.  With Valentine's Day coming up, I thought it might be fun to try it with Creative Paperclay and one of my favorite texturing tools - scrunched up aluminum foil!


and since I saved the cut-out, I can try it in reverse!


I might use these for card embellishments or a special project for my sweetheart!

This fun technique can be used with just about any stencil and texture tool or texture sheets.


Thanks for joining me here again!  As always, play, experiment, and have fun!

Tori
Find me on Facebook, or peruse & ponder pics with me on Pinterest

Sunday, February 5, 2017

Totally "Delight"ful

So, I have a file cabinet that I truly can't wait to be able to paint it and make it pretty again...I am thinking a chalkboard paint in a color to match the rest of the space I am working on!  I also needed something where I could hang paper on to be able to get to easier as I am working, or I just get inspiration for something!!  Since I work at home, I need a space that functions for various things (for the moment) - thus the notes!
  
I recycle my printer paper - as I print something out, if it isn't something I need to cut out or use at all, I put it in a file so I can use the backside of the paper for the notes.  When I get enough papers, I simply cut them down to 4.25 x 5.5 notepaper size, so when I need a sheet of paper, then I have one available!  As I was working on my entire space - I knew I needed something that I could add to that file cabinet, and at least for the moment, will make it look a bit better!  
As for the rest of my creative space, I have been recycling a lot of shoe boxes and shipping boxes and putting a lot of my items in them!  I can't wait to get the rest of the stuff put together!!!

Supplies needed:
Delight product 
Molded flowers 
Ribbon
Clip
Paint for flowers
Paint brush
Ruler 
Knife or straight edge 
Magnet pieces
Hot glue

Directions:  
Step one:  Flatten out the brick of Delight product.


Step two:  Take your ruler and knife or straight edge (I used a smaller ruler) - straighten up the edges of the Delight product.

Step three:  Using the pencil - start to roll the top of the product - and the bottom of the product...let dry completely

Step four:  Using your favorite flower mold - start to mold the flowers you want to use - using the extra left over from step two.  Allow to dry.  After flowers are dried, paint them - and allow to finish drying.  

Step five:  Start to add the ribbon to the top part - and then the bottom part of the creation.  At the top of the piece, add the clip for the papers.  Make the bows for the bottom as well as the bow for the top.  Add the flowers to the middle of the bows.  


Step six:  Finish off by adding the magnets to the back - I used 3 strip's one at the top, center and bottom of the piece! 

I love how this one turned out - much lighter than the other one I made, and really just perfect!  My file cabinet will be painted black, and the rest of the space will be black, white, and accent color of pink!  I have enjoyed organizing - and creating things with the Delight product!  I can't wait to get the rest of the items done that is on my list - and my space finished up!
Thanks for stopping by,
Lynda Jeffs
Memories in Tyme and 
2017 Creative Paperclay Design Team  

Friday, February 3, 2017

February First Friday Fan Day


Need some inspiration for your next Creative Paperclay® project? Check out what folks are making with Creative Paperclay™.


Decorated Chicks
Fairy House
Valentine Chicks
Scandinavian Inspired Star Garland
Faux Tree Trunk
Making a Sculpture

Sculpting Candy Hearts

HELP US FIND YOU!!
  1. Use the hashtag #CreativePaperclay on all your social networks.
  2. When using Facebook, be sure the your posts and images using the #Creative Paperclay hashtag are set to public, otherwise we won't be able to find you.
  3. Share your projects on the Creative PaperClay® Facebook page.
I'm always trolling the web, looking for great Creative Paperclay® projects. If you find something, post it on our Facebook page.

GOT QUESTIONS???

Find the answers to your paperclay questions. See what other folks are creating. Stop by our Facebook group and say, "Hi!" Creative Paperclay Q&A
Carole