Thursday, August 30, 2018

Creative Paperclay® Shelf Sitting Wizard


Supplies:

Creative Paperclay®

4x2 inch Darice Paper Mache' cones, Amazon

Tibetan Lambswool, https://www.ooakartistemporium.com/

½ inch wide ribbon

Felt

Rolling pin

Sculpting tool

Paint brush
Gesso

Acrylic paints

Fabric-Tac Permanent Adhesive, Michaels, Joann, Hobby Lobby

White glue


Step 1; Roll out Creative Paperclay®, enough to cover the cone. Cover the cone with a thin layer of white glue so the clay has something to grab onto. Cover the cone with clay and roll out a round piece to cover the bottom of the cone. Smooth and let dry


Step 2; Roll a strip of clay about 1 to 2 inches wide and long enough to go around the cone bottom for the brim of the hat.  Attach and smooth with water. Make the brim go up and over the part you want the nose. Make a small or big ball for the nose depending on how big you want the Wizards nose to be.


Step 3; Make 2 teardrops shapes any size you want for shoes. Take the handle of a paintbrush and press at an angle into the teardrop for the opening of the shoes. 


Let everything dry


Step 4; Sand everything smooth and make sure to fill in any cracks. Check to make sure the piece sits flat. Paint with Gesso, let dry then paint the face with a beige color and the hat and shoes with the color of your choice. 


Step 5; Cut strands of Tibetan Lambswool off of the hide the length you want the beard to be and glue the individual strands onto the face of the Wizard until you get the look you want. 


Step 6; Cut 2 pieces of ribbon the length you want so the legs will dangle over the edge of a shelf. Tie a knot at the end of each ribbon and glue into the opening of each shoe. Glue the other end to the bottom of the cone. You can cover the ends of the ribbons with a round piece of felt.


Have fun making funny noses or big shoe, even feet.


Creative Paperclay®       https://www.paperclay.com

Hobby Lobby, Michaels, Joann, Amazon


Wednesday, August 29, 2018

Bulletin Board - Delight Style


Hello everyone, long time no see, and for that I apologize!  I hope this project is something you can have fun with - and customize to what YOU want, like I did this one!!!!  I went to Target the other day - and found a plain ole' bulletin board - and instantly knew I had to alter it!  This is what I ended up with, pleased I am!
I wanted something that I could stick a picture on the bottom and be able to frame it when I needed to...or put a pen for the notepad that is next to this!  I wanted to be able to look at something pretty, and have elements that simply was made for a "reason"!   The picture, is something I want to frame, so I simply placed it here, and can be easily exchanged!  Lets get started, shall we!    

Supplies needed for this project:
  1. 2 bricks of Delight Modeling compound
  2. Flower molds
  3. Paint of your choice (My paint of choice is Twinkling H2O's)
  4. Bling of your choice (I used gold and pink adhesive gems)
  5. Black and white floss (or your choice)
  6. Stamped clay butterfly (or your choice of whatever)
  7. Of course - the bulletin board purchased from Target 

I started with the braid around the top edge of the bulletin board!  To achieve this:


Step one:  Using a brick of delight, take your ruler, and cut the whole length of the brick.   Roll this piece out as long as you can.  You need 2 of these pieces to braid.
Step two:  Start at the top and braid the top part of the board, and then start to do the sides.  Using my glue gun - as it dried, I made sure to put plenty of glue on the outside edge.


Step three:  From the rolled out piece, you want to roll out a really small piece.  If you look at the leaf, you will see what I am saying!  You will need a few small pieces - one or two leave flat and let them dry!
Step four:   After you roll a small piece out - take a paint brush (or something like it) and wrap it around the brush like the picture below!  Let it dry before you take it off the paint brush.     

Step five:  Unless you have flowers already molded (like I do - for this exact reason) - then you will need to mold your flowers and allow them to dry.
Step six:  For the bottom part - you will want to find chipboard of some sort, and cut the pieces you will need for the bottom of your board.  For me, I wanted a shelf to add pictures or even put a pen for notes!   (see below)

Step seven:  Taking flattened Delight - you will start to cover the side pieces,  and then the bottom piece.  I put the Delight on both sides of the chipboard side pieces first.  Let the sides dry first before you do the bottom.  Lay the board flat when you dry this piece.
**TIP - lesson learned on my side, I would only do the front piece with the Delight and not the inside of this piece. 


Step eight:  Once the flowers are dried, start to paint them.  I used to use Radiant Pearls paints and loved them!!!!  I recently found out our Twinkling H2O's are THE SAME THING and happy girl am I!!!!  Paint your flowers (or molded shape) what you want, and put them aside!  Also paint the butterfly (or whatever shape) to put in the top right corner.   My butterfly was for a special person who is gone!


Step nine:  Start to add your flowers and bling in a manor that is attractive to YOU.  Add the floss bow at the right corner for the butterfly to go on.  Add the curl's made in step 4, in random places by the flowers.
Step ten:  Add the bling around the flowers or where ever you want on the board.  I started with the flower on the right middle (white flower) - because I knew I wanted the butterfly at the top right by the bow.
 Step eleven:  Once the bottom part is dried, start to add your painted flowers (or whatever you chose) and leaves to that piece.  The rest of the flowers you paint, can be randomly placed around the rest of what you have already done.  If you look at the picture above - and then the picture at the top, you can see how the rest was filled in!

I love how the whole thing turned out, looks wonderful hanging on my wall!  The push pins are being started on, another blog post on my Memories in Tyme blog when it IS done, until then - have fun making your own bulletin board!  Plenty of paper crafts, creative challenges, and Christmas challenges on the blog!  I hope you join me there too!  Until next month!

Lynda Jeffs
Creative Paperclay Design Team
   

Monday, August 27, 2018

Are You Ready To Get Started On Your Christmas Decor?


I love the Christmas Season and I love Angels so as I was thinking of things to make for the upcoming holidays I thought of this little goofy angel who isn't perfect or isn't he?

Supplies Needed For This Project:

Acrylic Paints
Wire for halo
Glue for loose parts


I started out by using my Paperclay to form the different pieces of the angel and attaching them together with the Paperclay itself. If you work up the area that you have made and also the piece you are attaching with a dab of water, when you put them together they should form a good bond. If you haven't done it properly and your pieces come apart after it dries then just use some glue to put them back together again. 

After I got all the pieces put together, I fashioned a halo out of wire. I poked it into the head of the angel and then took it out, put some glue on it and reinserted it into the angel's head.
I then started painting the little guy with acrylic paints.


After the angel was finished I painted the robe and wings with Plaid Glitterific and it gave the little angel a wonderful sparkle about him.


And there you have it! I think I'm going to make a whole Angel Choir of them in different sizes! I think they would make a terrific bit of decor for Christmas don't you? I think this guy is so quirky he's cute. If you are interested in trying out some Creative Paperclay go on over to their website  at 
www.creativepaperclay.com and check out their wonderful products. Plaid Glitterific is one of the newest products that Plaid has put out this year and is a wonderful product. It comes in several different colors of glitter and what's so neat about it is the glitter is actually imbedded in the acrylic suspension. Check the Glitterific and all the many other products that Plaid has to offer at: www.plaidonline.com. These are both wonderful companies with products that we all want to have. Please leave me a comment below to let me know what you think of this project.
Thanks!
Barbara

Friday, August 24, 2018

How to Create an Artdoll with Creative Paperclay


Hello everyone! My name is Cinnamon Willis and I am going to show you all how I created this soft bodied art doll with fabric and Creative Paperclay® for the limbs and head. I normally sculpt my dolls completely out of clay but I wanted to step out of my comfort zone and attempt to make a soft bodied doll. There are many different ways to go about doing this, but I took the steps that I listed below, let me know if you try this method out and I hope you enjoy!

Supplies

  • Pencil
  • Cardstock paper
  • Muslin Fabric
  • Thread
  • Skewers
  • Scissors
  • Sewing machine or be prepared to stitch by hand
  • Creative Paperclay®
  • Newspaper
  • Masking tape
  • Sand paper
  • Wool
  • Acrylic paint
  • Sealer, Varnish
  • E600 Craft Glue
  • Beads and buttons
  • Rocks or bean bag filler


I started out with drawing a basic shape of a torso and some limbs on a piece of cardstock paper. Next, I cut them out and traced them onto the muslin cloth. After tracking these pieces, I cut them out from the cloth making sure to cut two of each piece so that they could be sewn together. Save the card stock pieces so that they can be used again for another doll. Note that I only have the top portion of the arms and legs here. We will be sculpting the bottom parts from paper clay and attaching them with beads in later steps!

With your cloth pieces, line up the matching pairs so that they can be sewn together, use straight pins to keep them in place once the alignment is right.


This is where you will be sewing the pieces together for your doll. This can be done either by hand or by a sewing machine. As you can see from the photos above, I used both. My machine konked out on me in the middle of this project. Whichever method you feel comfortable using, make sure to leave a seam allowance or about a ¼ of an inch from the edges free when you sew the pieces together. Also be sure to leave about and inch free at the top of each piece so that they can later be turned inside out and stuffed.


Turn the pieces inside out, I use the eraser end of a pencil to do this so that I don't poke through the material. With the torso, I filled the bottom with little pebbles so that the doll could have some weight and sit by herself.


This can also be stuffed with bean bag fill. From the chest up, I filled the piece with fiber. I stitched the neck up by hand and placed a wooden skewer down the middle of the doll so that the head could later be attached to it. After stitching the neck around the skewer, I secured it with e600 glue and made sure that the skewer sat in a good place at the bottom where it wouldn’t wobble to much. I filled the limbs with poly fiber after turning them inside out and stitched up the remainder of the fabric by hand trying hard not to make the stitches visible.


Once the neck is dry, you can now move on to attaching the limbs. I did what was called a basic button joint for the limbs. What you’ll need to do is line up the shoulders to the top part of where the arms would meet, take a long needle and sew straight  through the button, arm, torso and, the other arm and button on one pass. Do another pass through, coming out the other side and lining up to where the other button is on the arm. Do this two more times ensuring each hole on both button sides have been passed through. Do the same for the the bottom half with the legs.


Now that you know how big the doll will be, you can start working on the head and the limbs in paperclay. Make a ball of newspaper and wrap it around a skewer that is the same size as the skewer in the torso with masking tape. (If you are more comfortable working directly on the doll, do so but try not to get any clay on the body.) Start adding clay to this, keep in mind that this will need to match the body of your doll so keep it in proportion to it. Since you are using masking tape here, you can pop it off of the stick and try it on the stick of the torso to see how it matches up to the body. Keep doing this until you get the proper size that you are going for.


Once you allow the head to dry, you could begin working on the details such as the face shape and features. This can be done by adding a drop of water onto the places that you would like to add clay to and blending the new clay into it. Don’t worry about getting things perfect when working with moist paper clay, most of the sculpting is done when it is dry with sanding. Once you are done and have worked out the face, you can sand it down with a very fine grit of sandpaper to smooth everything out. I usually work with a 400 grit sheet of sandpaper for getting Creative Paperclay® super smooth. Seal with varnish when complete.


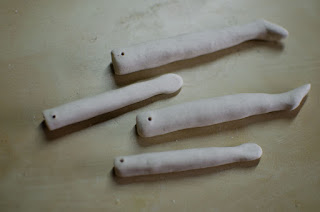
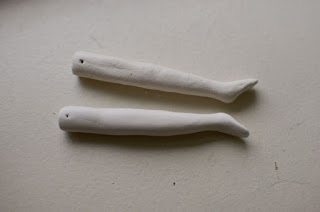
At this stage you can start making the lower half of the legs and arms to attach to the body. Here I cut four skewers down about an inch smaller than the size of what I would want the limbs to be, and wrapped them with masking tape. Cover them with the clay and make sure to leave about a half of an inch at the top so that you can burrow a hole straight through. This will be where you attach the limbs to the body. Make sure to burrow the holes while the clay is still moist and in the right orientation as shown in the first picture above. (Ex. if the foot is facing forward, burrow the hole horizontally at the top so that the foot swings in the right direction.) The second picture shows the difference between the sanded and unsanded versions of the legs.


Paint the limbs and head to the color that you would like them to be. After the pieces have dried use a varnish to cover and protect the paint from chipping.You can also paint the muslin fabric as I did here. I used acrylic paint and thinned it out a bit with water for easier paint application. Keep in mind that this stiffens up the fabric a bit so try not to put paint that is too heavy on the fabric. I suggest trying it out on scrap pieces thinning the paint out with water first to see how it turns out before painting the body.


Now that the limbs are painted, you can attach them to the torso with the beads and thread. Make sure that the beads are sideways where the holes of the beads are facing the same direction as the holes on the button joints. This is important for the movement of the limbs, otherwise they will swing sideways which would be unnatural.


Last but not least comes the head, take the head and burrow it back on to the skewer to make sure it still sits on it. If it doesn’t fit, make adjustments so that it does. Take it back off of the skewer and squeeze a bit of E600 glue into the hole at the bottom where the masking tape is. Immediately position it back onto the skewer on the body and place it where you would like for it to sit. Set this aside and allow it to dry for at least 12 hours.


You can now accessorize your doll if you wish with hair, clothing and whatever else you would like to add. I had a beautiful piece of African print fabric, some tulle and a brand new sewing machine that I wanted to try out. For the hair, I used some beautiful Border Leicester grey wool with caramel tips that I had in my supply bin.

Thank you for stopping by, and I hope that you enjoyed today's tutorial! You can find Creative Paperclay® at the following retailers Creative Paperclay® Online Store, Michael's, Amazon, Joann's

The paints that I used can be purchased directly from Plaid at https://plaidonline.com/brands/plaid

See more of my work at Melandolly.com, and head over to my Instagram page to see other projects that I am currently working on!


Wednesday, August 8, 2018

Easy Peasy Home Decor with Delight!™


Those of you who follow my work and blog know that I have been experimenting with acrylic pours this week (https://polymercreations4u.wordpress.com/ ).  Experiment is the key word here.  Researching the process ahead of time yielded a wealth of information, many "formulas" for the pour ratio, and (yes) many thoughts on what to use for a flow medium (all purpose glue, Mod Podge®, Floetrol®).

Plaid® Crafts sent a box of goodies a couple of weeks ago filled with a variety of paints, glitter, and Mod Podge®!  Yippee...I had everything that I needed!  Mod Podge®, paint, and water plus a stash of canvases.  I tend to jump into things with both feet...this was no different.  I started with a 50/50 mix of Mod Podge®/paint.  Most people would mix a couple of colors and then test.  Yea, not me.
I mixed up 6 colors of paint adding enough water to make it flow (or so I thought). Plaid® sent me Mega Glitter Mod Podge® along with the regular gloss I mixed up a cup of that too (50/50 with silver paint).  I mean, who doesn't like glitter??  Excited to get started I took all of my supplies outside to paint. (NOTE: Flow painting can make a HUGE mess.  I worked on a plastic covered table and then was able to roll up the mess and throw it away at the end).
I am not going to bore you with the details of my first painting experiment since you can check out my blog post for the results of that one and the subsequent experiments...let's just say that my first mix was a bit....ummmm, thick.  Instead of getting gorgeous the gorgeous flow painting I expected, I got what I have referred to as rocky terrain.  Bummer.  You would think that seeing one rocky terrain I would think "Perhaps I should thin the mix a bit more...get a better flow."  Yea, No 😖  Instead I carried on and created 3 more rocky terrain canvases using up all of the paint mix in the process.
While not the effect that I thought I would get, I set them aside to dry in hopes they would speak to me in some way.  Fast forward a few days and they began to scream "CLAY!!" I grabbed one of my favorite products Delight!™ Air Dry Modeling Compound as a vision took hold.  I saw 2 versions in my head, so decided to do both (of course). (NOTE:  Each flower used about 1/4 of the Delight!™ package)

I decided to start with a sunflower, growing from the side of my canvas.  I separated the clay into 8 pieces to start.  
One of the pieces was rolled into a ball, flattened (about 1/4" thick), and pinched on one side to form a teardrop.  This was the start of my sunflower center.
The petals were created using the following steps: 
1) Roll a ball.  
2) Roll the ball into a log with a slightly tapered end.
3) Flatten the log into a petal shape (about 1/4" thick).
4) Pinch the edges to thin and make it more "petal like".
5) I used a turkey lacer (or you can use a toothpick) to make texture lines on the petal.  The shape can be adjusted at this point (if desired).  Repeat process with 2 more pieces.
The petals were positioned with the center before starting on the next batch of petals.  
2 more were created following the above directions.  I wanted these to fit behind the others without the design sticking out too much, so I flattened the bottom edges to fit each snuggly behind the first petals.
 
I divided the remaining 2 clay balls in half, rolled each into a ball, and then continued with the directions to create 4 more petals.  These were added to make the snuflower come to life.  once i had all of the petals in place I wasn't as happy with the center, so I removed it to rework the shape.
A little texture gave the center just the look I wanted (NOTE: The texture was created with the tip of a fruit corer!)
The entire piece was set aside to dry overnight before adding paint.  I quickly moved on to my second floral thought: An artsy flower, not as realistic in nature as the first.

For the second flower I thought of 7 petals and a simple center.  I separated the clay into 8 pieces and rolled each into a ball.
7 of the balls were rolled into teardrops and flattened to about 1/4" thick.
A few of the petals got cracks in the surface as I flattened them.  A fingertip dipped into water and then rubbed over the surface and edges helped to smooth any problem areas.


The petals were put together, manipulated as needed to fit together without too many gaps.

I wanted the center to be simple, so a ball of clay pressed on top of the petals worked perfectly.  (NOTE: The center was pressed on loosely to allow for additional details to be added)
The design needed some "POP".  I grabbed some texture sheets and stamps from my stash (I do love texture) and went to work.  
The first thought was all petals the same, but that seemed a bit...plain.  I decided to use multiple textures, some bold and some simple to give the flower a wonky balance.
The center was replaced.  With the texture on the petals I thought the center needed a little something too.  The fruit corer came in handy once again.
Happy with the design, I placed the flower onto the canvas and set it aside to dry overnight.

DAY 2: Painting 
I am a member of the NAEA (National Art Educators Association).  I recently participated in an online conference.  We received a goodie box filled with materials to use during the conference.  One of my absolute favorite products in the box was from OOLY, the Chroma Blends Pearlescent Watercolor set.  I wondered if they would work on my flowers...so of course I jumped in (no turning back once I start!)

For my sunflower I wanted to use colors that made it come alive on the canvas rather than blending in.  For that reason, I began with the orange and then highlighted with the golden yellow.  The center was painted first with brown and then highlighted with purple (I pulled the color choice from the canvas background).
 

Once dry, The sunflower was glued to the canvas.  It looked a little bare, so again I went to my stash of materials (I have been crafting for so many years I have a little of everything!).  I found metal scrapbooking words that were the perfect finishing touch.
 For the second flower I wanted the color to be a bit more bold, so I chose the vibrant red.   
Purple helped tie the flower to the canvas color.
 
Once dry, the flower was glued in place.  
I hope you have enjoyed this super easy way to create new pieces for your home decor.  I post for this blog the 2nd Wednesday of every month.  Hope to see you again next time!
You can also visit  https://polymercreations4u.wordpress.com/ for experiments in creating Acrylic Flow canvases.