Thursday, January 30, 2020

Creative Paperclay and Power Sander


Materials List

Palm or Hand sander (I have one made by Black and Decker that is shaped like a small iron)

Pre-shaped (made for this sander) sand paper, medium grit

Safety glasses (to protect from dust and debris)

Dry Creative Paperclay head or other art object needing a large area sanded

Barely damp cloth (for wiping dust and smoothing)

Regular sand paper ...medium and fine...it is up to you how smooth you want your sculpt.  I do primitives, so I don't try to get out all the imperfections.


Power Sanding Creative Paper Clay

Hey there everybody…I’m part of the 3rd world tonight!  My son was not here to operate the editing software.  I guess my hubby will have to learn…maybe even the technically challenged, Carly Smith! So, it’s just written instructions, pictures and one short video.  It is also a short tutorial as I have two new puppies I am keeping up with!  LOL!


Has anyone here ever used a power sander on their Creative Paperclay doll heads?  Well, if you haven’t…you are in for a treat!  Its easier on the hands to do the larger areas that do not have sculpting on them…for example, the back and top of the head.


It really smooths overlapped clay and other imperfections. However, you must be careful not to press the sander too hard as you may take off more clay than you would like.


Step 1- Put on safety glasses

Step 2-   Turn on sander and begin sanding (sanding outside is best, but I only demonstrated the sander for a few moments inside for purposes of lighting and comfort)


Step 3- Wipe over the head area and finish out the fine sanding by hand. Wipe again.

Thank you so much, ya'll for looking!

!
My best always,

Carly


Wednesday, January 29, 2020

The Transformation of Dough Art Using Delight Air Dry Modeling Compound!

 
Hello all!
Recently a Facebook post has been making the rounds on multiple artist friends' pages as well as on my own from well-meaning friends who said: "This made me think of you!".  Well, I had to rise to the challenge.  Could I take the pastry art shown and create the same pieces using Delight Air Dry?  I had to try and do it.  I grabbed a package of Delight and went to work.

The video is from a Chinese artist (I apologize, but I cannot pull up a working link to share).  The speed in which she works had me watching each segment multiple times to be able to create just one piece (haha).  After my "painstaking" research, I have broken down the steps into photos for you.

First up, "The Heart":
The heart begins with one circle.  (NOTE: The cutter size doesn't really matter since I believe these simple directions will work no matter what size you are creating.)  I own a set of Ateco circle cutters (12 pcs) and they worked great for this project!
Pull off a bit of Delight Air Dry Modeling Compound and flattened it with a roller on my work surface.  Cut three circles and place the remainder of clay in a damp paper towel to keep the clay moist.


Next, stack the 3 circles, one on top of the other, without squishing them together.
Use a skewer or needle tool of some sort to press the stack together in the center without cutting through.  I used a darning needle, but a knitting needle or turkey lacer or (in a pinch) a pencil should work just as well.
Fold the stack in half.  Again, do not squish (that is the technical term) the layers together.  Use the skewer to once again compress the stack together in the center without cutting through.  Fold the stack in half again, then turn it so the flat side is on your work surface.
 
Pinch the bottom to form the heart bottom and manipulate the rest of the layers to form a beautiful layered heart!
Set aside to dry.  Once dry, the heart can be painted with watercolors or acrylics OR it can be left white.  That's it!  Easy peasy lemon squeezy heart.  Imagine creating a batch of these for a mixed media canvas...Delight Air Dry is so lightweight that it can be glued to a canvas in multiples and hung on the wall for a lightweight seasonal decoration ❤

On to our next creation: The Rose
To start, pull off a bit of the Delight Air Dry (from the clay wrapped in the damp paper towel) and flatten it on your work surface.  Cut 5 circles (I cut 2" circles for this one).  Place any remaining clay back into the damp paper towel.
Cut each circle in half.  Line them up with the cut edges all in a line.  Overlap the points (as shown) and press together.
In the video tutorial, the pastry artist used a comb to imprint a texture on the curved edge of each petal.  I am a curly-headed girl and do not own a comb, so I found the next best thing: the attachment from personal shaver!  Tiny, but it worked to add a texture to the edge.  In the absence of a "personal shaver", you could add detail with a needle tool (one line at a time), the coil from inside a pen, OR the edge of a spiral binder!  Trust me when I say you will see texture in everything once you get started looking!
(NOTE: I forgot to take a photo of texturing the rose, so this is the same tool being used in an upcoming tutorial)

Once each petal has a texture, it is time to roll up the rose.  Begin at one end and roll tightly.  I did not press the petals at the top.  Instead, I focused on pressing the bottom of the petals (the flat edge) together.  This will allow the top of the petals to begin to flare out.
 

Once the rose is completely rolled up, place it face up on the work surface and gently flare out the petals to create a lovely rose (see above photo).  Leave to dry and then paint if desired.  Wouldn't this make a lovely pin for Mother's Day??

Next up: The Braided Feather/Leaf
This is probably one of the easiest of the ideas!  Pull off another piece from the reserved clay (damp paper towel).  On your work surface roll out a snake.  
Coil the snake, gently tucking the end into the center (as shown). 
Use a needle tool (I used a darning needle) to impress a line down the center of the coil without cutting through.
Pinch the top end and it is done!
Please note: After impressing the line, the feather/leaf can be curved to create a more natural effect.  Of course, set aside to dry and then paint as desired.

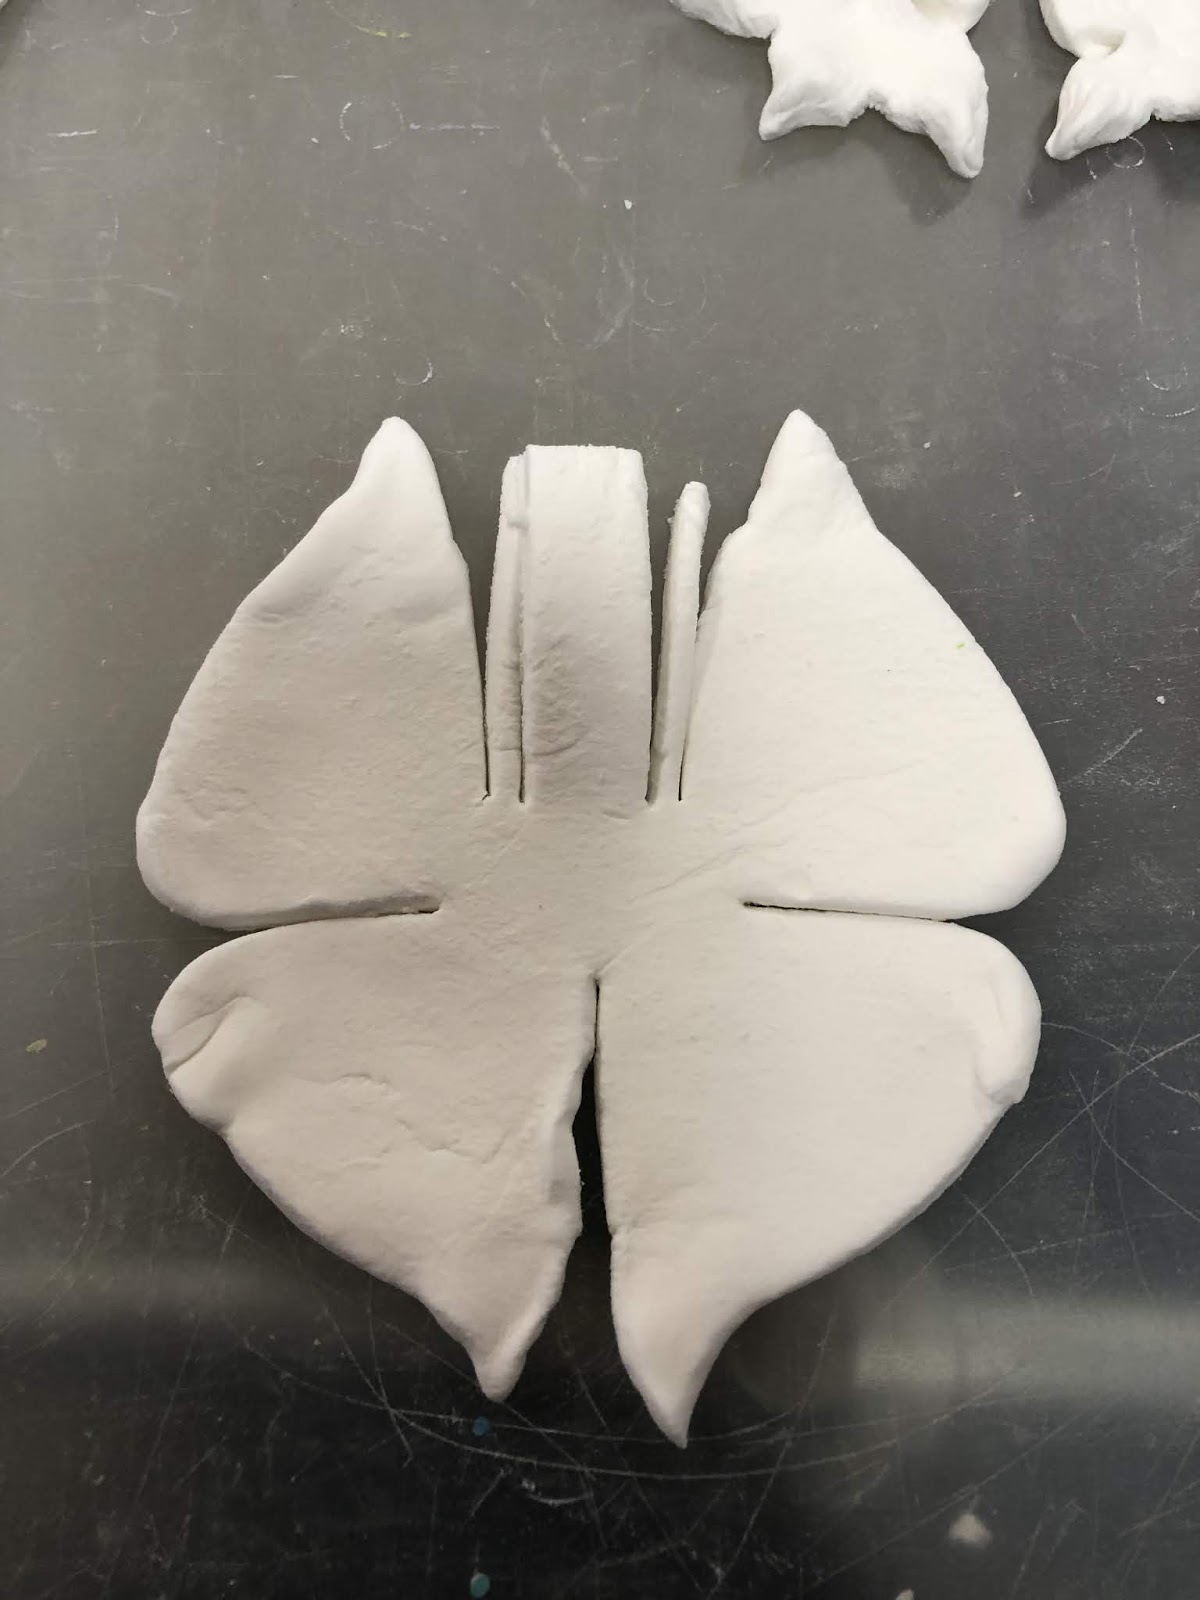
One last one: The Butterfly
Begin the butterfly in the same way as the others by grabbing a bit of the reserved clay.  Flatten the clay on your work surface and then cut out a circle.  I used the largest of the cutters (approx 4") for this one.  Use a cutting tool (a plastic knife or butter knife will work well) to cut lines as shown below.
Next, manipulate the "wings" to add curves and points rather than flat edges.  Can you see the butterfly taking shape??
Fold down the center to create the butterfly's body.  Be sure to pinch the end to help the body take shape.  Curve the antennae.  Add lines to the wings using a needle tool (I used my darning needle, but the back of your knife will work just as well).  As you can see I used the attachment from the shaver to impress lines down the center of the body.
 

The final step? I decided to roll the antennae down onto the top of the body and add a couple of glass beads to give the butterfly sparkly eyes. 
Of course, the butterfly is just as beautiful with the antennae curved between the wings and no visible eyes.
As with the others, set the butterfly aside to dry and then paint as desired.

I hope you have enjoyed these quick and easy creations.  Return next month for a few more of the Delight "pastry creations".

Linda Hess


Friday, January 24, 2020

Glitterific Office Buddy


Hello everyone and happy Friday! Today I am going to show you how I made my new little Glitterific Office buddy for my desk at work out of a wooden peg. He also serves as a pencil topper but I mostly like to have him standing off to the side as a reminder that I have a whole life filled with creativity outside of my 9-5. I’ve been having a rough time readjusting to being back at the office after traveling these past few weeks so I needed something exciting and fun on my desk to snap me out of it!

Supplies:
  • Creative paperclay
  • peg
  • sanding paper
  • acrylic paint
  • Folkart Glitterific acrylic paint
  • drill
  • pliers


First, I took my peg and figured out what size drill bit to use so that it could be placed on top of a pencil. Once that was sorted, I took a pair of pliers to hold the peg in place while I drilled out the hole. Be careful while using the drill and make sure that you drill about an inch so that the piece doesn’t topple over while it is sitting on top of your pen or pencil. Try the topper after drilling to see if it sits comfortably on top of your pencil. When the fit is right for you, move on to the next step.


I began to cover the top of the peg with Creative paperclay. I had some left over from a pack that dried out a bit. I conditioned it with some water and when it got a bit soggy I mashed it in place and allowed it to dry. Whenever I have semi dried out clay, I will use it for the base layer of a piece if possible and then use newer clay on top so that I could work out fine details.


Here I added a layer of newer clay that was a bit more pliable. When this layer dried, I went on to start building up the face.


I rarely make dolls with masculine features, or sculpt ears. Out of all of the dolls that I’ve created, there may be a total of 5 that actually have ears and maybe 4 males. I decided that I would try to work on those things that I am not comfortable with and see how they turn out.


I wanted to try out this new Folkart glitterific acrylic paint that I got from Plaid. I of course went with a shiny gold basecoat to put the glitter paint on top of.


After painting the piece in full gold, I began to put on a coat of the glitterific. I wasn’t sure of how to apply it to the piece, but I did realize that you can't just squirt it out of the tube like you normally would with normal paint. It has to be poured out into your paint tray and then painted on with a brush.
After a few coats, I realized that I still wasn't getting as much glitter as I would like, so I ended up just applying the glitter on the piece directly with a stick. 


Here is what I ended up creating with all that glitter, I do admit that I went a bit too far! Use Glitterific with caution and most importantly, have fun doing it!


Thank you all once again for stopping by, and I hope that you enjoyed today's tutorial! You can find Creative Paperclay® at the following retailers Creative Paperclay® Online Store, Michael'sAmazon, Joann's and Glitterific Folkart Paint at Plaid

See more of my work at Melandolly.com and be sure to catch updates on my Instagram page


Wednesday, January 15, 2020

Pocket full of hope


Pocket Full of Hope

Supplies:
Creative Paperclay
Heart cookie cutter
rubber stamp 
rolling utensil
craft glue
toilet paper roll
1" to 2" button
Wire for hanging
fine sand paper
ribbons for embellishing


Fun Easy Gift idea


roll out clay about 1/4" thick


and large enough to fill cookie cutter area


Using rubber stamp 


Press rubber stamp into clay, cover the entire piece of rolled clay


Cut out heart


I smoothed edge with my finger


Cut out two holes to hang piece by,  I use a large drinking straw
Let dry


Flip over and let back dry also


Cut a toilet  paper tube to fit in center of heart

Then cut in half 
bend about 1/4" under of sides


Put glue on folded area and put in place of front of heart and let dry


Roll out another piece about half the height of the heart


Cut one edge straight across


Stamp this piece 


Put glue on lower part of heart front


Lay next piece over the tube, cut off excess clay
around edge of hear...there will be an opening the very bottom
let dry


Roll out another piece of clay and add glue to the tip or point of hear


lay in place and sort of pull to give it the look I did
glue a button in place, while it is still not dry
let dry

I use DecoArt paints

Chalky Gesso light green 
paints 
Blue Mist
Dragon Fruit
Dusty Rose
white antiquing cream
make up sponge


Paint entire piece with gesso


I attached a copper colored wire 


gessoed wire


Sponge heart with 
blue mist
let dry
sponge edge with dusty rose
 let dry
sponge edge with Dragon Fruit
let dry


paint entire piece with antiquing medium
let dry
wipe off excess and let dry


lightly sand wire so a bit of wire shows 
and tie ribbon into bow

Hope you enjoy this