Saturday, July 23, 2022

How to Make a Steampunk Character


Hello everyone! My name is Cinnamon Willis and I am going to show you how I created this cute steampunk sculpture!


Supplies:


Gloves
Mask
Drill with small bits
Copper acrylic paint
Drop cloth or someplace to work on that can support a mess
Small wood circle
Bronze gears and key
Creative Paperclay®
Water
Sanding paper


First start off with getting your materials in order. Cover your work area with a drop cloth (I have a board that I work on instead), gloves,


Get a small drill bit and drill two holes into your wood disk for the feet of your sculpture. Make sure the bit is the same size as the wire so that it fits in snugly.


Begin to make your armature out of the wire. Check to make sure the wire sits snug in the holes that you drilled.


Continue making the armature to how you would like your figure to look. When you are done with the shape, use masking tape to cover the parts that you want to cover with clay. Begin putting the clay on top of the masking tape. Continue building up the sculpture and set it aside to dry before beginning another layer. 


Here I made little nubby hands and a square head.


Sand down the pieces that you would like to get nice and smooth.


Paint the piece black so that you can cover it with the bronze or gold if you like. The coat of black paint makes the metal paint look more like a piece of metal.


Here is a coating of bronze paint that was put on top of the black. Streak the metallic on top of the black sporadically so that it isn't so uniform.


Start getting your gears and key ready to be placed on the piece. Use e6000 glue to put the pieces on the figure and use a small string of wire to hook the key on with to hang from the figure's hand.


Use a protective coating to seal your figure. This is how he turned out.

Thank you all once again for stopping by, and I hope that you enjoyed today's tutorial! You can find Creative Paperclay® at the following retailers Creative Paperclay® Online Store, Michael's, Amazon, Joann's.

See more of my work at Melandolly.com, catch updates on 

my Instagram page and here is a link to my shop!


Thursday, July 7, 2022

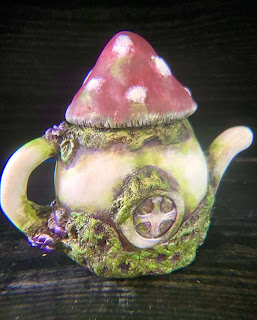
Little Teapot

Hi there, I'm Susie and I'm spilling the tea on how to create your own little teapot out of a recycled jar. I create monthly tutorials for as a Creative Paperclay® Design Team Member. They are meant to a simple building block for a creative to add their own ideas. So have fun with it. I do keep my videos short, because if you're like me, I like to get to the main idea and get busy creating on my own.

View the photos and then click on the video


Some supplies you'll need to gather:

Small Jar (I used a rounded little honey jar) Masking tape aluminum foil air dry clay (I use Creative Paperclay® water clay tools lace or your choice of item to create textures in the clay flower, insect and leaf molds if desired sand paper (fine grit) acrylic paints paint brushes Water based sealant (I used krylon spray clear matte finish)


You can find more tutorials from other design team members on the Creative Paperclay® blog.
http://creativepaperclay.blogspot.com/ You can find my work at: www. ArtbysusieK.com @Artbysusiek on IG, FB and TikTok @WillowHollowWoods on IG and FB

email ArtbySusieK@gmail.com