Friday, February 26, 2021

Create an Articulated Doll from a Sketch


Hello and happy Friday everyone, Cinnamon here and I am going to show you how I created this articulated doll out of one of my sketches. Since paperclay is made with paper fibers, you can draw directly onto it with pencils. Follow the steps below to see how this was done.

Supplies:
  • Creative Paperclay®
  • Small hand roller or something to flatten out clay
  • Thread
  • Exacto knife or plastic knife
  • Sand paper
  • Thin 22 gauge wire
  • Colored pencils
  • Sealer, Varnish


I started off with a sketch that I did years ago. I scanned it into my computer and made a few changes to it so that I could turn it into a doll such as made some legs and turned the skirt into pants. (I ended up not using the skirt in the photo at all by the way.)


I printed out the new sketch and cut out the pieces. I then took my clay and flattened it out with the hand roller. This could also be done with getting something flat like a book and pressing down onto the clay until it is the thinness that you would like. I recommend not going thinner then 1/4 inch in thickness, thin pieces are prone to warping when they dry.


When you are happy with the thickness of your clay, you can press your cut out pieces of paper into the clay. After your sketch pieces are flushed to the clay, you can use them as a guide to cut out the pieces from the sheet of clay.  I used a tool that was flat like an exacto knife to give me clean cuts but you can use a plastic knife to get the same results. Begin to separate your pieces from the clay.

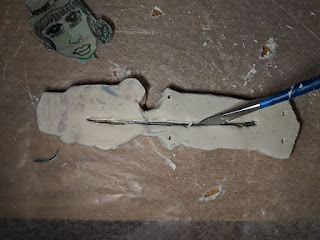


After separating the pieces, I noticed that a few of the thinner areas were tearing after cutting the pieces out. I put them face down and reinforced them by inserting a thin piece of wire in those areas and smoothed the clay around it to conceal the wire. Remove the pieces of paper after you used them to shape your pieces around them. I left the face on because I wasn't sure how to go about redrawing it. I suggest to remove all pieces before the clay dries since it is a lot harder to remove after the fact which I found out the hard way.


While the clay is still moist, poke all of your holes in for you to later attach the limbs with thread. Set the pieces aside to dry. I noticed after the pieces started drying that a few were beginning to warp. I sat a cup on top of those pieces to help them dry flat.


When the pieces are dry, sand them down so that you can get a smooth surface for drawing onto.


Begin drawing straight onto your pieces, paperclay is made from paper fibers so it easily accepts pencil as well as paints. Color in your pieces with colored pencils or paint if you would like.


Take all of your pieces and coat them with a varnish at this stage so that you don't smudge the pencil while you are threading the pieces.


Take your needle and thread and run it through the holes to attach each piece. Make sure you put the knots in the back when you tie the pieces together.


This is how she looks, AND she's flying!

Thank you all once again for stopping by, and I hope that you enjoyed 
today's tutorial! You can find Creative Paperclay® at the following 

See more of my work at Melandolly.com, catch updates on 
my Instagram page and here is a link to my shop!


.  

Friday, February 12, 2021

St Patrick's Day Four Leaf Clover Tutorial


Thanks for stopping by for a fun and quick project, perfect for St Patrick's Day. I am Susie Krichbaum of Art by SusieK and I am a Creative Paperclay® Design Team member. The design team presents tutorials and tips throughout the month and post them at https://creativepaperclay.blogspot.com/ SKILL LEVEL: beginner
VIDEO BELOW: filmed in real time and time-laspe with my voice instructing. SUPPLIES: Small canvas or canvas hardboard ** I prefer hardboard to canvas because it provides a stronger surface. I purchased my hardboard at the Dollar Store, but you could also use a flat piece of wood which would look so nice. Creative Paperclay® Available at Michael's, Joanne Fabrics and Dick Blick Art Supplies (online or store) variety of clay tools water gesso (optional) can use white acrylic paint acrylic paints You can glitz it up with glitter or shimmer paints all you want. I even added a few drops of Diamond Glaze® on the clover for water droplets. This project took about 1.5 hours to sculpt and then another hour to paint. **tip when I let the clay dry over night I placed heavy cups along the edges of the hardboard to prevent warping. You will see this in the video. Add a little easel photo stand for a cute little accent piece.


I hope you enjoyed this tutorial.  If you have any questions you can leave a comment below, find me in Creative Paperclay®Q & A Facebook group as well as my email ArtbysusieK@gmail.com


๐—œ ๐—ถ๐—ป๐˜ƒ๐—ถ๐˜๐—ฒ ๐˜†๐—ผ๐˜‚ ๐˜๐—ผ ๐—บ๐˜† ๐—ผ๐˜๐—ต๐—ฒ๐—ฟ ๐—ฎ๐—ฟ๐˜ ๐˜€๐—ฝ๐—ฎ๐—ฐ๐—ฒ๐˜€ on Facebook and Instagram:

* @๐—ฎ๐—ฟ๐˜๐—ฏ๐˜†๐˜€๐˜‚๐˜€๐—ถ๐—ฒ๐—ธ ๐น๐‘œ๐“‡ ๐’ซ๐‘’๐’ธ๐“Š๐“๐’พ๐’ถ๐“‡ ๐’ถ๐“ƒ๐’น ๐ป๐’ถ๐“๐“๐‘œ๐“Œ๐‘’๐‘’๐“ƒ

* @๐—ช๐—ถ๐—น๐—น๐—ผ๐˜„๐—›๐—ผ๐—น๐—น๐—ผ๐˜„๐—ช๐—ผ๐—ผ๐—ฑ๐˜€   ๐’ป๐‘œ๐“‡ ๐ธ๐’ถ๐“‡๐“‰๐’ฝ๐“Ž ๐’ž๐’ฝ๐’ถ๐“‡๐’ถ๐’ธ๐“‰๐‘’๐“‡๐“ˆ ๐’ถ๐“ƒ๐’น ๐‘€๐’ถ๐‘”๐’พ๐’ธ๐“€

* @๐—™๐—น๐—ผ๐—ผ๐—ฟ๐—”๐—ฟ๐˜๐—ฏ๐˜†๐—ฆ๐˜‚๐˜€๐—ถek  ๐‘œ๐“Š๐“‡ ๐’ป๐“๐‘œ๐‘œ๐“‡๐“ˆ ๐’ถ๐“ƒ๐’น ๐‘œ๐“‰๐’ฝ๐‘’๐“‡ ๐’ฝ๐‘œ๐“‚๐‘’ ๐’นรฉ๐’ธ๐‘œ๐“‡

            ๐“’๐“ก๐“”๐“๐“ฃ๐“˜๐“ฅ๐“” ๐“Ÿ๐“๐“Ÿ๐“”๐“ก๐“’๐“›๐“๐“จ® ๐““๐“ฎ๐“ผ๐“ฒ๐“ฐ๐“ท ๐“ฃ๐“ฎ๐“ช๐“ถ ๐“œ๐“ฎ  @creativepaperclay

 WEBSITE

Susie Krichbaum of Art by Susie K
www.ArtbySusieK.com


Friday, February 5, 2021

February 2021 First Friday Fan Day


Need some inspiration for your next Creative Paperclay® project? Check out what folks are making with Creative Paperclay™.


Candleholders
Pop Top Doll Pin
Clay Knot Earrings

Make an Air Dry Clay Pinch Pot
Glowing Mushroom Nghtlight
Easter Bunny Statuette

HELP US FIND YOU!!
  1. Use the hashtag #CreativePaperclay on all your social networks.
  2. When using Facebook, be sure the your posts and images using the #Creative Paperclay hashtag are set to public, otherwise we won't be able to find you.
  3. Share your projects on the Creative PaperClay® Facebook page.
I'm always trolling the web, looking for great Creative Paperclay® projects. If you find something, post it on our Facebook page.

GOT QUESTIONS???

Find the answers to your paperclay questions. See what other folks are creating. Stop by our Facebook group and say, "Hi!" Creative Paperclay Q&A
Carole

Monday, February 1, 2021

Clay Talk: A Creative Paperclay® Phone Stand

 Hello, did you miss last months Clay Talk? Not to worry. Below is a recording of Clay Talk.


It is quite a simple process but the result is stunning.

Here is the video:


Don't forget to share your creations with us in our Facebook Group. We would love to see them! For more inspiration have a look around the blog. There are tutorials for many levels using Creative Paperclay®. You can also visit my blog suzettehussey.com


You can find Creative Paperclay® online at Creative Paperclay Co and also at Michaels, Hobby Lobby, Dickblick and Amazon. 


Thanks for stopping by!


Suzette


Blog: https://suzettehussey.com/

Website:  https://www.papermachepatch.com

Instagram: https://www.instagram.com/papermachepatch/

Facebook: https://www.facebook.com/papermachepatch/

YouTube: https://www.youtube.com/c/PaperMachePatch

Skillshare: https://skl.sh/2QyIn93


Friday, January 22, 2021

How to Make a Heart Pendant for a String Necklace Using a Paint Blocking Technique


Hello and happy Friday everyone, Cinnamon here and I am going to show you how I created this pendant using a paint blocking technique with artist tape. I chose the Pan African Flag design to celebrate Black History Month, but you could apply this technique to any design that you would like.

Supplies:
Creative Paperclay®
artist tape or masking tape
Sand paper
Skewer
Leather string for a necklace
Thin 22 gauge wire
Acrylic paint
Sealer, Varnish


Start with the amount of clay that you would like to use for your piece. Since this piece is small, I didn't use any type of filler to cut down on the amount of clay that I would use as I normally would. Create the shape of your choice and smooth it out as much as you possibly can, I chose a heart.


Make the hole for your string with your skewer before the piece dries. Make as many adjustments to the hole as you need. Set the piece aside to dry for at least 24 hours or until it feels dry to the touch.


When the piece is dry, this would be the perfect time to sand it. I am happy with the imperfections of this heart so I chose to leave it as is.


I painted this first with a layer of black paint. I chose black for the underpainting so that it could show a bit through the top layer for a rustic worn look. Set the piece aside to allow coat of paint to dry.


After the coat of paint is dry to the touch, use artist tape to block out any part of the heart that you don't want to paint on by accident. I like to use artist tape because it is designed to not damage paper if you remove it from artwork. You could sub it out for masking tape as well but just make sure to be extra careful when you are removing it. I blocked out the middle of the piece with the artist tape so that I could get perfectly straight lines on the top and bottom.


I painted the top and bottom with a dry brush technique so that the black layer underneath could show through.


When the paint dries pull the artist tape up to see if any of the paint layers needs to be touched up again. If you are happy with the finish, spray your piece with protective coating and set it aside to dry.


I had a wide flat leather string, so I was not able to tie a knot in it as I could if it was a thinner piece. I had to improvise by wrapping a piece of wire around the base to pull the strings in the front and back together and also separate them in the front as shown in the second photo so that the pendant would lay flat.


This is what it looked like after I was done. Tie the loose string in the back to the length that you would like the pendant to hang.


This dress form is 1/4 scale, so the pendant looks way bigger then it actually is.


Thank you all once again for stopping by, and I hope that you enjoyed 
today's tutorial! You can find Creative Paperclay® at the following 

See more of my work at Melandolly.com, catch updates on 
my Instagram page and here is a link to my shop!


Friday, January 15, 2021

Be My Valentine


Just in time to create one of a kind Valentines for that special someone, or maybe just for yourself.  


Supplies needed for part one
"The Sculpting"

Creative Paperclay®
Cardboard
Masking tape
Aluminum Foil
Scraps of lace for texturizing
basic clay tools
small bowl of water
    Your imagination!  

To prepare supplies for step two:
 "The Painting and Finishing Details"

Acrylic paints the colors you desire
 *I used titanium white, linen, metallic champagne,  and color change pink
Gesso (optional)
paint brushes
paper towel
water
lace or ribbon for creating the hanging piece and bow
glue
buttons (optional)


A time lapse video is available by clicking on the video link below.  The sculpting of the project took about an hour, not including the drying time.  For best results let the air dry clay cure over night before sanding and then painting.  

PART ONE
"The Sculpting"

PART TWO
"Painting and Assembling"


If you have any questions about this project you can comment in the section below or send me an email at ArtbySusieK@gmail.com / Subject line Be My Valentine Tutorial.  


Enjoy yourself and take all the creative freedom you need to make this your own.  


         I invite you to visit my other art spots:

* @artbysusiek For Peculiar and Halloween

* @WillowHollowWoods  for Earthy Characters and Magick

* @FloorArtbySusieK  Art for your floors and other home dรฉcor

          CREATIVE PAPERCLAY® Design Team Member

Email ArtbySusieK@gmail.com