Showing posts with label Ornaments. Show all posts

Tuesday, December 20, 2016

Tori's Tip - Cookie Decorating Fun for Kids of All Ages


For my tip this month I'm reminding you that Delight™ Air Dry Modeling Compound retains color well when mixed with acrylic paint, it is very light weight, and can be easily rolled out and cut with cookie cutters!

For a fun way to make ornaments,  mix up a batch of gingerbread or cookie dough colored clay, cut out shapes with cookie cutters and allow the pieces to dry.  When the clay pieces are dry, decorate them with puffy "shiny"fabric paints to create the look of icing.

This will be my last post of the year, so I'll wish all of you a HAPPY NEW YEAR! - looking forward to the new year ahead and creating more projects with Creative Paperclay® and Delight™


Thanks for joining me here again!  As always, play, experiment, and have fun!

Tori
Find me on Facebook, or peruse & ponder pics with me on Pinterest

Friday, September 11, 2015

"A" is for Apple

Today's How To is about making some Apple Ornaments for your favourite teacher!


Hi, it's Ann (from the blog at:  www.annmakes.blogspot.com) here today to share with you my latest Creative Paperclay® Project.  I was inspired by the Back To School Theme.  I still have one Teenager who is attending a new to him school this year, and with that came a lot of excitement and anxiety.  Now that the house is just a little bit more quiet and things are starting to calm down, I found some time and thought I would get a head start on some School Theme Ornaments.  Here is what I did:


First I dug out one of my kids' old plasticine making molds that looks like an apple.  I dusted the inside with some talcum powder, pushed in some Creative Paperclay® Modeling Material, and popped the apple piece out.  I repeated the process over and over to make a few apples.  


As the Creative Paperclay ® was air drying I inserted a paperclip into the back of each apple.


Once the apples were dry I smoothed out any roughness with an emery board, and I brushed off the excess dust.  I then Painted the apples in Red, and in Green.  I made some brown for the stems by mixing some red and green together and then painted the stems. 


As a final top coat I brushed on some Glossy Sealer.

I used some red and white twine for the small bows and as cords for hanging the apples.

The supplies I used:
Creative Paperclay® Modeling Material
DecoArt Crafter's Acrylics in Christmas Red, and Christmas Green
DecoArt Glue, Sealer, Finish in Gloss
Twine (Stash)
Paper clips from Staples

This is a fun and easy project that can be done with children.  I hope that you are inspired to make some fun ornaments.  To see other crafty goodies please come visit my blog at : http://annmakes.blogspot.com.

Thanks for stopping by.


Tuesday, December 9, 2014

Sing A long Christmas Ornament The Little Drummer Boy by Gloriann Irizarry


1


Happy holidays to all and a bless new year to all my wonderful friends, followers and collectors.
This season is full of the family gathering, food, decorations and many Christmas Songs.
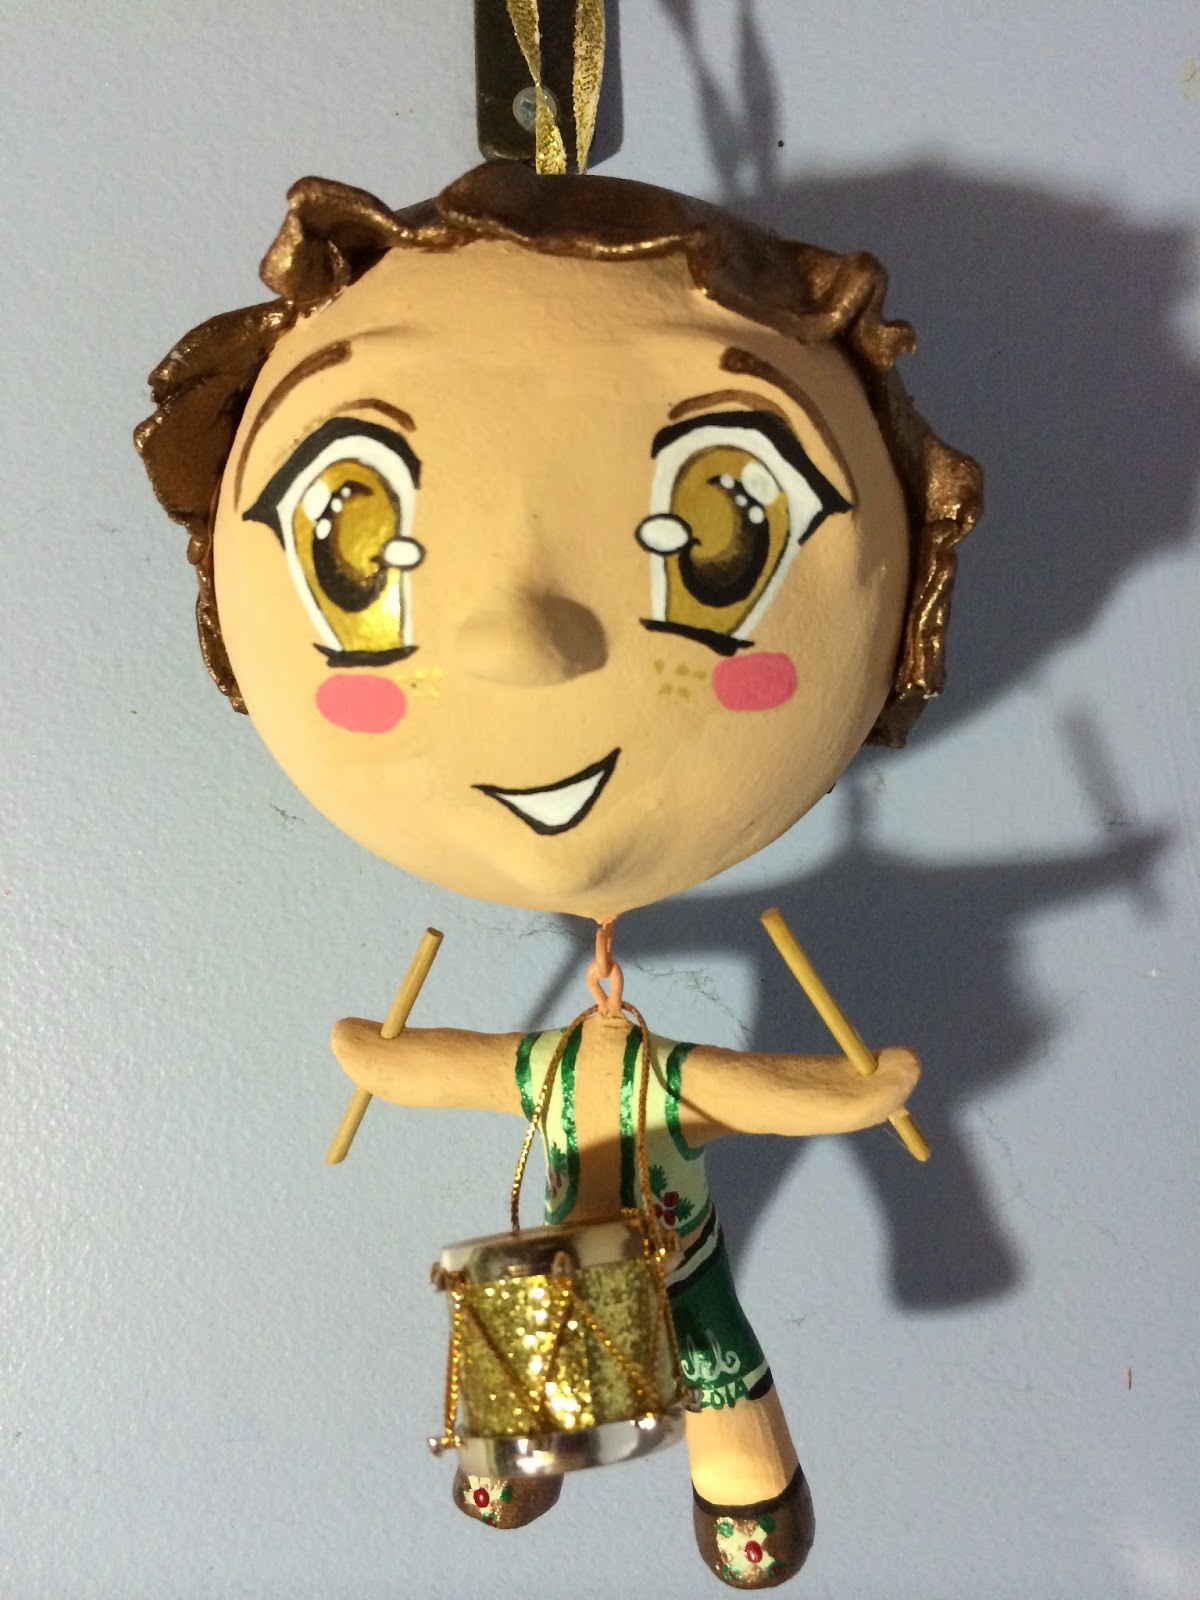
Thanks to these beautiful songs and to show the holiday spirit why not make an ornament. I have to say been part of crafting groups sure help to inspire you. These groups challenge you to create and make your gears turn. This is how this Sing A Long ornament took shape. With the help of my girls we choose The Little Drummer Boy we give him a Anime Manga better know has Chibi style and brought him to life in a cute ornament to hang from your Christmas tree or anywhere you want.


Materials
 
Delight™ Modeling Material
Foam round ornaments
Mini Drum Christmas Ornament
Wires
Multi use pliers
Aluminum foil
Acrylic paints
Brushes
Scissors
Water Mist bottle
Tacky Glue
 #2 Pencil


Cut a small piece of wire to create the small body armature.
Since is a chibi body it doesn't have to be big.
Chibi is a style of Anime/Manga drawing style used in characters to show smaller children as the actual meaning of the word is "short person" or "small child." have very small bodies with large heads.  


Is very important you pay attention to the neck piece a hop is required to hang the head from it.
Just bend the wire in half and shape a hoop with the pliers.
Now cut a strip of the aluminum foil and start wrapping around the armature.
 
 
Make sure your press the foil secure to the armature to shape the belly and back. 

 
Used your pliers cut a 3 inches long wire and curl it up like in the photo above.


Twist the wire inside the foam ball.
This will anchor the wire on your ornament head.
These ornament balls are seasonal items and I found these at Walmart fairly priced $.48 each
 
 
Now time to cover the ball with the Delight™ Modeling Material . Start by rolling a big ball flat to be able to cover the entire doll head.
I choose Delight™ Modeling Material due to be one of the most light weight clay I ever seen.
It help when your making a ornament because it is easy to use and once it dry has a foam like texture.

 
Once you have the sheet all rolled out like a pizza dough cover the ball and cut any excess out.
Smooth the edges with your finger and some water.
 
 
Do the same with the body.
Roll some clay out and cover all the body making sure all the foil and wires are cover in clay.


Shape all the body parts like the hands, belly and feet.
Chibi style doesn't required many detailed feet or hands so have fun


To make the hair just roll a smaller ball and once flat mist the head and attach the whole rolled clay on top and style to your like. You can also cut any excess out .

 
Move the the clay around roll it a little to give the hair the natural flow and it looks nice once it dry.
Set aside and let it dry.


Once the head is completely dry. Use your favorite acrylic paint in your chosen skin color.
Here the Peach Rose was applied.

 
Make sure your entire body is all painted with at least 2 coats of acrylic paint.
Water the paint down with water to minimized the brush strokes when the paint dry.
 
 
Now that the body base paint is dry you can start by painting the top vest and the little shoes.
Vest is light mint green and the shoes Renaissance Metallic brown 

 
Use the same Renaissance Metallic brown for the hair and apply 2 full coats.
Make sure you always wait for each coat to be completely dry before adding the other .

 
Do the same on the vest add to full coats of the light mint green.


Use Metallic Green for the pants and also use 2 full coats of paint.

 
Line up the vest with the Dark Metallic green.
Create some holly leaf detail on the vest and add dots to the shoes. 

 
To give the final touch to the vest use the Tuscan red and add the holly berries.
3 simple dots will be enough to achieve this look.
Here you can also add some belt detail. Also you can sign and year your ornament.

 
One more red dot of Yellow to create the buckle and a center dot of Tuscan red to make the shoe pop. .

 
For the drum sticks you can use toothpicks.
Stab thru the hand and cut to size.
Use a little dot of Tacky Glue or  Elmer's glue to secure the sticks in place.

 
Now to make the signature Chibi big eyes. Start by lightly sketching the eyes over the dolls head
 with a regular #2 pencil. Make sure the placement is were you want them to be. If the placement r not were you want them to be lines  can be easy removed with a school eraser.

 
Cover the whole iris with white. White is a base to make the top color pop and looks more vibrant.
Wait for them to dry.


Now add 2 coats of  the Teddy Bear FolkArt acrylic paint to create the iris.
Make sure is completely dry before each coat is apply.


Now to give the eyes some shine use Gold acrylic paint  to the final third coat.
For the Pupils use Renaissance Metallic brown to finish the eyes.
Paint 2 coats in a half moon shape. Make sure you wait for the pupils to dry between coats.


After the pupil had dry use the white acrylic paint to finish the eyes.
Water the white paint down to minimized the strokes out.
Paint 2 coats or more depending on the skin color of the doll you might need more. Now again make sure the paint is all dried before the other coat is added to achieve a nice bright eyes. 


Now use the Black acrylic paint to accent the eyes. Water the black out and with a small brush start outlining the eyelashes and pupils.

 
To finish the eyes add some whites to give them some shine.
Use the gold paint and add some freckles.
Use the black to out line the mouth and rose to blush the cheeks.
 
 
To finish the doll out use Black acrylic to outline the belt, pants and shoes.


Before your add the head to the body make sure to thread your cute mini drum ornament.
Use a pair of plier to twist and shape the head wire into a nice hoop and thread it to the body.
Secure it in place with the pliers. Paint it with acrylic paint to cover the wire and give it clean look.
 
Seal the ornament with any matter acrylic sealer to protect the paint over time.


 Now your Little Drummer Boy is ready to be display.
 
Are you ready for the holidays? Let just remember the true meaning of these holidays and make sure we spend time with all your loves ones. Don't be afraid to have fun and let them know how much your love them so they can have great memories to treasure.


Thank you kindly for join us for this Sing A long Christmas Ornament The Little Drummer Boy and if you have any questions feel free to leave us your comments below or email me here
 
 
scan or visit my blog at


Friday, December 5, 2014

December First Friday Fan Day with Rachel Whetzel

Happy Holidays, Creatives!! Rachel Whetzel here! It's First Friday Fan Day, and we appreciate you sharing all your creations using Creative PaperClay® with us! This will  be my last First Friday Fan Day post for a while, as I'm taking a break from working as a Designer for Creative PaperClay®.
I hope you hop over to the links I'm sharing with you today, and let your fellow Creative PaperClay® lovers know you saw what they shared too!


FACEBOOK
Hazel shared her first experience with Creative PaperClay®, and she is hooked! 

PINTEREST
These adorable Mermaids just melt my heart! 
And this Angel too!! 
Of course, it wouldn't be a true Christmas Season without a round little Santa to share! 

WORLD WIDE WEB
The Holiday Queen has TOO MANY adorable projects to share... just VISIT HER BLOG, and take your pick!! 

HELP OTHERS FIND YOU!!
Use the hashtag #CreativePaperclay on all your social networks. Be sure, when using Facebook, that you make your posts and images using the Creative PaperClay® hashtag are set to public, otherwise, people won't be able to find them. You can also share your projects to the Creative PaperClay® FACEBOOK PAGE
START SHARING NOW!!

Thanks for reading! I have loved every second of my two years here as a Designer for Creative PaperClay® and I hope to be able to return in the future!! In the mean time, if you'd like to keep up with me, and see more of what I'm up to and keep up with me, I'd also love it if you'd visit MY BLOG and Subscribe! You can also find me on FACEBOOK!

Thursday, December 5, 2013

Steampunk Christmas Ornament ACEO Frame

Hello There and Happy December, This is LuLu Lancaster with a simple ACEO Steampunk ornament frame.

I love the small original art cards known as ACEO, but sometimes it can be difficult to display them. 
This little frame is easy to make and is versatile where you can create different looks and even switch out the cards ;)

You will need 
~Creative PaperClay®
~an Artist trading card ACEO or small photo size 3.5"x2.5"
~a plastic sleeve for ACEOs
~tacky glue
~small dish of water
~scrap of lace
~metallic paint or mica pigments and glaze

~misc. metal objects~
old jewelry pieces bits of old chain

~a wipe out tool or smoothing tool.
~4 eye hooks or eye pins
~and ribbon

First you will need to make trace your card and create an opening either inside the tracing for a smaller opening and overall frame,
 or outside the tracing for a larger opening and larger frame size.

 Next you will need to roll out 4 small logs to place on your pattern. This will create the frame itself.
Smoothe the logs into one frame with a small amount water by either using your finger or a smoothing tool such as a wipe out tool. 

create a pattern in the clay for some texture. using an old scrap of lace you can gently imprint the clay by pressing down and rubbing a damp finger across the lace. Gently pull up to release and repeat on each side.


push 4 eye pins or eye screws into each corner of the frame. These are used for the ribbon and to hold your misc. bits and bobs.


Allow your frame to dry overnight. and gather your small pieces of metal or bits and bobs ;)


After your frame has dried you can paint it with metallic paint


attach the plastic sleeve to the back of the frame with a bit of tacky glue.

attach your findings to the bottom two eye pins, and add a length of ribbon ties to the top 2.

Slip your ACEO into the opening ;)

You now have a cute steampunk frame ornament.

Thank you so much for following along :) remember you can use this basic template to create any number of different themed frames for your tiny cards or small photographs.
LuLu