Showing posts with label Rachel Whetzel. Show all posts

Sunday, January 4, 2015

Meet our Design Team


Terri Sproul - Design Team Leader 
Terri Sproul is the force behind a fun paint called “Terri Sproul Mixers” from Sakura Hobby Craft and of a DVD called "MasquePen Magic" to see more of her video check out her Youtube Channel at http://www.youtube.com/terrisproul and on her Tuesday Night Live stream, http://www.linqto.com/rooms/terrisproul. She is a diverse and experienced CHA Designer, design team leader and instructor for multiple companies in the paper craft world including “ Robin Nest”, “Creative Paperclay®”, “Sakura Hobby Craft” and Arnold Grummer!”. Terri and her husband Marc have the pleasure of living in San Diego County on top of Palomar Mountain. She has received a Bachelor of Scrapbooking Arts from Creating Keepsakes and Bachelor of Scrapbooking Education from EK Success. Terri’s passion is teaching fellow Scrapbooker’s and Stamper’s new techniques, and to think ‘out of the box’ and ‘off the Page.’ Visit her website and blog to see all the exciting stuff she does at http://www.terrisproul.com – link to blog is also there.


Rachel Whetzel - Guest Designer 
Rachel Whetzel specializes in creativity and mixed media art through thrifting, up-cycling, re-purposing and new design. She has had the privilege of being published in several Stampington Publications, and is a contributing artist in Seth Apter’s newest Mixed Media book, “The Mixed-Media Artist: Art Tips, Tricks, Secrets and Dreams from Over 40 Amazing Artists”. Rachel owns the art journaling prompt blog, A Year in the Life of an Art Journal and the photography inspired, Monday Mugshots. This is Rachel's fourth year as a member of the Creative Paperclay® team. She loves breaking rules, and is married to a cop. (is that like a double negative?) When she's not obsessively refreshing her Facebook page, Rachel likes to create things with thrift store findings and things other people call the J word… (that’s JUNK) When she's not creating things, she's neglecting her housework, spending time with her family by the river in the summer, playing horseshoes with the kin folk, cheering too loudly and possibly cursing at her kid’s games, and milking her goats. Not necessarily in that order, except for the neglecting house work part. You can find Rachel on line at the following places!


Carole Lassak - Fan Friday and Kids Projects 
Carole Lassak In addition to paper crafting and mixed media projects, Carole enjoys a variety of handcrafts and fiber arts, including jewelry making, needlepoint, crewel, knitting, crocheting, beadwork, and lacemaking. She regularly travels abroad to study the art of handmade bobbin lace. She incorporates mixed media techniques to create unique jewelry and paper art pieces. In addition to her “real” job as Communications Manager at Delphia Consulting, her “fun” job is working with the Create & Craft team on a variety of creative endeavors. Carole holds Tombow Techniques Basics and Zutter Bind-it-All certifications. Her design team memberships include Sakura Hobby Crafts (Apr. – Sept. 2011), Amazing Mold Putty (Oct. 2011 to Mar. 2012; Apr. to Oct. 2013), The Robin’s Nest (Jan. – Jun. 2012), and Arnold Grummer's Paper Making (Oct. 2012 to date). Her favorite food is sushi, especially sea urchin. “I think any piece of raw seafood on a pillow of rice would delight me.”


Hi everyone, I am Lynda Jeffs - back for my 2nd term on the design team! I am married to a wonderful man named Del - who truly has been one of the best things that has happened to me! We have 8 kids together (4 boys and 4 girls), and just had our 8th grand-child (3 boys and 5 girls), with one more on the way! We currently live in Sparks, Nevada...I've lived in 3 states since June 2012 - I hope this is one of my last and final stops! Creative wise, I have made cards for almost 23 years now...my first project was my almost 23 year old daughters' birth announcements made out of a Disney stamp and cardstock! I have been making scrapbooks now for over 15 years now and love to create one of a kind items! One of my favorite thing right now is using Creative Paperclay® with my scrapbook templates to make one of a kind embellishments for my cards or pages! I also love to alter things, to make them in to something else which you can check out my ideas for all of these on my blog at www.memoriesintyme.blogspot.com/ . On a side note, I love to read, watch HGTV...spend time with my family, bake when I can...and collect fun ideas to create later on! This is me in a nutshell!


My name is Gloriann Irizarry. I was born and raised in the beautiful Caribbean island of Puerto Rico. Ever since I can recall, I always had my hands on crayons, scissors and paper. My parents knew from the start how much I love to create! I remember taking my dad’s catalogues and cutting everything out to play with the pictures and to create collages. I had so much fun doing this. My dad, well, he really was not sure how to place his order from my collage! When I turned 10 years old, I moved to the eastern coast of Puerto Rico to live with my dear Irizarry grandparents. There too I attended Ana Roque High School. My experiences at this school helped to make one thing crystal clear to me: I LOVE ART! I took a freshman art class with a wonderful art teacher. I never left the classroom (or so it seemed!). I became addicted to art and came back every semester for more classes. I could not stop! I loved how our teacher motivated us to create and craft, how he guided us, and how he helped us improve our skills. He also organized expos and fairs so that our art pieces had a place to be shown. Yes! I ended up taking a total of 6 semesters of Art classes with him and graduated the top of the Art class from the Escuela Superior Technologica Humacao in 1996. It was a great learning experience. Once I graduated from high school, I went to the El Turabo University for a year before I moved to upstate New York in 1998 . I now live in the beautiful Mohawk Valley here in central NY with my family. As a mother of three young wonderful daughters, I find myself working, caring for my family, and taxiing kids from here to there for various sporting events. I have to say I’m never bored! I enjoy every little moment I spend with my girls, but will always continue to work time to create art into my daily schedule as that means doing what I love the most. My girls are learning the joys of creating also! I love to sculpt and will never stop creating. I was born this way and for that I thank GOD every day. Art has been a great way to be creative and to express myself. I like to keep my hands busy creating – whether it is unique jewelry, art dolls, ooak sculpture figures, fairy wings for all your project needs, or even wigs and clothing for your sculptures. I love all the variety in art! Why? because ART is so rewarding. Seeing your creation take form is an awesome feeling. All my available items will be for sale at my store.


My mom said I started drawing and crafting at the age of three, experimenting with every art and craft medium I could get my hands on (and some I wasn't supposed to get my hands on!) As a teen I worked as an illustrator for our school newspaper, and also started my freelance career designing advertisements and business logos. Throughout my adult years, my artistic endeavors have taken many paths, both professionally and privately. I allowed my vision to dictate the technique, so rather than stick with one media, my work included oil painting, watercolors, colored pencil, pen and ink, sculpting, wood carving, metal work, computer graphics, and more. I am still obsessed with creating art, and finding or inventing new ways to bring my ideas to life. I have been a crafts instructor and professional miniaturist for almost 20 years - a job which allows me to work with a wide variety of media! I discovered Creative Paperclay® in 1999, and it quickly became my favorite clay for crafting...well, just about everything! I am extremely thrilled that my horse sculpture was chosen to be on the front of every package! My interests range from steampunk and fairy gardening, to robotics and vintage crafts, but my favorite activity is playing and creating with my grandkids. I also enjoy writing, gardening, photography, camping, dog training, and sock dancing.

I am a true Southern Californian. I was raised in Columbia, South Carolina and became a permanent resident of Southern California following job assignment through U.S. Army with 17 served. I have been married for 23 years and have two man babies aged 21 and 23 years old. 
I consider myself a Mixed Media Impressionist and an Art Supply Enthusiast. I used to be an avid digital photobook creator and food photography hobbyist. And I even had the privilege to have one of my photobooks included in a starter kit for the consultant’s package for digital scrapbooking company. I started paper crafting shortly after my father in law passed away in March 2009. My mother in law asked me to create a traditional scrapbook for her. 
So that project caused me to evolve from a digi girl to a mixed media follower.
I am an avid art supply shopper and I love conducting creative play with new products and techniques. I enjoy creating are Artist Trading Cards (ATC), Altered Playing Cards (APC), Altered Books and most recently I have been experimenting with Altered Bottles and Altered Shoes. I also a regular participant in art swaps.
My love for creating ATCs inspired me to start my own ATC club which I established at my local scrapbook store, Custom Impressions in Los Alamitos, CA. During my meetings, I provide detailed product reviews and technique demonstrations. I was appointed to establish an altered art program for the store and teach some of the classes. I am now evolving from a skilled demonstrator to an educator with my first classes scheduled at the beginning on January 2015.
I frequently use book pages, gessos, stamps, stencils, texture paste, modeling paste, spray inks, acrylic paint, watercolor products, Colourarte products, Viva Décor products and varies clay products in projects. 
I take pride in my work and challenge myself to create projects that ignite an art share conversation. My primary mission now is to spread joy through my art and inspire others to conduct their own creative play.


I have been creating art for as long as I can remember. I studied graphic design in Portland, Oregon before moving to Denton, Texas and putting all my focus on creating mixed media art. In addition to being on the Creative Paperclay design team, I am a contributor for the Robin's Nest Design Team, an article writer for Mixed Media Art, and a blogger for DecoArt.

I strongly believe in giving back. I volunteer at Scrap Denton Creative Reuse Center where I teach workshops, art camps, and perform art demos. I am very passionate about mixed media art and enjoy helping and watching others discover their creativity.




Ann is a Mixed Media artist who lives near Ottawa, Ontario Canada, mom of two terrific teens, wife of a very busy businessman, and servant to one fluffy cat. From sewing and most needle crafts, stamping, scrapbooking and a lot of paper crafts, to drawing, painting and working with inks, Ann is multi skilled and never bored . She had some formal training with a short stint in fine Arts in College, many many workshops, and a lot of self learning. She also has experience working as a consultant, teacher, and writer of various crafts. Her style is eclectic and vintage, inspired by nature and her collections of found objects and ephemera. She loves to scour the internet, magazines, and flea markets for ideas which she collects in her various notebooks and takes lots of pictures with her I phone. Her favourite place to be is in her home studio with her beloved family nearby. Her family motto is : Live well, laugh often, and love much. Her blog is: http://annmakes.blogspot.com


Hi, my name is Donna and I live in the Rocky Mountains of Colorado. This is
where I create all of my art. I love art of all kinds.

Paint, ink, clay, and drawing. I love it all! I have been published and have been
a spotlight designers on many blogs.

I am excited to be on the Creative Paperclay design team for a second term!

Friday, December 19, 2014

Photobooth Prop Phrenzy with Rachel Whetzel

Happy HOLIDAYS, Creatives!! Rachel Whetzel here! I've been a busy elf this season, helping with some projects for the Christmas Party at my husband's work. One of the larger projects we're doing, is creating a photobooth area. Employees can get dressed up, and be silly while taking their pictures at the party! We've made a TON of the props, some signs, and fun festive frames, but I wanted to do more than the usual paper cut outs on a stick for a few of them. I got busy making THESE using Creative PaperClay® Modeling Material. After our party, I'll share more of the projects that weren't Creative PaperClay® related on MY BLOG.


This is my last post here on the blog for a while!! I'm taking a break from some design team commitments, and spending HUGE amounts of time at basketball games. Thank you all so much for your support, and for the love you show each of us designers here! I have enjoyed being here so much. Of course, I won't stop creating, farming and generally misbehaving, so if you'd like to keep up with me on my other interweb haunts, I would love that. (links at the end of this post) Now, ON TO BUSINESS! 

WHAT YOU'LL NEED to make your own photobooth props:
  • Creative Paperclay®
  • Paints and Brushes I use Folk Art acrylic craft paints and Krylon Spray paints
  • Foil
  • Empty and clean large can
  • Headbands
  • Various decorations... (holly, berries, hat band ribbon, metal pipe cleaners, bells
  • Sturdy small dowels
  • Drill (I use a hand drill) 
  • Glue (I used E6000) 
Gather your supplies for your creations, and get cracking smooshing and shaping your foil into shapes! I created the core for my carrot nose, rudolph's nose, and Frosty's pipe. 


Wrap and twist your foil around a headband to create the core for your antlers.


Cover your pieces with Creative PaperClay®, and place them in the oven to speed up your drying time. I usually put mine in at about 190 degrees F. 


To add stability to my pieces attached to headbands, I added a layer of Creative PaperClay® to the underside of the headbands. Here they are, complete with paint. 


Once your pieces are dry, sand them, and paint them, and add your decorations! I put some holly, berries and a hat band around the hat:


Some orange spray paint, and shading using stain to bring out the "carrotness" of my carrot nose:


Some red paint and glitter to Rudolf's nose:


And some bells and pipe cleaners wound into coils to his antlers. I also painted the headband red, to imitate his halter. 


Once everything is painted and decorated, add your dowels by drilling a hole into the pieces that will need a dowel, and glue them into place. Now you're READY FOR ACTION!! 


Thanks for reading! I have loved every second of my two years here as a Designer for Creative PaperClay® and I hope to be able to return in the future!! In the mean time, if you'd like to keep up with me, and see more of what I'm up to and keep up with me, I'd also love it if you'd visit MY BLOG and Subscribe! You can also find me on FACEBOOK!

Friday, December 5, 2014

December First Friday Fan Day with Rachel Whetzel

Happy Holidays, Creatives!! Rachel Whetzel here! It's First Friday Fan Day, and we appreciate you sharing all your creations using Creative PaperClay® with us! This will  be my last First Friday Fan Day post for a while, as I'm taking a break from working as a Designer for Creative PaperClay®.
I hope you hop over to the links I'm sharing with you today, and let your fellow Creative PaperClay® lovers know you saw what they shared too!


FACEBOOK
Hazel shared her first experience with Creative PaperClay®, and she is hooked! 

PINTEREST
These adorable Mermaids just melt my heart! 
And this Angel too!! 
Of course, it wouldn't be a true Christmas Season without a round little Santa to share! 

WORLD WIDE WEB
The Holiday Queen has TOO MANY adorable projects to share... just VISIT HER BLOG, and take your pick!! 

HELP OTHERS FIND YOU!!
Use the hashtag #CreativePaperclay on all your social networks. Be sure, when using Facebook, that you make your posts and images using the Creative PaperClay® hashtag are set to public, otherwise, people won't be able to find them. You can also share your projects to the Creative PaperClay® FACEBOOK PAGE
START SHARING NOW!!

Thanks for reading! I have loved every second of my two years here as a Designer for Creative PaperClay® and I hope to be able to return in the future!! In the mean time, if you'd like to keep up with me, and see more of what I'm up to and keep up with me, I'd also love it if you'd visit MY BLOG and Subscribe! You can also find me on FACEBOOK!

Friday, November 21, 2014

Winter Skeleton Snowball Snowman by Rachel Whetzel

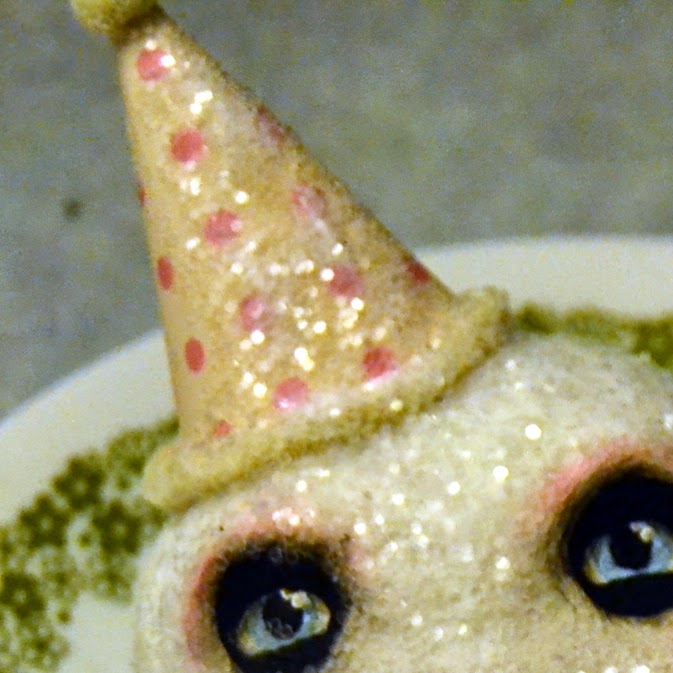
It's been CHILLY out in the world, Creatives!! Rachel Whetzel here! All the snow talk on line is making me feel very Wintery, so today, I'm sharing a little twist on a classic Winter icon, using Creative PaperClay® and a LOT of glitter.
I have made a few Skeletons using Creative Paperclay®, but never (I'm not sure WHY...?) any SNOWMEN... so I got started the other day, with a vague snowman/snowball idea in my head. As I worked, I changed directions a little bit, and ended up creating a Skull snowball. I may be a bit partial, but I really REALLY like how she turned out!


WHAT YOU'LL NEED to make your own Snowball Skeleton:
  • Scrap Paper and Tape (I used some old homework from the boys, and some Washi that isn't my favorite) 
  • Creative Paperclay®
  • Paints and Brushes I use Folk Art acrylic craft paints and Krylon Spray paints
  • Pastels 
  • A 3X3 inch (or so) piece of patterned paper. 
  • Yarn or metal pipe cleaners
  • Glue. I used E600 and Crafter's Pick the Ultimate
  • Glitter. I used an old jar of clear glitter I purchased at the thrift store, but you can get it at any crafting or school supply store.
  • Fake Holly or other collar decorations
To start, I create a core for my snowball. Using a core helps me use less clay, and also speeds up dry time, because innards don't need to dry! To create my core, I used a couple pages of old homework from my boys, and rolled them up into a ball. Then, to keep the shape, I wrapped the papers up in some of my less favorite Washi tape. Not because it needs to be Washi, but because that's what was close, and I was lazy. Any tape will do. Masking is nice too, because it's easy to shape as you tape. 


Once I had a good basic shape, I pressed Creative Paperclay® over the top, and created a more uniform roundness to the snowball.


When my shape was satisfactory, and while my clay was still wet, I layered on some more clay and shaped it into a face. You can add fresh clay to dry also. In both cases, you should use a bit of water on your finger tips and wiped onto the location you're adding new clay. This helps the two surfaces join well. Some rolled clay for the eyebrow bone, a rolled piece for the nose, and balls at the cheek and chin. Blend all the edges, and shape. I used my fingers for the whole process.


I also added a small round of clay at the bottom of the ball, to help the piece sit in one direction when it's resting on a counter or shelf.


I popped my piece into the oven at a VERY low temp (190 degrees) to speed up my drying time. Then I painted it with white gesso, and added the face of my piece. When I was working on the mouth, I originally tried to make an actual skeleton mouth, but I realized the piece would look more like a snowman if I used "coal" dots instead, so that's what I ended up with. For the eyes, the skeleton look is achieved by painting the black for the hollow eye sockets, and then painting eyes in over that. Notice that the nose is also similar to a skelton's. I think that is key to letting people know this isn't your ordinary snowman. Last, use your pastels to add a rosy glow to your skeleton's cheeks, brow bones, "nose" and chin.


Blend the eye socket area where the white meets the black with some shading. You can use your pastels for this area too. 


Now you're ready for your GLITTER!! I used Crafter's Pick, the Ultimate for this part. I kept the glue thin at the front of the face, and made it thicker around the sides and forehead.  I didn't put any glue on the eye area.


Sprinkle your glitter on, and while it's drying, get to work on your HAT! To make my hat, I used a large glass to draw a circle, and cut it out of my patterned paper. Then I folded it in 1/2, and rolled it into a cone. I cut a little of the excess off, and taped the inside seam of my cone to hold the shape. Then I glued the outside seam. I tied some yarn, cut the tip of the cone to create a hole the strings would fit through, and pulled the "pom" into the top of the hat. Then I glued the same yarn around the "bottom" of the hat, on the outside of the paper. Once that was dry enough, I glued the whole thing down onto my snowball snowman's head. I also added some glue and glitter to the top to make the hat look a little frosty! All of this gluing was done using Crafter's Pick. 


To create the "collar" on my snowball, I used some vintage Holly leaves and berries that I had saved from a thrift store find I have had stashed for years. For this part, I used my E6000 glue, because I wanted to make sure the plastic holly leaves and berries stayed in place well. 


Once that glue was also dry, I painted just a bit more glue (Crafter's Pick) onto the leaves and berries, and frosted them with some glitter! 


Here she is again! I feel like she needs a name... IDEAS!? 


Thanks for reading! If you'd like to keep up with me, and see more of what I'm up to, I'd also love it if you'd visit MY BLOG and Subscribe! You can also find me on FACEBOOK!

Friday, November 7, 2014

First Friday Fan Day, November 2014 with Rachel Whetzel

Happy NOVEMBER, Creatives!! Rachel Whetzel here! It's First Friday Fan Day, and we appreciate you sharing all your creations using Creative PaperClay® with us!
I hope you hop over to the links I'm sharing with you today, and let your fellow Creative PaperClay® lovers know you saw what they shared too!


FACEBOOK
Willowing shared what's on her mind these days.
Shauna shared a Day of the Dead bust she made.
Cindy shared this adorable pumpkin.
This totally creepy Frankenstein!! 

PINTEREST
This ADORABLE primative bunny rabbit is for sale!
Make yourself some beautiful ornaments.
This fairy tutorial would make a great elf for Christmas! 
Store your Christmas treats in this chilly container!
I love this WIP
MUST make some of these whimsical snowballs!!

HELP ME FIND YOU!!
Use the hashtag #CreativePaperclay on all your social networks. Be sure, when using Facebook, that you make your posts and images using the Creative PaperClay® hashtag are set to public, otherwise, I won't be able to find them. You can also share your projects to the Creative PaperClay® FACEBOOK PAGE. Each month, I'll browse the interwebs looking for projects from YOU, that I can share here! Be featured next month! START SHARING NOW!!

Thanks for reading! If you'd like to keep up with me, and see more of what I'm up to, I'd also love it if you'd visit MY BLOG and Subscribe! You can also find me on FACEBOOK!

Friday, October 17, 2014

Custom Fireman's Helmet by Rachel Whetzel

Hello, out there in Creativeland!! It's Rachel Whetzel, again! Earlier this year, I was contacted by a woman to make her husband a very unique gift. She wanted a vintage, steam punk style fireman's helmet made as a gift for his birthday. I have been working on the two part piece, and am FINALLY able to share it with you!!

WHAT YOU'LL NEED to make your own Helmet:
  • An old fireman's helmet as a base
  • Some rug hooking canvas, or other fibrous material
  • Creative Paperclay®
  • Sandpaper
  • Paints. I use Folk Art acrylic craft paints and Krylon Spray paints
  • Stain. I used Valspar antiquing stain
  • Paint brushes
I wanted to be sure my Creative Paperclay® stuck to the plastic surface of the helmet I was using, so I glued down some rug hooking canvas to the piece. The fabric of the canvas, and it's large holes were the perfect combination. They allow the clay to fill in nooks and crannies, and get a nice grip on the surface I was working with.
Once the glue was dry, I started layering Creative Paperclay® onto the piece.
I used the metal part that stuck off the top, as the base for an eagle that my client wanted on her helmet.
Once the eagle base had dried, I started layering in feathers, and creating a faux stitched leather look along the ridges of the plastic helmet.

After those layers of Creative Paperclay® had dried well, I started building up the edges of the helmet too.
Once ALL of my layers of  were dry, I sanded... and sanded... and sanded... and FINALLY, a few arm cramps and some raw fingers later, I spray painted the whole piece with a black base. 
Then, I painted the eagle with a few layers of gold paint, put red paint into my faux stitching spots, and used some stain to draw out the detail on my eagle.
When all that was finished, I put my client's custom made leather name plate on the front of the helmet to finish it off!! You can see the second part to this piece on the Amazing Mold Putty blog today! When my customer has given her surprise gift, I'll share the set on my Facebook page!

Thank you for reading! Want to see more of what I'm up to?
Visit me on PINTEREST and INSTAGRAM, or like MY PAGE on Facebook!
 ~ rachel

Friday, October 3, 2014

First Friday Fan Day October 3rd with Rachel Whetzel

Hello, once again! Rachel Whetzel here! It's First Friday Fan Day, and we appreciate you sharing all your creations using Creative PaperClay® with us! 
I hope you hop over to the links I'm sharing with you today, and let your fellow Creative PaperClay® lovers know you saw what they shared too!

FACEBOOK
Maria shared her ART DOLL page with us!

PINTEREST 
Holy Toledo!! There were a TON of pins this month! Check them out!! 
THIS little trick or treater is adorable. 
These WEE FOLK feel like FALL to me! 
Get your Winter decorations started early with these SNOW MEN.
Or try your hand at making one of THESE Frosties! 
These CHRISTMAS ORNAMENTS are beautifully intricate.

HELP ME FIND YOU!!
Use the hashtag #CreativePaperclay on all your social networks. Be sure, when using Facebook, that you make your posts and images using the Creative PaperClay® hashtag are set to public, otherwise, I won't be able to find them. You can also share your projects to the Creative PaperClay® FACEBOOK PAGE. Each month, I'll browse the interwebs looking for projects from YOU, that I can share here! Be featured next month! START SHARING NOW!!

In OTHER NEWS!! 


Our Halloween LINK UP is nearly here! Be sure to visit the blog, and add YOUR link to the party! 

Thanks for reading! If you'd like to keep up with me, and see more of what I'm up to, I'd also love it if you'd visit MY BLOG and Subscribe! You can also find me on FACEBOOK!