Showing posts with label tools. Show all posts

Wednesday, August 2, 2017

Creating Paper Texture August 2017 #artbygloricom Tip

August 2017 #artbygloricom Montly Tip
 
 
Hola and Hi to all my wonderful friends. It is Gloriann Irizarry from #artbygloricom once more with a neat and easy tip. It is another wonderful summer day here in Upstate NY.
Since summer is almost done I wanted to share with you a super neat trick I pick up over the years of me sculpting with the super versatile Creative Paperclay.


I like to recycle olf materials so for this one I will use a old brown envelope I recently got from a order in the mail. Cut all arounf the edges of the envelope. Pull the envelope in 2 parts.

 
Now you can cover the one part with clear thin tape and then completely crinkle it up.

 
Now use the tape covered portion facing the nicely moist Creative Paperclay and press it all aound it.

 
Make sure you press firmly and are using the clear tape cover portion. The clear tape will give the envelope the protection it needs to hold the crinkles and will tranfer the texture to the clay very nicely.

 
Dont be afraind to press hard or moving the little crinkled ball of paper around to make diferent imprints on the flat wet layer of Creative Paperclay material.

 
Once you are happy with the results you can set is aside to dry. This is how I make the crinkled texture look on some of my mix media sculpted pieces. Looks great when you paint them because the paint loves to pool in the crevices and will give the piece a more three-dimensional look instead of a flat layer.


It also work good at night when you make any lamp from recycle glass. The harder you press the clay against the glass containes the more light you will get to shine thru the final piece.
 
I hope you find this Tip useful and if so fee free to like and share.
For more fre Creative Paperclay Material ideas and tutorial feel free to follow us. Stay tune.
 
Sincerely
Gloriann Irizarry
@artbygloricom #artbygloricom
@bygloricom #bygloricom

Tuesday, January 3, 2017

Tori's Tip - Simple Relief Carving

Happy New Year, friends! 

Later this month I will be showing you how to create a set of "art dice".  I have chosen to do a relief carving in the center of each side of my dice, and although it isn't necessary to do this to complete the project, I'm sharing the how-to for my monthly tip.

This type of carving, done on dry clay, can be used for many different types of projects, including page embellishments, boxes, etc.

Bonus tip - I've included a diagram for making your own sculpting/scraping tool :)


Thanks for joining me here again!  As always, play, experiment, and have fun!

Tori
Find me on Facebook, or peruse & ponder pics with me on Pinterest

Tuesday, July 14, 2015

Best Creative Paperclay Tools Tips by Gloriann Irizarry

 
It is finally Summer. The weather is getting nice and hot. Now I have been ask about Creative Paperclay and what's the best tools to use so I will be answering this question to full extend today. Feel free to visit our Creative Paperclay Q&A Facebook page if full of many wonderful Creative Paperclay artist always helping others with any question you might have about Creative Paperclay .


Rollers are the best way to roll a clay sheet.
It doesn't have to be fancy or expensive a simple old aluminum foil paper roller will work.
Has long the cardboard is thick it should do the trick.

 
Aluminum foil is wonderful to create nice armatures and it is easy to bend and shape to most desired shapes. You can keep in the sculpt or removed the paper after the clay dry.

 
Freezer paper is great to keep the clay from sticking on your working surface.
Lay a sheet on your working table and can be use to keep the clay from sticking when you roll the sheets of clay out.


Stainless steel wires and foam forms are one of my favorites to use to create armatures for paper clay projects. They will save you time and money.


you can also use regular object like water bottles and foam to create intricate shapes. 
The best way to keep them from falling apart is Hot glue. Now the trick is not to use high temperature but use Low temperature instead and let it fully dry so it nice and thigh.


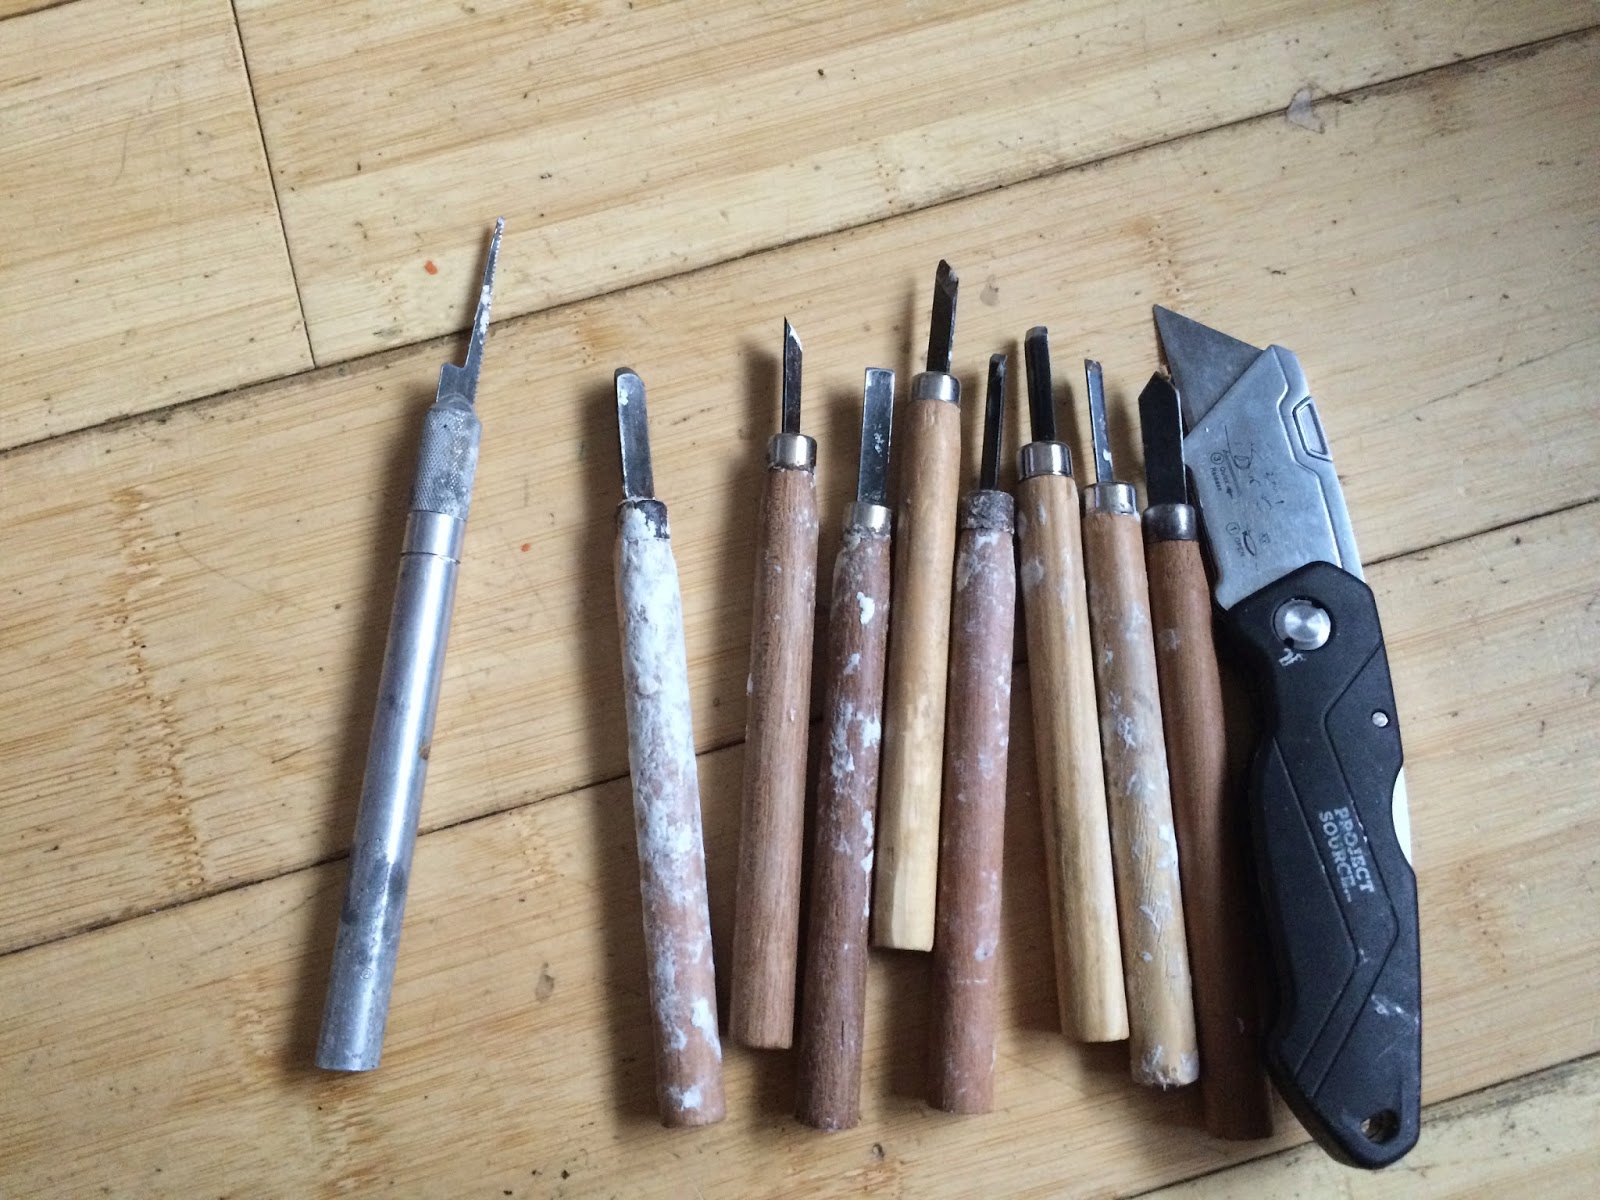
Hobby knife and carving tools work great .
 
Any spray bottle can be recycle for you to use has a water clay mister

 
Paper tape is wonderful to create nice armature or use has fillers for your sculpt.


Flat brushes are my favorite to smooth the sculpt with water.


Now don't be afraid to try other tools like executers, texture plates or mold design or marketed for either polymer clay of cake fondant they work wonderful on Creative Paperclay . You will be surprise all the wonderful thing available out there for you. If you cant find a tool you like don't give up is always fun to make your own too.  Now the possibilities are endless all you need to do is let your imagination Fly.
 
I hope this help and feel free to visit our blog for more wonderful tips by many other great designers team members so stay tune .    
 
 
Sincerely
 

Tuesday, June 23, 2015

Glori's June Creative Paperclay® 2015


Glori's June Creative Paperclay®


Welcome back to the Creative Paperclay® Blog
 
Summer vacations are in and kids are out of school. Now if you take some time off during the summer lets make sure our tool are well taken care of. Yes some of the many tools out there are mainly design for the use of polymer clay and the composition of the Creative Paperclay® is way different so the tools will need more care and attention.
 
Polymer clay is oil base and Creative Paperclay® is water base so we need to have that in consideration when you are finding tools to convert to Creative Paperclay®


For example when your using metal items or wires make sure you clean your tools carefully after every use. Wipe it clean and remove any excess clay off the tool.
Dry the tool off and to protect it from any water damage wipe it with some baby oil.


I like to do this to all my Xacto or hobby knifes to keep the sharp and ready for my next projects.
 
 
Keeping the maintenance on your tools will allow you to keep them efficient, free of rust and ready for your next project. Doing this will allow your favorite tools to be use on both polymer clay to Creative Paperclay® and back many times over.
 
When you create tools dedicate only to Creative Paperclay® make sure you do a test on the metal to be use. You want to make sure is water and rust resistant so you don't end up with a disaster once the water base  Creative Paperclay® dry all over it.
 
A well balance maintenance and care after every use any tool can be used with the versatile Creative Paperclay® and last you a life time.
 
I hope this all my Creative Paperclay® crafters and remember if you do have any paperclay project  question you can join us at our Facebook Page by clicking here .
 
Stay tune for more tutorials coming soon
 
Have a great summer and lets keep crafting!
 
 
Sincerely,

Tuesday, June 16, 2015

Tori's Tip for June - Create Your Own Sculpting Tools


This month I'd like to share with you some of the ways you can make your own sculpting tools -

  • Craft sticks can be whittled, sawn, and sanded in many different configurations.  These simple tools are some of my favorites for working with Creative Paperclay® modeling material
  • Dowels can also be used in a number of ways; the wooden dowels shown above, from bottom to top, are; dowel with large needle inserted and glued into the end (drill hole first, then insert with pliers), dowel with sewing needle inserted so that the eye of the needle can be used as a tiny gauge, hardwood dowel turned on a lathe, with a small scoop carved onto the end, craft dowel shaped into large rounded sculpting tool.
  • Next up is a piece of hard plastic tubing, with stainless steel shapes inserted.  Small pieces of sheet metal from the hardware or craft store can be cut with a jeweler's saw into any configuration that suits your sculpting needs.
  • Plastic erasers can also be cut down to shape when you want a soft touch (works really well with soft material like Delight™ Air Dry Modeling Compound)  adjust the flexibility of the tip by making the shaft longer or shorter.  The tips can be made to fit in a pencil extender, as shown.
  • Bent plastic coated wire is another easy tool to make for scraping away clay


Have fun creating your own tools, they are often better than purchased tools since they're created just to fit YOUR needs!


I'd love for you to join me for more projects & art adventures on my personal blog
Find me on Facebook, or peruse & ponder pics with me on Pinterest


Tuesday, April 21, 2015

Tori's Tip for April - Check your mailbox for FREE Craft Supplies!


Some people might hate getting "junk mail", but I always look forward to my fresh batch of craft supplies!  I can use the paper for paper maché, either in strips or after it has been through the shredder, and use the windows from the envelopes, shiny advertisements, etc. for collages or embellishments.  My most favorite junk mail gifts though, are the great tools that come disguised as credit cards.  There are many uses for them just as they are; smoothing clay, spreading glue or paint, scraping or using as a spatula when clay sticks, smoothing repairs of fresh clay onto dry, and slicing clay rolls, but they can also be cut and shaped in a variety of ways as well! (As an added bonus, the sticky junk that holds them to the envelopes can also be used to lightly tack small objects in place on a stick to hold the object for painting).

Here's a sampling of some of the ways the cards can be modified:


Turning the cards into clay texturing/sculpting tools with specialty scissors gives you lots of options.   The tool can be used for creating rough textures or smooth - if you are going for the smooth look, dip the tool in water before using, scrape across the clay a little bit at a time, and wiping off excess clay as necessary.


As always, play, experiment, and have fun!
Thanks for joining me on the blog

I'd love for you to join me for more projects & art adventures on my personal blog
Find me on Facebook, or peruse & ponder pics with me on Pinterest
Connect on Google+ or see what new creations I may have on Etsy


Tuesday, February 24, 2015

February helpful tip

 
Wow I can not believe it but  February is almost gone and this winter sure has been a very interesting.
Now today I want to answer a very often ask question.
 
What tools are required to work  Creative Paperclay®?
 
I will answer it but I want to let everyone know that working the Creative Paperclay®
 it is different for everyone. Some artist develop their own techniques while other create 
and make their own tools to work with.
 Now if you are new to this wonderful sculpting medium don't be afraid. This article will guide
you and soon you will see your self grow and learning  what will work and what will not.
I will show you the tools I favor , but remember  every artist is different and have their own  techniques. That is why these are to be use  not instructions , but more of a guide so you can see what you like and will practice you will  learn how to make it your own.


 A roller pin I found this one at the baker section, scissors  and water bottle mist.
 
 
Xacto Knifes, wood carving tool and heavy cutter.
 

 One of my favorite Xacto blades is this one is serrated

 
Rubber wipe away tool I found these at Hardy's Hobbies Studio

 
Aluminum Foil
 
 
White, grey or black primer.To seal the final piece. I like to used it if you want a nice clean 
painted surface. If you prime it will allow the acrylic paint to cover in less coats. Will also
help to prevent  the paint from falling off once it dries.


Copper, aluminum or stainless steel wires for armature making.
 
 
 Paper or painters tape. These is very useful to create armatures.

 
Flat wash paint brushes I use these to sculpt and soften the wet clay mix. A little water and this brush makes wonderful clean surfaces that will required less sanding once the piece dries.
 

 Now this bags are very useful and I love to keep them on hand. work good for storage your wet clay or pieces your working on. I like to have many sizes available. 


Now those are some of my must have in my studio If you have any questions or will like any more ideas how to use the Creative Paperclay Q&A  join us at facebook .
I hope this gives you an idea of the most commonly used tools.
 
Feel free to experiment and enjoy working with this one of a kind Creative Paperclay® Material
 
 
Have a bless day
Sincerely Gloriann Irizarry

Thursday, July 17, 2014

Creative PaperClay ® Tip for July with LuLu Lancaster


Hello :) This is LuLu Lancaster and today I have my monthly Tip.
 I thought about this months blog post while I was sculpting, and was pondering what could I tell you that would be of use. I think I have covered painting and sanding and just plain sculpting for the fun of it...but I had not shared the tools I use.

While there are a multitude of tools out there, I find that while using Creative PaperClay® I use some that are sort of non conventional,
and the one I use the most is attached, my hand!
My scarred up, dry skin, non manicured hands!

My fingers fit the eye sockets of my art dolls in just the perfect way. My thumb is the right size for smoothing the jawline. My middle finger can work wonders on the brow. Nothing can squish the clay or add water to it quite like my hands either. 


While my hands are my most used tool. I do have some odd tools as well, that nothing else seems to do the trick like.

I have an xacto knife for cutting clay
aluminum foil for adding crinkle texture or just armature
crochet hooks for effects and getting into crevices
dental tools for tiny details
wire ear and nose detail sculpting
brass tubing under lip detail
and many others!
chopsticks
dowels
screwdrivers
actual clay tools too! 

But my hands are by far my most used tool

Basically you do not have to go out and buy up all the fancy clay tools out there.
 You have one of the most versatile already with you (your hands) 
and then I am sure you have many more odd useful tools laying about the house <3

Thank you for reading along and Have a great day sculpting :D
LuLu


Tuesday, November 26, 2013

Tool Tip for Paper Clay and Art Doll BJD Crafting


Hello again my dear crafty friends!
Today I wanted to share a few of my favorite tools in my studio.


And I found one of them in the cake making isle. 


Yes my friends I do love my
  Wilton®  9" Foundant Rolling Pin. 
I so easy to roll out my Creative Paperclay evenly, at the perfect thickness for easy cutting and shaping. 
Roll the perfect 4mm (1/8in) height great to used in many sculpting projects. I like the slide-on adjustable rubber rings. It help to create the perfect clay sheet.


 The beauty of this tool is that it can be easy found at many stores like 
Michael's JoAnn's and Hobby Lobby's


The best way to be used is by rolling the clay between 2 sheets of Saran Wrap plastic sheets.I don't like to roll the clay too wet so it doesn't stick to the plastic when I'm peeling it. 


 It will give you nice and even clay sheet all the time.  


 Once you have your clay sheet rolled is ready to be add to any surface your working on.
 Here is an example i love to used for.


 I love to make ball jointed dolls (BJD). 
These dolls are sculpted in pieces and later string with elastic. 
And for that reason they have to be strong and hollow. So I always like to create all my pieces with
 a core and cover it on Saran wrap.


Is so easy to now be cover with the clay sheet i created with my roller.


This allow me to have an even sheet all over the core.
 It makes it easier to cut it out and once the center is out i get a even hollow piece for me to work with .

I found the easier and most secured way to cut the Creative Paperclay is 
Using my second favorite tool I own.


My X-ACTO saw blade. I purchase these after a very bad cut using the regular X-ACTO blades.
These blades will give you more control were you want your cuts because it is so precised.


After the precised cut is made I like to used a Elmer's Glue to bond the 2 pieces back together. 
It works great with The Creative Paperclay.

With the hollow core I'm now able to create  my OOAK pieces. 
The possibilities are endless.


Eleanor 2013 byglori.com


I hope your enjoys my little tips and please stay tune for more to come.

Feel free to email me any questions at gloriann@byglori.com


Have a bless day and happy Crafting!

Sincerely,

Gloriann Irizary at By Glori