Wednesday, October 14, 2020

Circular Texture Pin by Linda Hess


 Inspiration is all around us.  I mention that because this tutorial was inspired by my love of texture and ways to bring multiples together in an artistic way.  I hope you enjoy this.  As always, it is easy peasy lemon squeezy to do. 😄

Materials:

Creative PaperClay

a non-porous work surface

a roller (I used an acrylic roller, but a dedicated rolling pin would also work)

a circle cutter (mine is 2" round, but any size will work)

a knife or blade

texture sheets, stamps, mesh...the sky is the limit!

lightbulbs (the good, old fashioned kind) 

foil

Procedure: Part1

1)  Open the package of Creative PaperClay, pull off a bit, and place it on the work surface.  Rewrap the remainder of the package tightly in plastic wrap OR in a Ziploc baggie, squeezing the air out before sealing.  Using the acrylic roller, flatten the clay on your work surface to an even thickness

HINT: If you roll the clay between 2 popsicle sticks, then the final sheet of clay will have a uniform thickness.

2)  Use a circle cutter (mine is 2" round) to cut a few circles from the clay sheet.


3) Press texture into the clay circle.  The texture sheet will distort the circle slightly, depending upon texture used, so be sure to recut the circle to maintain uniformity in size.  Repeat with a variety of textures on the remainder of circles.


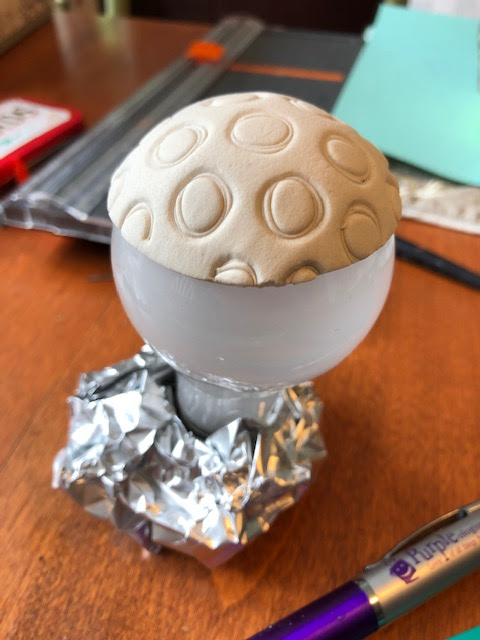
4) Gently lift each circle off your work surface.  Place onto the curved surface of a light bulb and press into place using the palm of your hand.  Repeat with each circle.  Let dry in place overnight OR (if you are an impatient sort) bake for 10-15 minutes @ 275 degrees.  

NOTE: You may have noticed in one of the pictures that I created a base for my lightbulb with a piece of foil.  This can be easily created by lightly crumpling a piece of foil, wrapping it around the lightbulb base, and flattening the bottom on your work surface.  It allows the clay circle to remain upright to dry rather than the possibility of a flat spot should it roll on the table.


That's it!  The first part is done.  After the textured circles have dried completely, pop them off the lightbulbs and continue on...


Procedure: Part 2

Materials:

Creative PaperClay

knife, blade, or Exacto knife

plastic paint palette 

assorted wires (aluminum 10g and Funwire 20g shown)

knitting or darning needle

scissors or wire cutters

Step 1) Use the knife, straight blade, or Exacto knife to cut each circle into 2 or 3 pieces.  If cutting is difficult, rock the tool back and forth to "saw" through the dried clay.  Rough edges can be carefully shaved away.  NOTE: Keep any shavings in the paint palette until later.  Arrange pieces, mixing textures, as shown above.

Step 2) There are 2 different ways to put the pieces together.  The first way is to roll a ball of Creative PaperClay (from the part set aside in plastic wrap or Ziploc), flatten the bottom slightly, and then arrange components on top of the ball.  Once you are happy with the arrangement, remove each piece, rub tacky glue on the inside, and place it back on top of the ball to dry.


The second way to put the components together is to (once again) roll a ball of Creative PaperClay, but instead of leaving it rounded, flatten the clay into a disc about 1/8-1/4" thick.  The disc can then be flattened inside of the cut, textured pieces.


Bet you thought we were done!  No way!  Now it is time to add some embellishments. 
 
Step 3) Again, there are options.  The first is to use a thick, aluminum wire (super easy to bend) to fill any channels or create another visual component.  Cut a piece of the wire longer than the length you will need.  Bend each end in and curve the wire, as shown below.

Curve the wire component and place it as desired.  Don't get frustrated if you need to rework the curve a few times.  Press everything together and set aside to dry as you work on the others.
NOTE: For this wire option, I used the first way to put together components (a solid ball behind the pieces).  The solid ball will give a better grip to the larger wire.

The second way to add wire is to use Funwire (or telephone wire).  Again, Funwire is easy to manipulate.  For this option, wrap the wire around a knitting needle, creating a tight coil.  Continue wrapping until the wire coil is longer than the space in which you would like to place it.  Leave the ends loose (see left photo).  These ends can be embedded into the back of the component.  


For this example, I used the hollowed back construction.  With that construction, I placed the piece on top of a lightbulb (smaller diameter than the initial one used) to dry.  Placing it on the lightbulb will also help to hold the wire in place (see below).


Step 4) Remember the shavings that were set aside in the paint palette?  Add water (a few drops at a time) to the shavings.  Allow the clay to soak up the water before pressing the mixture together to form a paste (add more water if needed).  You want the paste to be the consistency of tacky glue.

Use this paste to backfill any areas where there may be large cracks between the clay and wire components.  I am a big fan of using my finger for this process.  I usually press the mixture in with one finger and then wipe away excess with another.  If the paste smooths out any texture, use a fingernail or a toothpick or a turkey lacer to remove the paste and reveal the texture again.  Once you are happy with the piece's connections and look, set it aside to dry one final time.
NOTE:  It should not take as long to dry this time since you have applied such a thin layer.

Step 5) Almost done!!  Roll one final piece of Creative PaperClay into a thin sheet.  Cut 1 circle (same size as before) for each pin.  Press the domed component on top of the circle. NOTE:  I do this on top of a piece of paper or waxed paper so it will not stick to my work surface.
Cut or smooth away any clay that squishes out past the edges.  Allow the piece to dry flat overnight OR quick dry by popping the piece into the oven (250-275 degrees) for about 15 minutes.

Procedure: Part 3

Materials:
Plaid paints in choice of colors (I used Folk Art Multi-Surface Metallics in #2966 Bright Gold, #6310 Malachite, #6313 Tanzanite, and #6308 Garnet)
Small paintbrush
Bar Pinbacks
Superglue

1) Use the paintbrush to paint each section of the domed pin with one layer of your chosen colors, making sure to get down into the embedded textures.  Once the first layer dries, a second layer in an alternate color can be rubbed gently over the surface.  I used Tanzanite, Garnet, and Malachite to paint the first layer, then rubbed bright gold over the top.   Be sure to wipe away any paint that may cover the wires. 
2) Use super glue to attach a bar pin to the back of each pin.  
ENJOY 😁


Friday, October 9, 2020

Ghost Stories


Ghost Stories Mini Journal by Art by Susie K


I don't know about you, but October is my favorite month of the year.  Although I live in South Florida I create my own change of seasons with my decor.  Halloween keeps me on my toes as I typically travel to Halloween Art shows along my coast and in Georgia.  2020 is a little different this year, so in the "Spirit" of keeping things small I created this little tutorial so you can create your own mini Ghost Story Book.  


SUPPLIES:
Mini Journal with hard cover
Creative Paperclay®  and/or Delight Air Dry Clay  
bowl of water
simple clay tools
string
foil
something for texture i.e. Lace, balled up foil, charms etc
acrylic paints
paint brushes
            ***and your imagination***

Enjoy the slide show tutorial which includes written instruction below each slide.  


Facebook and Instagram accounts:

o    @artbysusiek For Peculiar and Halloween

o     @WillowHollowWoods  for Earthy Characters and Magick

o     @FloorArtbySusieK  Art for your floors and other home décor

EMAIL:  ArtbySusieK@gmail.com

WEBSITE: https://artbysusiek.com

Sign up for my Creative Breakfast Club 🎨 for exclusive offers and updates on website
ETSY: www.artbysusiek.etsy.com
PINTEREST: https://www.pinterest.com/susiewhc/
CREATIVE PAPERCLAY® Design Team Member @CreativePaperClay


Thursday, October 8, 2020

SWEET TREATS - Vintage Bather Enjoying a Sweet Treat

SWEET TREATS 
Vintage Bather Enjoying a Sweet Treat 


Isn't this the universal picture of childhood happiness?

There are so many options for sculpting with Creative Paperclay.  Follow along and create your own characters to suit your mood or the seasons.

SUPPLIES:

Creative Paperclay
Newspaper, Aluminium Foil, Plastic, or Paper Bags
Masking Tape
Wire (aluminium armature wire 16 gauge)
Black Gesso 
Acrylic Paint
Acrylic Sealant (Mod-Podge - brush on or Krylon Crystal Clear - spray) 
Basic Sculpting Tools (Knitting Needles and Popsicle Sticks work well.
Paint Brushes
Wire Cutters
Sand Paper


I start by creating a basic human figure with crumpled paper, foil, and plastic bags.  This is a great way to save garbage from going into landfills!  Use wire for the arms legs and neck.


Once the body form is completed.  cover the entire thing with masking tape.  This will allow you to really see the shape and it is easier to work with than loose bits of paper, foil, and plastic.


Have fun playing with different poses and positions before adding any clay. 


Start your sculpture by adding a thin layer of Creative Paperclay over the entire piece.  Allow it to dry completely before adding subsequent layers of clay. I like working outside in the sun to speed up the process.  If you have any cracks or imperfections use sand paper to smooth things out.


Next sculpt in the features and any other details.  You can keep the sculpting very simple.  The painting will bring it to life!


I left the shoulders for last to accommodate the ice cream and painting in hard to reach places.


At this point I was still deciding on the final pose.  I also added a bit of fluffy hair and a sailors scarf for additional vintage flair.


This Ice Cream cone is as big as her head but I'm rolling with it.  I enjoy a bit of whimsy in my art.


Once the sculpture is completely dry apply 1 or 2 coats of black gesso. If needed sand between coats to get rid of any imperfections. Once the gesso dries paint with acrylic paint. I paint in many layers using a dry brush technique. don't try to rush this step. 


I have detailed painting videos on my YouTube channel if you need some guidance with that.


Lastly, fill in the shoulder areas, attach the ice cream or other accessories in place with wire,  allow to dry, them gesso and paint. 


Allow your paint to dry for 24 hours then spray or brush on your sealant of choice.


For a tutorial on the ice cream cone go here


I think she looks like baby Einstein.  Do you see it?  It cracks me up all the time!
                                         Instagram: https://www.instagram.com/redwoodcoastcreativearts/

                                                         https://lorraineteresina.wixsite.com/lala
          Pinterest: https://www.pinterest.com/lala_415/
                                              YouTube: https://www.youtube.com/user/babylalamermaid1

Monday, October 5, 2020

Make your own Jack o'lantern

 Hello, welcome to another blog post. Today I have a spooktacular project for you! 


Isn’t he adorable. We made him on Clay Talk last Thursday.  Here is the video. Unfortunately, I had a technical glitch with the sound, so you will have to turn your volume up high to hear. Regardless,  you can still follow along. 


Clay Talk is held once a month on the first Thursday. It takes place on Facebook Live on the Creative Paperclay Modeling Material page. The next episode will be on Thursday, November 5th, at 8pm EST/ 5Pm PST. We will be getting started on Christmas decorations! Be sure to join us!


You can share your creations with us on our Facebook page. We would love to see them! For more inspiration have a look around the blog. There are tutorials for many levels using Creative Paperclay®. You can also visit my YouTube channel, Paper Mache Patch. I have a host of videos using Creative Paperclay ® as well as mixed media.

You can find Creative Paperclay® online at Creative Paperclay Co and also at Michaels, Hobby Lobby, Dickblick and Amazon. 

Thanks for stopping by!

Suzette


Friday, October 2, 2020

 ~Sweet Sentiments~

PaperClay Project by Sherri Welser


There are so many fun things you can create with PaperClay ! Today I will be creating tiles and using stamps, mica and embellishments to create these beautiful clay tiles! These tiles can be put on a wooden surface such as a plaque  as seen here.

Supplies

1 package of PaperClay

clay roller

cutter

rubber stamps

 2 stacks of 3 playing cards each ( for keeping the clay  level )

mica powder

metal embellishments

glass beads

e 6000


Set up your work station by laying down a mat and placing a stack of cards on either side of the ball of PaperClay. Using your roller ..roll over the clay and flatten out evenly. Take your rubber stamps and stamp into the clay. Using the cutter cut into squares and rectangles and with a small paint brush, brush on mica powered. At this point you can also push beads in and metal embellishments. and glue down . Let dry and these fun tiles can now be arranged and glued onto your surface. 


October 2020 First Friday Fan Day


Need some inspiration for your next Creative Paperclay® project? Check out what folks are making with Creative Paperclay™.


Toy Cookies and Biscuits
Ghost Tealights
Rainbow Wall Ornament
Air Dry Clay Beads
Miniature Teacups and Plates

Yarn Bowl
Kids' Project: Gilded Leaf-shaped Bowls
Custom Firefighter's Helmet

HELP US FIND YOU!!
  1. Use the hashtag #CreativePaperclay on all your social networks.
  2. When using Facebook, be sure the your posts and images using the #Creative Paperclay hashtag are set to public, otherwise we won't be able to find you.
  3. Share your projects on the Creative PaperClay® Facebook page.
I'm always trolling the web, looking for great Creative Paperclay® projects. If you find something, post it on our Facebook page.

GOT QUESTIONS???

Find the answers to your paperclay questions. See what other folks are creating. Stop by our Facebook group and say, "Hi!" Creative Paperclay Q&A
Carole