
I have done a lot of experimenting for this piece this month. Thought I'd go special since I'm 40 at the end of the month... ;)

For this tutorial you will need:
- Amaizing mold putty - make a mold of something you love
- Creative Paperclay(R)
- Acrylic paint - your desired colours
- Painting or palette knife
- Canvas to the desired size
- Terri Sproul mixers - your desired colours
- Chipboard letters
- Paper flowers
- Fiskars texture plate or similar
- Brushes
- Fiskars paper boarder punch
- Cardstock or papers
- Sand paper
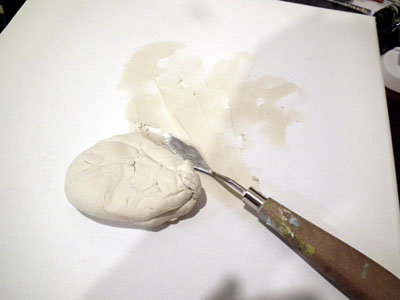
Step 1: apply paperclay directly to canvas with a painting or palette knife. Squishing it into the canvas.

Step 2: Next press a Fiskars texture plate into the clay on the canvas surface.


Now set canvas a-side to dry for about 24 hours.
Step 3: use the Fiskars texture plates to make your own mini boarders


Step 4: With Amaizing Mold Putty I made a mold out of my sons eagle on his toy bow and arrow set.
All I had to do was mold an extra wing to put on the finished eagle. I painted it up with acrylic paints.


Step 6:

Paint up your canvas. I used different yellow browns to dark browns.
Step 7: Let your paint dry and then sand your canvas down lightly

This shows up texture and white areas, its awesome.
Step 8: Punch out some paper with the Fiskars Boarder punch. Then stick it on the boarder of the canvas.

Step 9: add your flowers - i glued the boarders and flowers down with crystal lacquer

Step 10: when your boarder strips are finished drying paint with burnt umber or a dark colour.
Then when the paint is dry..... mix up TS Mixer - I used interference green here and paint it on lightly to the surface. Its so sparkly and awesome and this reminds me so much of Jade or NZ Pounamu (Po-na-moo)


Congrats you have finished your Canvas! yipee!!!
The flowers are hand made by me and are called "Kakabeak"
The swirl boarder strips of paperclay are very similar to the Maori carvings seen around New Zealand.
Stay tuned later on in the month for my tip and I'll be showing you how to make paperclay letters!!!
Yes the lettering you see here are also made out of Creative Paperclay (R). yipppe!!!
Happy Crafting
from Debbie Buckland
http://artycrafty.wordpress.com
3 comments:
WOW, Debbie! That's a fabulous piece of artwork! I've never thought of using Paperclay on my canvas light that but it's brilliant! What a wonderful surface to work on...my mind whirls with possibilities! Can't wait to see how you made the letters! Thank you so much for the inspiration!...Nancy :o)
Debra, you did an amazing job on this canvas and I love how you've used Creative Paperclay in so many different ways.
This is gorgeous, Debbie. Thanks for the tutorial and great inspiration.
Post a Comment