Thursday, April 19, 2018

Upcycled Cherub Bottle


Hello there! Jenn here and I would like to share how I upcycled an old bottle into this beautiful decor using Delight™ air dry modeling compound from Creative Paperclay®!
This was so much fun and such a transformation!
I started with an ordinary old bottle as seen below.

I used a silicone mold to mold the cherub using Delight™ air dry modeling compound. This compound is very lightweight even after it dries and works very well for projects such as this.
While my little cherub was drying I gessoed the entire bottle with white gesso, allowed it to dry, and then added a script stencil to the back side using texture paste.
I also wrapped soft, bendable wire around the neck leaving the excess to add my butterfly later.
I added some script stamping using a dark brown ink and let it dry overnight.
Next day! I added my molded cherub to the front of the bottle. I coated her with white gesso.Using a matte gel medium that dries transparent, I added some art stones and mini art stones as seen.


After adding a few metal embellishments and gessoing them I allowed it to dry again. I used Colorique inks in Verdigris and Poppy mixed in water to apply color. I used these on the butterfly and heart as well. I added some bling around the neck and some flowers then applied the butterfly to the top wire. The cork was made using a rose embellishment attached to a small wooden thimble. I also added the little bird on chain to the stopper. For a glittery effect I brushed over the face and some of the bottle using DecoArt Pearlizing medium.


Supplies for this project:
Recycled glass bottle
White Gesso Texture Paste
Stencil
Stamp
Brown Inkpad
Colorique Verdigris
Colorique Poppy
DecoArt Pearlizing Medium
Metal embellishments
3d Matte Gel
Art Stones and Mini Art Stones
Metal Butterfly
Rhinestone Strand
Chain with charms
Small wooden Spool
Soft Bendable wire
Flowers
Glue gun

Creative Paperclay® and Delight™ are conveniently available for you to purchase online and at the below listed retailers.

Thank You So Much for visiting the blog and viewing my post today!! I hope that you create something fun and share it with us on Facebook!

Until Next Time, Happy Creating!!


Friday, April 6, 2018

April 2018 First Friday Fan Day


Need some inspiration for your next Creative Paperclay® project? Check out what folks are making with Creative Paperclay™.


How to Make Ring Dishes
Rainbow Crayon Holder
Make Your Own Clay Tools
Key Chain Fobs

Tips and Tricks for Using Paperclay
Cosplay: Make a Fitted Face Mask
Emu Egg Humpty Dumpty

HELP US FIND YOU!!
  1. Use the hashtag #CreativePaperclay on all your social networks.
  2. When using Facebook, be sure the your posts and images using the #Creative Paperclay hashtag are set to public, otherwise we won't be able to find you.
  3. Share your projects on the Creative PaperClay® Facebook page.
I'm always trolling the web, looking for great Creative Paperclay® projects. If you find something, post it on our Facebook page.

GOT QUESTIONS???

Find the answers to your paperclay questions. See what other folks are creating. Stop by our Facebook group and say, "Hi!" Creative Paperclay Q&A
Carole

Monday, April 2, 2018

DIY Sitting Bird Ornament

Hello! Welcome to another Creative Paperclay® Design Team tutorial. Today I have a sitting bird ornament to share with you. Not only do I show you how to sculpt this, but also how to apply a crackle and a gilding wax.  Isn't that exciting? It is actually very easy and when you are finished you will have this cute little bird sitting on your shelf.


The supplies you will need are:

Creative Paperclay®

foil
toothpick
a stone to help weigh-down bird
white glue
gesso
white acrylic 
black acrylic 
Golden Acrylic- Inference Gold
Americana Multi-surface Acrylics-
  • Jade Green
  • Mushroom
Decoart Media Crackle Glaze
Pebeo Gilding Wax - Empire Gold
jute twine
scissors
Sculpting tools
glue gun and glue sticks
sandpaper
paintbrushes
stencil brush or cotton swab
paper towel or soft cloth 
gloves
water
template for birds feet


Let's get started!


Step 1

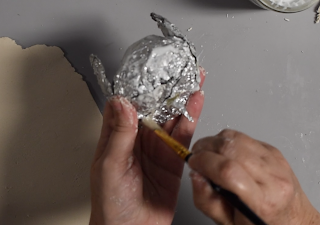
Place a stone in a large piece of foil and wrap tightly. This will ensure your sculpture sits without toppling over.

bird_1


Step 2

Add more foil as needed until you are happy with the shape.


 Step 3

Form the wings and attach with hot glue.


 Step 4

Form the beak with foil wrapped around a toothpick and insert. Secure with hot glue.

          bird 4


 Step 5

Coat armature with diluted glue. This is not absolutely necessary but I like to ensure my clay sticks to the armature properly so all my hard work is not ruined. 

Bird5


Step 6

Cover with Creative Paperclay®. Ensure you press down carefully so no air bubbles are trapped.

bird 6


Step 7

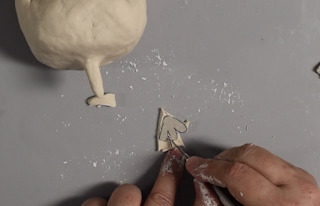
Cut out the feet using your template. Poke a hole in the heal of each foot using a toothpick.

bird 7

Step 8

Roll two balls of clay for the eyes and attach. Set aside to dry.


Step 9

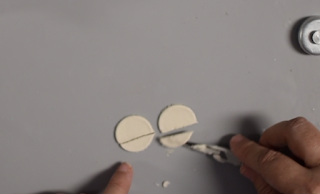
Roll out some clay and cut out two circles for the eyelids. 


Step 10

Cut off about one third of each circle.

bird10

Step 11

Paint on a little diluted glue and attach eyelids blending in seams. 

bird 11

Step 12

Set aside to dry.

Step 13

Paint your bird whatever colors you choose.


bird 13


Step 14

Leave to dry overnight. It needs to be thoroughly dry before you apply the crackle.

Step 15

Cover with a coat of crackle medium and let it dry overnight. Don't use a fan, hairdryer or heat gun. Let it dry naturally.

bird15

Step 16

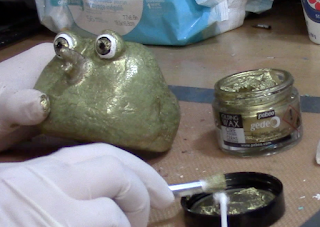
Use a stencil brush to apply a coat of gilders wax. Work in a well ventilated area!


bird 16

Step 17

Wipe wax off of surface leaving in the cracks.

bird 17


Step 18

Drill two holes in base to attach the legs.

bird18


Step 19

Use a needle to thread twine through hole in each foot. Tie a knot to secure.

bird 19

bird20

Step 20

Now to attach the legs. Place a bit of glue in each hole on the base and insert the other end of the string.

bird 21

bird 22

Congratulations! You are done! Isn't he cute?


I have also made a video if you would like to follow along.


I do hope you enjoyed this tutorial! You can share your creations with us on our Facebook page. We would love to see them! For more inspiration have a look around the blog. There are tutorials for many levels using Creative Paperclay®. You can also visit my blog www.papermachepatch.com.

Thanks for stopping by!


Suzette