Showing posts with label pin. Show all posts
Thursday, October 10, 2013
"Fall" Back Roses
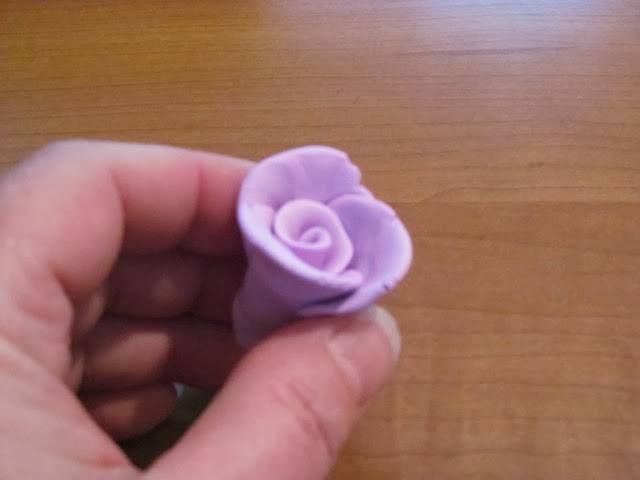
With the brisk fall weather finally upon us and my toes tucked inside shoes instead of free to enjoy the warmth outside, I decided to bring thoughts of warmer weather out into the studio. With that in mind, I give you the Creative PaperClay Rose pendant (or ring or bracelet or headband...whatever you would like to attach it to).
The supplies are simple: Creative PaperClay, Prismacolor markers (or any watercolor marker), a damp paper towel, a cutting tool, and your hands
Begin by pulling off a bit of PaperClay from the package. Knead it a bit and then flatten into a "pancake". Dab the pancake with your chosen marker color. Begin folding and squishing the color into the PaperClay. Once mixed in, look at the color. Not dark enough?? Repeat the process until you are happy with the color. Now time to start the rose.
Roses begin with small marble sized balls of clay. Of course, the size can be adapted depending upon what size rose you would like to end up with. I will start with a small rose. Roll 3 marble sized balls from the colored clay. Cover the remainder with the damp paper towel (this will keep it from drying too quickly).
Roll 1 of the balls into a short log. Flatten slightly along the length.
Then pinch one side firmly between your thumb and pointer finger from end to end (this will thin the edge to give a more realistic rose petal appearance).
Immediately roll the log up from one end to the other (like a cinnamon roll). Flare out the thinned edge slightly. This is the center of your flower. Set aside.
For the other 3 balls, flatten each slightly and then pinch into a teardrop shape. Along the curved edge, pinch firmly to thin the edge. Be sure the center of the petal stays thick as this gives your finished rose stability and strength. Repeat process until you have 3 "petals".
Now, retrieve the center of your flower. Place one petal next to the center and press into place at the base.
Add a second petal, overlapping the first one slightly and press into place. Finally add the third petal overlapping edges with the other 2. Press into place.
Flare out the upper edges by pulling back and pushing up (all one motion)...I hope that makes sense!
Once the rose is complete, use the cutting tool to even up the bottom so your rose will sit flat.
Repeat process until colored clay has been used. Larger roses can be accomplished by adding a second layer of petals (5 marbles instead of 3). Set aside your rose garden to dry (about 24 hrs). Once dry, glue onto pins, pendants, headbands, etc using tacky glue (I use The Ultimate by Crafter's Pick).
I hope this brings a bit of warmth to your day.
P.S. The process also works with Delight Air Dry Modeling Compound ;-)
Tuesday, November 15, 2011
Thanksgiving Turkey Pin
For my first official tutorial I decided to create something fun to wear for Thanksgiving. I love wearing unique pins and brooches during the Fall and Winter holidays and making your own for you and as gifts for family and friends makes them extra special.
Supplies you'll need:
Creative Paperclay®
Craft Glue
Black bead for eye. (I used a black onyx round bead)
Pin Back
Your sculpting tools
Something to roll the clay out with
Paint brushes
Acrylic paints (I used French Vanilla, Dark Brown, Black and Metallic Copper but feel free to choose the colors you like!)
Water
Strong Glue for pin back (I use E-6000)
Protective Urethane spray
Okay, let's play!
Step 1. Grab about a golf ball size of clay and role it out to about 1/8 inch thick. I use bamboo skewers to rest my roller on while rolling out the clay. Next, cut out 11 circles to make the tail feathers with. If you look at the picture you can see I used what looks like some really nice cutters. What they are are those brass candle stick inserts you use to help keep wax off the lip of your candle sticks. You can find them in several sizes and they come in a pack of 5 or six. They work great are are inexpensive clay cutters! Or you can eye ball it and make 5, 1/2 inch balls and 6, 1/3 inch or so.
Step 2. Now take all those nice clay balls and roll them into cone shapes about 1 1/2 inches long.
Step 3. Lay all your clay cones out into the shape of the tail feathers and gently flatten a bit. Don't worry if the bottoms don't match, you're going to trim them next.
Step 4. Now trim the bottoms of your feathers to make a nice curved arch.
Step 5. Time for a bit a detail. You can use a toothpick or a tool with a straight edge to add details to the tail feathers. Don't push all the way through the clay, you just want the lines deep enough to hold onto the dark brown paint later. Now let the tail feather dry a bit, you don't want to squish out all your lovely work.
Step 6. After the tail feathers have dried a bit it's time to add the rest of the turkey. Make a ball of clay a little bit smaller than the size you want the body. Before pressing it in place, brush a little bit of craft glue along the bottom edge of the feathers to help the body stick. Now press the ball in place and shape it till you like the way it looks.
Step 7. I added feather details to the body with a silicone tipped sculpting tool but you can use a piece of wire bent into a U shape to stamp feather impressions into the body.
Step 8. Next we'll make the turkey's neck, head and the wattle. The WHAT? LOL. The wattle is that hangy down thingy on the turkey's beak and neck. (I didn't know either so I looked it up!) Just make a snake shape, give it a little curve, paint a little glue on the back and press in place. The head is a flattened ball of clay with one edge pinched out a little for his beak. The wattle (teehee) is a tear shape press in place. Don't forget to paint a little glue on the back of each piece before pressing into place.
Step 9. Here's lookin at ya! Add a little glue to your bead and press it into the head.
Now let this all dry. If you're like me and you can't stand to wait a few hours do what I do. Warm your oven to 200 degrees. Turn oven off, place your turkey pin in oven on something flat, like a cake pan and leave in oven till dry. Keep an eye on it though, in case it starts to crack or bend.
Step 10. Now that your pin is dry you can add the nice smooth bottom. Roll out a chunk of clay to about 1/8 inch. Paint glue all over the back of your pin and then gently press the turkey onto the rolled out clay. Trim all the extra clay away from the pin and smooth the edges. Let dry again.
Step 11. Once your pin is completely dry you can paint it in the colors of your choice. Once your paint is dry, thin your dark brown paint just a little with water and then paint over small sections at a time, making sure you get it into all those wonderful details. Gently wipe off with a damp cloth or sponge before it dries. I use a makeup sponge for this. They work great and are soft enough that they don't pull of any of the other dried paint. This helps pop out your details.
You can spray a protective coating on your pin after it is completely dry. I used a matte finish by Krylon.
I hope you enjoyed my Thanksgiving Turkey Pin tutorial. I had fun creating it for you!
Supplies you'll need:
Creative Paperclay®
Craft Glue
Black bead for eye. (I used a black onyx round bead)
Pin Back
Your sculpting tools
Something to roll the clay out with
Paint brushes
Acrylic paints (I used French Vanilla, Dark Brown, Black and Metallic Copper but feel free to choose the colors you like!)
Water
Strong Glue for pin back (I use E-6000)
Protective Urethane spray
Okay, let's play!
Step 1. Grab about a golf ball size of clay and role it out to about 1/8 inch thick. I use bamboo skewers to rest my roller on while rolling out the clay. Next, cut out 11 circles to make the tail feathers with. If you look at the picture you can see I used what looks like some really nice cutters. What they are are those brass candle stick inserts you use to help keep wax off the lip of your candle sticks. You can find them in several sizes and they come in a pack of 5 or six. They work great are are inexpensive clay cutters! Or you can eye ball it and make 5, 1/2 inch balls and 6, 1/3 inch or so.
Step 2. Now take all those nice clay balls and roll them into cone shapes about 1 1/2 inches long.
Step 3. Lay all your clay cones out into the shape of the tail feathers and gently flatten a bit. Don't worry if the bottoms don't match, you're going to trim them next.
Step 4. Now trim the bottoms of your feathers to make a nice curved arch.
Step 5. Time for a bit a detail. You can use a toothpick or a tool with a straight edge to add details to the tail feathers. Don't push all the way through the clay, you just want the lines deep enough to hold onto the dark brown paint later. Now let the tail feather dry a bit, you don't want to squish out all your lovely work.
Step 6. After the tail feathers have dried a bit it's time to add the rest of the turkey. Make a ball of clay a little bit smaller than the size you want the body. Before pressing it in place, brush a little bit of craft glue along the bottom edge of the feathers to help the body stick. Now press the ball in place and shape it till you like the way it looks.
Step 7. I added feather details to the body with a silicone tipped sculpting tool but you can use a piece of wire bent into a U shape to stamp feather impressions into the body.
Step 8. Next we'll make the turkey's neck, head and the wattle. The WHAT? LOL. The wattle is that hangy down thingy on the turkey's beak and neck. (I didn't know either so I looked it up!) Just make a snake shape, give it a little curve, paint a little glue on the back and press in place. The head is a flattened ball of clay with one edge pinched out a little for his beak. The wattle (teehee) is a tear shape press in place. Don't forget to paint a little glue on the back of each piece before pressing into place.
Now let this all dry. If you're like me and you can't stand to wait a few hours do what I do. Warm your oven to 200 degrees. Turn oven off, place your turkey pin in oven on something flat, like a cake pan and leave in oven till dry. Keep an eye on it though, in case it starts to crack or bend.
Step 10. Now that your pin is dry you can add the nice smooth bottom. Roll out a chunk of clay to about 1/8 inch. Paint glue all over the back of your pin and then gently press the turkey onto the rolled out clay. Trim all the extra clay away from the pin and smooth the edges. Let dry again.
Step 11. Once your pin is completely dry you can paint it in the colors of your choice. Once your paint is dry, thin your dark brown paint just a little with water and then paint over small sections at a time, making sure you get it into all those wonderful details. Gently wipe off with a damp cloth or sponge before it dries. I use a makeup sponge for this. They work great and are soft enough that they don't pull of any of the other dried paint. This helps pop out your details.
You can spray a protective coating on your pin after it is completely dry. I used a matte finish by Krylon.
Subscribe to:
Posts (Atom)