Thursday, June 7, 2018

Necklace with Creative Paperclay® Face Pendant


Necklace with Creative Paperclay®
Face Pendant
Supplies:

Creative Paperclay® Sculpted or molded face
Black or White Gesso (I used Liquitex brand.)
Acrylic Paint (I used Silver and Violet)
Paint Brush (Gesso can be hard on brushes.  Use cheap foam brushes for this.) 
Sandpaper
Metal Leaf or Metallic Foils
Mica Powders or Metal Pulver (I used Eberhardt Faber Pulvers in purple, green, & blue)
Ranger Perfect Medium or other adhesive for leaf, foils, & powders
Fine wire - I used 30 gauge.  This is for adding beads and other embellishments to your pendant.
Assorted beads and embellishments
Bead Stringing Materials – I use Medium Soft Flex® Beading Wire
Jewelry Findings – To finish off your necklace you will ned crimp beads and one clasp
Leather, Suede, or Felt – Just a small piece to cover the back of the pendant for a professionally finished piece.
Glue – e6000, Fabri-Tac, Barge, or other heavy duty adhesive. 

 
What's on my Workbench Wednesdays? 
Today I have made a Necklace with a Creative Paperclay Face Pendant

I've been experimenting with Creative Paperclay® and Delight Clay modeling materials.  I am new to working with both of these mediums so there will be lots of test pieces as I explore all of the fun possibilities.  As a sculptor I especially love faces.  I am quickly amassing a collection of faces that will never become full sculptures.  As my collection of faces grows I am thinking up lots of ways to use these spare pieces.  The possibilities are endless!


Here are a few of my test pieces.  The blue one is made with Delight Clay.  Delight Clayis pure white out of the package.  I made this one blue by mixing in some alcohol inks.  I like how once the ink is blended into the Delight Clay modeling material it becomes fully incorporated and doesn't stain your hands or work surface.  This material sculpts and holds detail amazingly well for being so soft and marshmallow-ish straight out of the package.  I will elaborate more on that in another post.  The other faces were made from Creative Paperclay® using molds of some of my original sculpts.  As a side note, sometimes I sell my molds and faces.  Hit me up if you need some for your projects (LALA_415@Yahoo.com).

One of the things I like to do with these Creative Paperclay® faces is to make jewelry.  They make great brooches, pendants, earrings, beads, bracelets, and hair ornaments.  The toughest part for me is deciding which face to use and what to make with it.  The options can be mind boggling!


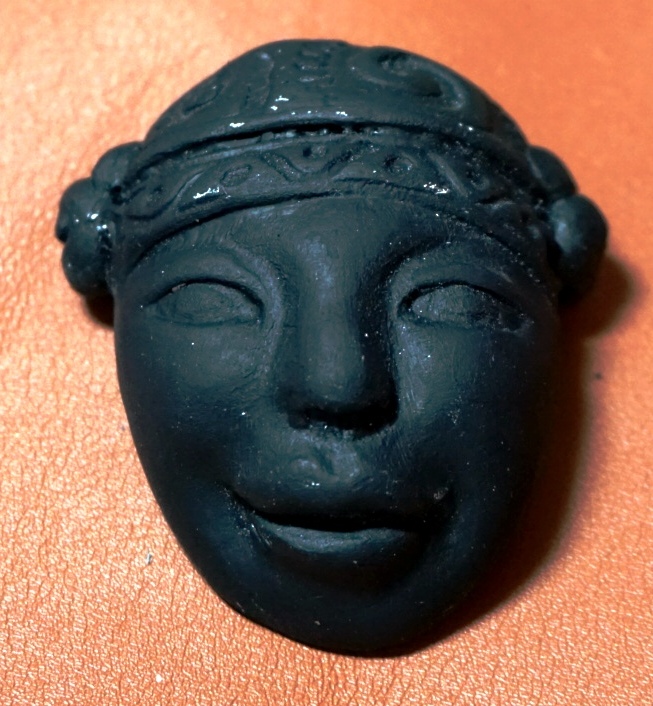
I like them all but, I have decided on this face for today's project, a necklace with a Creative Paperclay®  face pendant.  For your project you can use any face mold or sculpt your own.  Even simple sculpted faces make great jewelry!
I thought she should be dressed up a bit so I gave her a beaded headdress.  I made the headdress using one of my texture sheets. 
Roll out a bit of Creative Paperclay®, press into lightly, oiled texture sheet or rubber stamp, decide what part of the design you like best, cut to fit across forehead, moisten forehead with a bit of Creative Paperclay® slurry (just add a bit of water to a pea sized bit of Creative Paperclay®.) to adhere headdress to forehead.  Play around with the placement before sticking it on permanently.  I also added a few sculpted details on the sides.


Since this is a pendant you will need to add holes for stringing it up and adding beads and embellishments.  Use a needle tool or a toothpick to make holes on either side for stringing and adding optional embellishments.  You can drill holes with a simple hand tool after it's dry if you prefer.  When I don't know what the piece will be used for I often leave them without holes.   The beads will be added later but I made sure to add extra holes across her headdress to add a band of bling.After the Creative Paperclay® face and headdress is dry you can lightly sand the surface to remove any imperfections.  

Optionally, you can add a couple of light coats of gesso sand after each coat dries.  I used white gesso first and then black.  No reason for this really.  I just didn't know where this piece was going.

Paint your face with acrylic paints.  I used violet and silver mixed together because I wanted her to be metallic.  I dabbed the paint on randomly with my finger.  A brush, sponge or dabber would work as well.


At this point you can add metal leaf, foils, mica/metal powders if you would like. I also dabbed a bit more paint over the metal leaf. 

Allow the paint and adhesives to dry completely then add a couple coats of sealant or varnish.  Allow your sealant or vanish to dry completely between coats.

Now comes the fun part!  Decorate your Creative Paperclay® face pendant with beads, crystals, feathers or other embellishments.


Different background and lighting give her a completely different look.  Look at your piece in natural light, once she's dry before adding your sealer or varnish.

Now comes the REALLY fun part!  Using complimentary beads create an original, show stopper necklace!  Glue leather to back of pendant.  Allow glue to dry completely.  Wait at least an hour.  Trim off excess leather.  


Finally you get to the Really, Really fun part…. Wear your gorgeous new creation with pride!  BRAVO!  You did it!


I hope you have had as much fun creating and wearing this necklace as I have!  I still have a collection of tester pieces to work with.  Come back for more cool ideas and projects!  Creative Paperclay® and Delight™ are conveniently available for you to purchase online and at the below listed retailers.

I'll be back with more "What's On My Workbench Wednesday" fun on the first Wednesday of each month.


Until then, stay creative!  

Ciao!
LaLa


Monday, June 4, 2018

DIY Mushroom House Using Delight Clay™

Hello, welcome to another tutorial. Today I will show you how to make this beautiful mushroom house using Delight Clay™. You can place a battery operated tea light inside and watch the light flicker through the windows. Isn't that awesome!


Supply List

Delight Clay™

2L Plastic Bottle
Cardboard
Foil
Gesso
Acrylic Paint
Americana Gel Stain -OakDiorama turf (optional)
Paper flowers (optional)
Glue Gun and sticks
ScissorsCraft
 knife
Toothpick 
brushes
Water
Paper towel

Follow along in the video below to see how to create this masterpiece.


You can find Creative Paperclay® and Delight Clay™ online at Creative Paperclay Co and also at MichaelsHobby LobbyDickblick and Amazon. 

You can share your creations with us on our Facebook page. We would love to see them! For more inspiration have a look around the blog. There are tutorials for many levels using Creative Paperclay®. You can also visit my blog www.papermachepatch.com.

Thanks for stopping by!

Suzette


Friday, June 1, 2018

June 2018 First Friday Fan Day


Need some inspiration for your next Creative Paperclay® project? Check out what folks are making with Creative Paperclay™.


Paper Clay Angels
Boat on the Ocean
Wall Hanging Decor Piece
Paper Cay Leaves Tutorial
How to Make Paper Clay Lanterns
Mini Clay Pots
Mason Jar Fairy House

HELP US FIND YOU!!
  1. Use the hashtag #CreativePaperclay on all your social networks.
  2. When using Facebook, be sure the your posts and images using the #Creative Paperclay hashtag are set to public, otherwise we won't be able to find you.
  3. Share your projects on the Creative PaperClay® Facebook page.
I'm always trolling the web, looking for great Creative Paperclay® projects. If you find something, post it on our Facebook page.

GOT QUESTIONS???

Find the answers to your paperclay questions. See what other folks are creating. Stop by our Facebook group and say, "Hi!" Creative Paperclay Q&A
Carole

Monday, May 28, 2018

A Creative Paperclay Frida Kahlo type brooch

Hi everyone! It's Barbara here and I want to show you what I've created with Creative Paperclay!
I don't know what inspired me other than I think Frida Kahlo was an awesome artist and a courageous woman.

Here are the supplies needed for this project:

Creative Paperclay
Powder (either baby powder which I used or cornstarch)
Face mold
Clay tools (for making marks)
Acrylic Paints
Pin back
Glue
Spray sealer


This whole project was rather simple to make.

I started out with my molds and my Creative Paperclay I ended up choosing the face mold that is just peeking out from under the Creative Paperclay package.I filled the mold with Creative Paperclay and popped it out of the mold right away. I let it set all night to dry. The next day I fashioned flowers and leaves out of the clay and attached them to the face with super glue. I used different tools to make creases and dots on the flowers and leaves. I did not use any molds for this part of the project. 


I liked the way that the flowers and leaves turned out and how cute they looked framing her face.

I used a package of clay that I already had open and this is a different look with flowers and leaves that I created and some extra faces that I didn't use for this project. You can do so much and have so much fun with Creative Paperclay !

Here we are with the flowers and leaves painted. Because this piece became a brooch, it was rather small and difficult to paint. 

Here we are with my Frida all painted up! I'm in love with the way this project turned out. After the painting was complete I spray sealed the brooch and glued a pin back on it. I would definitely wear this myself, would you?

You really need to purchase some Creative Paperclay for yourself and try some of your own projects or maybe try this one! Please leave a comment below and let me know what you think of this project. I read everyone of them.

Barbara

Friday, May 25, 2018

How to Create an Art Doll in a Frame


Hello everyone! My name is Cinnamon Willis and I am going to show you all how to create an art doll in a frame using Creative Paperclay®.


Supplies
  • Wooden Skewer
  • Pliers
  • Scissors
  • Thin wire
  • Frame
  • Creative Paperclay®
  • Newspaper
  • Masking tape
  • Sand paper
  • Wool
  • Acrylic paint
  • Sealer, Varnish
  • Fabric
  • Needle and thread
  • E600 Craft Glue


Cut your skewer down to the size that you would like for the doll to be for it to fit nicely in the frame. Keep in mind that once you add the head onto it, the doll may end up being about a half inch taller.


How to Create an Art Doll in a Frame

Create the head by rolling a ball of paper and securing it to the top of skewer with masking tape. Wrap wire around the skewer and leave it sticking out on both sides, these will be the arms.


How to Create an Art Doll in a Frame


Bulk up the arms and torso with the paper and masking tape, leave the elbows and the edge of the shoulders free so that the arms can be repositioned later after the piece is done.


How to Create an Art Doll in a Frame

Cover the paper and taped areas with clay, and allow it to dry. Steer clear of covering the elbows and shoulders with clay at this stage as well.

How to Create an Art Doll in a Frame

Once the piece is dry, you could begin working on the details such as the face shape and features. This can be done by adding a drop of water onto the places that you would like to add clay to and blending the new clay into it. Don’t worry about getting things perfect when working with moist paper clay, most of the sculpting is done when it is dry.


I use an exacto knife to carve out features and I sand my details until I become satisfied with them. This takes a few attempts of building up with the clay and taking it away.


The drying process could be sped up with a toaster oven if you are in a rush. I usually put a piece in at 200-220 degrees and check on it every 20 minutes to make sure it doesn't burn.


When the piece is sanded and smoothed out to where you want it to be, it can be painted. I use acrylic paint, soft pastels and sometimes colored pencils for the details.


When I am done with this process I use a sealant to protect the paint job. I prefer to use the Winsor and Newton Matt varnish, it gives the doll a nice satiny looking finish.


At this stage I add the hair. I like to use wool since the strands are thin and don't look like spaghetti in proportion to the size of my dolls. You can use hair from the hair shop as well, but keep the thickness of the strands in mind, and figure out what is right for you.


Make an outfit out of fabric, feel free to glue the clothes on the back of the piece if you need to since it will be hidden when its secured to the frame.


After you are done with the clothing and you are happy with the way the doll looks, use the E600 glue to attach the doll to the frame. I make sure to tuck the shirt into the bottom of the frame opening and glue the back of the doll's head to the top of the frame, or wherever the head meets the frame best.

Thank you for tuning in, and I hope that you enjoyed today's tutorial! You can find Creative Paperclay® at the below listed retailers.


Please stop by my Instagram account to see some of my other works, and feel free to stop by my site Melandolly!