Penguin Creative Paperclay® Presents
Little Penguin Cutie Ornament
by Gloriann Irizarry
Baby is really cold out side! Since is really close to Christmas and the weather sure is reminding us to stay warm. I decided to create a little cute friend to make snow angels with.
Yes a ornament that can be either hang on your Christmas tree or display at your table.
This little penguin will sure warm your heart with his bright smile and red scarf.
I hope you enjoy this project instructions and remember
Happy Crafting!
Sincerely Gloriann Irizarry.
Materials List
Delight Creative Paperclay ®
2 foam spheres
Wooden stick
Clay roller
Needle tool
Mini water bottle spray
Paint brushes
Your favorite acrylic paints
Black
Orange
White
Red
Light Blue
I start by stacking the small foam sphere on top of the bigger one
Start the figure by rolling your Delight clay into a 1/4 thickness sheet.
I used Delight Clay because is so smooth and lighter and this is great for you to create a
nice ornament that will not weight you tree down.
Place the clay sheet on the top of the foam armature and begin to cover the entire double stacked with an even 1/4 sheet all over. Cut any excess and smooth all the edges by misting the clay with the water bottle. Use your fingers to smooth the clay is really easy this clay is very soft and lightweight
very friendly for you to work on.
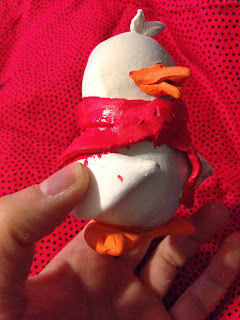
Once your done smoothing the clay your figure should look like a pear.
We will be working with this to create our little penguin.
To be able to work the little guy make sure you let this dry for a while.
It is easier to work the rest of the details if your pear shape is fully dry.
I notice it is a lot easier to cut shapes out of the clay sheet if you moist
and then the needle tool will slice with ease.
Cut 2 of these for the little wings.
I cut 2 little wings out of a 1/4 thickness clay sheet.
Mist the top edge of the wing and smooth the top to attach it to the penguin.
Repeat the process with the other wing to attached to the body.
I cut a pair of feet to our little frozen. Not to worry there is no rules to how you want the to look. He is a little fantasy creature and everything goes. Just have fun trace and use a needle tool to cut it off.
Remove the wooden stick out of the armature.
Smooth the feet edges a little and shape them.
Moist them and attach to the out little friend.
Make any adjustments so he looks good standing up.
I wanted to create a little scarf for him to wear.
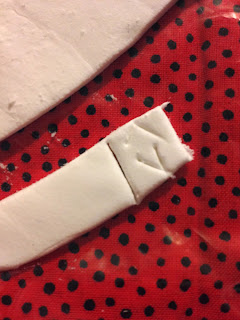
Start by flattening a clay sheet to a 1/4 thickness.
Use your needle tool and cut the scarf to the thickness you want your little friend to wear.
Now we are ready to keep him warm by rolling the strip around his neck.
I wanted to create the knot to pop up more so I cut a square piece.
Added the details with the needle took.
Then attach the little square to the scarf.
Now is time to give him a beak.
Easy! Cut 2 triangles out of a 1/4 thickness clay sheet. Make one bigger than the other.
Moist the face and start by attaching the button first.
Pinch a little to give the beak some shape and personality.
Now grab the bigger triangle and do the same.
Pinch a little to give it a little smile.
Here is your opportunity to give some personality to your new little frozen friend.
Make sure to remember to shape the profile look too.
I wanted to cover the wooden stick hole from the top of his head. So I cut 2 little leaves.
I will use them to give the effect of hair and be able to cover the hole on top of his head.
Pinch the 2 leaves and stuff them on the hole.
Now is time to adjust the feather hair do to any desired style.
I wanted him to have a little tail. I cut it out of the 1/4 thickness sheet.
Moist and attach to the lower back and smooth all the edges.
Now with the wooden stick I pinch the little feet to give him some flippers.
I also poke 2 holes for his nose at the top of the beak.
Now let him dry completely so we can then start to paint him up.
Lets have some fun with paint
I start painting the whole sculpture with one full coat in the Egg Shell white acrylic paint.
Once the first coat dry I grab the orange and color the bottom of his feet.
and color the top.
Then the beak in the same orange.
Grab your favorite acrylic paint color. In my case the red for his scarf.
Not to worry about off line, Because you will be using
the black and will cover any off set from the red paint.
After the feet and scarf dry go ahead and color his body in black.
Use a small detail brush to help you clean and smooth the paint edges.
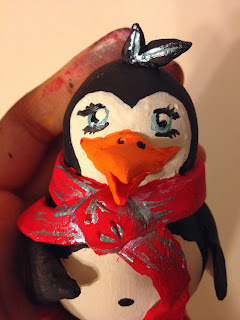
After the black paint has dry you can go and paint the eyes very simple.
Paint the blue circle first.
Then the center black dots.
Add some lashes.
And add the white glimmer circle last.
I decided to display him until my Christmas tree is up.
Once I'm ready all it takes is an O ring behind the little hair feathers a nice colorful ribbon and
We got an instant little cute Christmas tree ornament.
I love this clay for ornaments, Because is so lightweight and will not pull your tree branch down.
I also like it, because the clay is more flexible once is dried. Very handy for those who also have at home one curious feline kitty friend. Yes they seem to think we just hang a new toy for them to play with.
Whats not to like about curiosity that any way?
I wish everyone to have a very bless holiday and enjoy the family and friends.
Till next time.
Always
Gloriann Irizarry
gloriann@byglori.com
 Creative Paperclay product


.jpg)


