Friday, November 22, 2019

Holiday Gnome

Holiday Gnome

This is a simple fun piece...
you can paint it whatever colors you like...makes a great Santa in reds


Supplies needed:

creative paperclay
paper mache Christmas tree cone
craft glue
rolling utensil
marking tool ( i use a needle or knife)
pencil
paint brushes
paper
makeup sponge


I use DecoArt 

gesso

Paints:
Driftwood
Hi-lite flsesh
Asphaltum
white

Staining Antique Medium
Oak Gel Stain


You can adapt to any size


I cut a circle out of paper 


trace circle on cone


I then mark off a hat of sorts 


Gesso hat white and body black
really just helps me with placement


roll out paperclay about 1/8" thick


I trimmed it to clean up edges


added glue


Placed on the face


Rolled out more clay pieces
added glue and placed on the face


with a needle i added marking of hair lines


added more bits and a mustache 


Make a ball and glue above mustache
I used the end of paint brush to make nose holes but you can leave them off 


roll a 1/2" snake 


it will be glued above nose all the way around hat


I use a stiff brush to make fur texture on the snake


let dry


I gessoed the beard, nose and fur of hat
let dry


paint nose 


paint body


 i mix a dab of paint with the staining medium


Paint on beard


using a makeup sponge i dab white paint over the staining medium


using gel stain i shade hat and around the beard


I made a bow and added a bell to top of hat
hope you enjoy 


Friday, November 8, 2019

Santa Gnome Ornament


Hi I'm Susie Krichbaum of Art by Susie K and new design team member at Creative Paperclay®.  Join me every 2nd Friday starting November 11th, 2019 for tutorials, tips and tricks using Creative Paperclay®   and    DelightTM air dry modeling compound to create the fun and unique.


A little bit about me: I'm located in sunny  SW Florida and in my studio is where I spend most of my days. I create peculiar characters that tell a story - from the oddly sweet to the peacefully zen.  I pull inspiration from me Irish Roots, the allure of nature, fascination with strange tales and a love for Halloween.  I have been published several times in Art Doll Magazine and Prim Magazine and have exhibited my art at Spirits in Sanford Art Show in Orlando, FL, Hauntizaar Halloween Art show in St. Petersburg, FL and Heart of Halloween Art Show in Cumming, GA.  

I have been using Creative Paperclay® modeling compound since 2009 and it’s become my favorite clay to use.  For this tutorial I am using both Creative Paperclay®   and    DelightTM air dry modeling compound to create this almost feather light Christmas ornament.  I hope you enjoy browsing the pictures and have fun creating your own unique Santa Gnome.    Just for kicks I included a fast motion video at the bottom of the page, one of the sculpting process and one of the painting and embellishing process.   Sometimes it’s fun to watch the hands work (even though I go out of frame a few times, but I’ll get better at that)


Supplies:
Creative Paperclay® and DelightTM air dry modeling compound  (I used both / option to use one or the other is fine)
18 Gauge wire (I buy at a hardware store like Home Depot)
Foil
Masking tape
Small cup of water
Paper towels
Tools for cutting the wire
Clay tools (optional)  fingers work very well
rolling pin or large dowel, smooth bottle etc
Lace or doily
 White and red paint
Antique medium
Varnish or sealant  (here I'm using a brush on so it stays sticky for the glitter)
Red glitter
Clear glitter
Small piece of garland or ribbon

The most import thing on the list is to have fun and make it your own, add your own twist and see what you come up with. 


  Creating the Armature


Cut a piece of 18 gauge wire about 20" long and make a soft fold or loop joining the two ends together.  Start to twist the wires about 6" from the top. 

You end up with a little fish with the body roughly 5" long.  Everyone will have slightly different measurements.  No Gnome is the Same :)

Pull off about a 10" sheet of foil and start to form it to fit in the middle of your "fish" shape

Setting inside the wire and keeping it to about 1" wide from front to back.   Using the armature gives strength to the piece as well as helping you use less clay and have a lighter piece.  

Secure the foil in place with masking tape.  Tape also give the clay something to hang onto during the modeling process.

Now you look like you've created a bug with long antennas, here in Florida it's the making of the worst kind of bug we have, la cockroach!!

Adding the Clay


I started with the Creative Paperclay® air dry modeling compound.  Taking ball about the size of a ping pong ball and started rolling it out on a flat clean surface.  Flattening to about 1/4" thickness.  Pull the flat pancake of clay off the surface and lay it back down, dip fingers in some water and get the top surface damp. I prefer not to over wet the clay.  If you see a lot of cracks then adding more water is a good idea.  Working with clay too wet or too dry makes me a sad gal.   


Start to wrap your clay around the masking taped area of your piece.  Trim off the extra and with wet fingers work the clay into a nice smooth piece.  
Marking and making a small indention where I want the nose to be.  Also placing a line just above the nose to mark how far the hat will come down.   The is when I start to use the DelightTM air dry clay.  I model right over the first layer of clay that serves as a sturdy base.  
Wet the area where you want the nose to go and place a small ball of clay in place.  You can go any size you want, his nose is his only form of expression so you can be creative here.  
Roll out some logs of DelightTM clay to start to form the beard.  I started the beard from the line where the hat will meet all the way down to the bottom of the piece.  Have fun with the design here, I gave him a wavy beard, but a straight beard you work just as well.  


Starting to swirl like an ice cream cone.

I decided to leave the back plain for a signature or maybe dating the Christmas year or a simple Christmas message.

Adding some texture to the beard. Use a sharp point, even a straight pin or tooth pick will work well. Adding texture is an important step in making your piece pop with details.  We will be adding a stain to the entire piece and this is when you will really see some definition take place.  


  More clay and texture for the hat

The hat needs some life.  So Adding a generous 1/4" thick piece of DelightTM clay to the hat only. I cut one edge of the pancake in a straight line to form the bottom edge of the hat.  Wet one side of the clay and place the straight edge of the clay where the line was drawn just above the nose and beard lines.  

Wrap the clay around the hat area and trim off the excess.  

Yay!  more texture.  I am using a doily here to press in some interesting impressions onto the clay.  This is a fun technique to use and super easy.   Do as much or as little as you want.  

There he is all ready to dry overnight.  In the morning he will get a good ole' sanding and paint job.  

Sand, paint, glaze and embellish

Using a fine grit sand paper start to gently smooth out the rough areas, but don't sand away all the texture details.  Use a damp cloth to remove the clay dust.

Using gesso or a white full body acrylic paint, coat the entire piece with paint and let dry.  Don't forget to paint the nose.  I used a flesh tone mixed with red. 

Start by painting the hat.  I used red, but any color will do.  The paint extended right to the bottom edge.  We will be adding a little white trim after it dries.  

After all the paint has dried it's time to add some antique medium.  I start by doing this in sections, starting with the beard or white section start to quickly cover the with the medium and be ready to start wiping it off with a damp cloth or paper towel. 

Using the paper towel to remove 99% of the medium, but allowing it to sink into the texture and around the bottom of the hat like a shadow.

I also use Q tips to get into the small spaces.

Repeat the antiquing for the hat.  


Allow everything to dry before adding a glaze.   I used a brush on glaze so it would remain tacky to allow glitter to stick.  

I started with the hat and glazed only the red.  This way I can shake some red glitter on the hat and it won't get stuck in the beard or white fur around the hat.  

Tadaa!  Little red sparkle hat and I couldn't resist adding a touch of glitter to the nose.  


Repeat for the beard and hat fur and add white glitter.  Loop the wire in an attractive way and cut off any excess.    

Add a sprig of holly or tinsel.  Personalize by painting the date, name etc on the hat.  Make it your own and have fun with it. 
Click here to see the video for the sculpting process


Thank you all so very much for visiting and taking a look at this tutorial.  I hope to see you again in December.   
I invite you to visit my website and other social media platforms to see what I'm creating for the holidays.  

Happy Thanksgiving,
Susie Krichbaum

Contact: Susiewhc@gmail.com
Facebook and Instagram search @artbysusiek
Website :  https://artbysusiek.com Here you can sign up for my Creative Breakfast Club
ETSY: www.artbysusiek.etsy.com
PINTREST: https://www.pinterest.com/susiewhc/

Wednesday, November 6, 2019

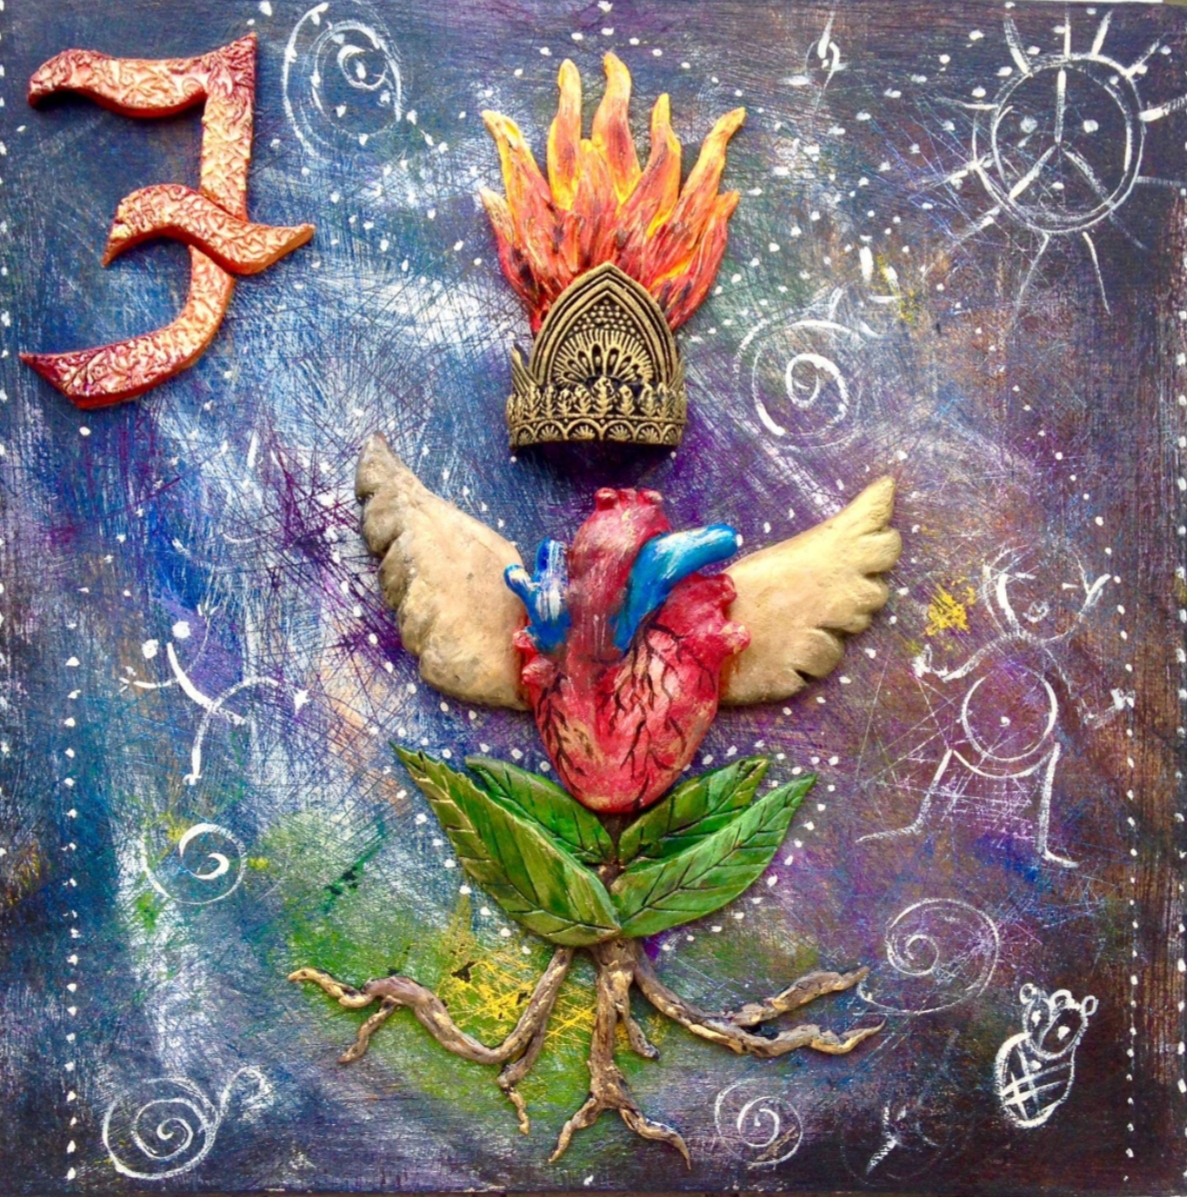
"F" IS FOR FREEDOM


"F" IS FOR FREEDOM 


Created for The Migrant's Alphabet traveling exhibit and Alphabet, Poetry Book.
Delight Modeling Medium & Acrylic Paint on wood panel.  Direct sculpted, textured, scratched.
Each of the 328 dots represents a prayer of love, peace, health, and intention.  There are Taino symbols of Water, baby, fertility, sun, snail, and coqui. 
Roots and leaves are a recurring symbol in my artwork.  For me strong roots and leaves, new growth are a of hope.
A flaming heart full of passion and fueled by dreams with golden wings is the epitome of freedom.
The background was painted in many layers.  Maybe 10 - 12 layers of paint.  Like the layers (the circle) of life, some layers are bright and sunny, some are dark and dreary, bits of color blend together to make new colors and show through on the the surface that is scratched and scared with the patina of time and the edges are worn with age.
I created this piece in the month of my 50th ride around the sun.  It was the perfect project to kick off the next half century of my journey.  I am so honored to be invited here.
Thank you, Jane Dávila for hosting this project!


Monday, November 4, 2019

Making Armatures for Your Sculptures


Hello, welcome to another post! Today I am going to talk to you about the insides of your sculpture otherwise known as the armature. To sum it up, the armature is the skeleton of your sculpture, the “bones” that support the actual body of the sculpture. An armature is needed when working with air-dry clays. It can be anything from a bottle to the cardboard tube that comes on a toilet roll or paper towel. I recently did a show on Armatures that can be used with Creative Paperclay®. I have included the video below. I go over the sculptures that I have made and what I have used as armatures.
For those of you interested in sculpting, I host a show called Clay Talk on Facebook live the first Thursday in every month. It is on the Creative Paperclay Modeling Material Facebook page. If you miss the live show don’t worry. I will be posting the videos here. Below is the show on armatures.


I hope this was helpful. If you have any questions just ask away in the comment section below. You can also learn a lot on the Creative Paperclay Q & A Group on Facebook. Don’t forget to join the live show on the 1st Thursday of every month.  This month another design team member, Gloriann Irizarry, will be hosting the show and will share with you how to make jewelry with Creative Paperclay®. Don't miss this one, you could make great presents! Mark your calendars - November 7th at 8pm EST


Thanks for stopping by!

Friday, November 1, 2019

November 2019 First Friday Fan Day


Need some inspiration for your next Creative Paperclay® project? Check out what folks are making with Creative Paperclay™.


Pendant Lamp
Hand Print Ornament
Scandinavian Gnomes
Clay Stone Paperweight

Succulent Pot
Sugar Skull
Cornucopia

HELP US FIND YOU!!
  1. Use the hashtag #CreativePaperclay on all your social networks.
  2. When using Facebook, be sure the your posts and images using the #Creative Paperclay hashtag are set to public, otherwise we won't be able to find you.
  3. Share your projects on the Creative PaperClay® Facebook page.
I'm always trolling the web, looking for great Creative Paperclay® projects. If you find something, post it on our Facebook page.

GOT QUESTIONS???

Find the answers to your paperclay questions. See what other folks are creating. Stop by our Facebook group and say, "Hi!" Creative Paperclay Q&A
Carole