Showing posts with label found objects. Show all posts

Saturday, June 24, 2023

Stranger Things with Delight® and Creative Paperclay®

Stranger Things artI have created a Stranger Things series (https://www.darleneoliviamcelroy.com/stranger-things) where I reach into my inner child and come up with strange creatures and happy little monsters. There is a simplicity to them but things don't have to be complex to have beauty to them. The art piece will use both Delight® and Creative Paperclay® but in a simple manner that is fun and creative. Plus I will also show you how to fix a ornate vintage frame.

SUPPLY LIST
Creative Paperclay® & Delight®
Mark Making Tools
Modern Masters 2 part Rusting Kit
Glue
Found Objects
Scissors
Brayer
Amazing Molding Putty
Acrylic Paint

Delight®
I love the fact that you can roll out Delight® into a thick paper and then cut it with scissors or an exacto knife. I already have ideas for some future projects using the Delight® paper (as I call it). 


Found objects and cut/textured Delight®


When working on my Stranger Things series, I start blocking in my design with objects I would like to use. I cut out my Delight® paper with both regular scissors and pinking shears prior to giving it texture with my tracing wheel. The left shape at the bottom is a paint skin that I made. 

The Delight® shape I made in the last step is now painted with a base color that will eventually be rusted. I made a circle of Creative Paperclay® that I added an eye to and which I will glue down when the clay dries. Texture was added with a rubber shaper. The found metal object will be rusted and embellished. This is the first in my Stranger Things series where I have added these two air drying clays and I am really enjoying it.
All Dressed Up
I finished my cute little monster with painting, rusting, adding found elements and hair made with Delight®. The rusting was done using the Modern Masters 2 part Rusting Kit. 


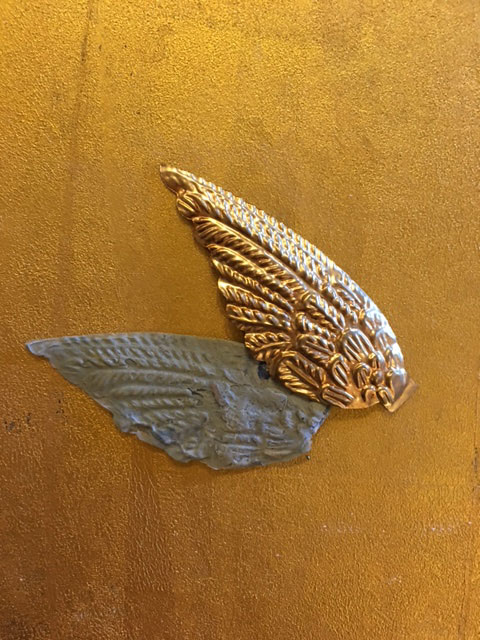
An ornate frame plays off the contemporary minimalist art but it is hard to find one that is in mint condition however they are fixable with Creative Paperclay®.
two part Amazing Molding Putty
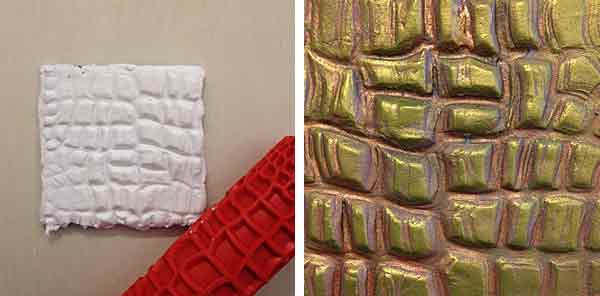
I used two part Amazing Molding Putty to make a mold of part of the frame that was in good condition. Once both parts of the putty are blended together, I laid it on the frame. It sets up in approximately 15 minutes.


Creative Paperclay® was applied to the frame in the areas that needed to be fixed then I laid the silicone mold matching it up to the good areas of the frame. When I am happy with how it looks and it is thoroughly dry, I coat it with polymer gloss medium to seal it and then decide whether to spray gold or black.

Dream in Color!

Darlene Olivia McElroy
NARRATIVE MIXED MEDIA ARTIST
www.darleneoliviamcelroy.com


Friday, November 24, 2017

Bejeweled Creative Paperclay® Painting


I have been working on a series of 48" x 48" paintings using Creative Paperclay® as part of my narrative. This piece is in its early stages and is just blocked in at this point. I loved combining the old with new in my work so I started with a traditional pose from the 1500's combined with highly decorated clay hearts.

SUPPLIES
Creative Paperclay®
Silicone mold
Found objects
Acrylic paint
Amazing Molding Putty
E6000 glue
Soft gel gloss


I started by casting a series of hearts. The mold was made from my collection of milagros and exvotos using Amazing Molding Putty.

While this was drying I gathered beads, found objects and E6000 glue.

The dried hearts were attached to my painting with soft gel gloss. BTW I work on wood panels.


People leave me bags of broken jewelry and other goodies at my door step. Last week I received three bags from three different people. It is like Christmas when I get these.

At a thrift door the last week, I found large bags of broken jewelry and odds and ends for a cheap price and I didn't pick them up. When I went back they were gone. Still kicking myself. 

This piece has faux pearls from the 30's, old bracelet and small charm.


I definitely have a baroque heart in this body that keeps trying to come out. Decorated with faux pearl, salt water pears, micro beads and vintage broach.


Old beaded necklace, broach and some mica flakes finished off this heart.

The finished piece will be posted on my facebook page when done - https://www.facebook.com/darleneoliviamcelroy

Dream in Color and throw nothing out.

Darlene Olivia McElroy

Friday, July 14, 2017

Changing Faces, Changing Stories

This is my favorite Creative Paperclay® post while being on the Creative Paperclay® Design Team and I wanted to share it again. To me it is all about paint and texture and I thought the paint match job came out perfect.

As a narrative artist I find that I am always adjusting the stories around me. This clay mask has been hanging around the studio for years. It has been cast, been in videos and I felt it was time for a facelift. Because it was clay, I knew it would take Creative Paperclay® very well.

SUPPLIES

Object
Creative Paperclay®
Acrylic Paint


I started by slightly dampening the surface with water then building up the butterfly shapes with the clay.


Next I added texture with a variety of tools from a wood skewer, ceramic mark making tools and something I do not know the name of. Maybe for cooking (not my specialty). Finished by smoothing the edges with a little water.


Next I applied a wet brown paint, I immediately blotted it for a stained effect. This was just my base color.


Since I wanted it to look like it was part of the original mask I added a wash of titan buff and grey paint. While wet I salted the paint to give it the feel of the mask.

Play with Art, and Dream in Color!

Tuesday, December 13, 2016

Lost & Found Drama with Creative Paperclay®

Mixed media artists and their friends are scavengers. A friend found a bunch of frames in the trash. They were good condition and ready to become an art project and what could be better for a mixed media painting but a mixed media frame. Easy, breezy, beautiful.

SUPPLIES

Creative Paperclay®
Stamps
Texture plates
Gold paint
Red oxide paint


Started by applying Creative Paperclay® to the frame by hand then brayering it flat before adding texture. I worked in sections.


Added final details.


The Holbien mat gold matched the frame perfectly. I could have left the frame painted gold but ....


I ended up apply a wash of red oxide paint. A wash is paint diluted with water. This wash sank into the recessed areas giving the frame's texture depth.

Dream in Color!

Darlene Olivia McElroy

Tuesday, October 11, 2016

Texture, Texture, Everywhere

It doesn't matter where I am. I am always looking for things I can cast or use for stamps. I make marks of all kinds on squares or tiles of Creative Paperclay®. When they dry, I will try different surface techniques on them.  I found this textured roller at a local flea market. Yes, I drawers full of stamps and texture plates but this is more of an adventure for me.

SUPPLIES

Found Objects
Creative Paperclay®


On a hike I found a volcanic rock with great texture. I love the natural texture it gives to the clay.


I had a bag of gold crumbles that I decided to play with. I tried mixing it in the clay and it disappeared. So the best way is to roll out your clay and sprinkled it on the clay. The final step was to brayer it into the clay. There is so much more to explore with this but that is for a later date.


I have drawers full of lace. I thought this would turn out differently but I do love the contemporary stamp it made. This is why we are the "mad scientist artist". I push a product to its limits and I make new discoveries all the time.


Mark making is important to me as an artist. These are rough marks made in the clay with an African porcupine quill. I can change the look just by wetting my fingers and smoothing out the marks.


I decided to use my alphabet stamps in no particular order to make a pattern. I was not trying to make words just a design. This is something that I can see using quite a bit.


I decided to raid my coin jar for a circle design in the clay. Fun.

Experiment. Be crazy. Dream in color.

Darlene Olivia McElroy


Thursday, May 26, 2016

Going Baroque with Creative Paperclay®


There is magic in mixed media. Old objects get a new life and are given a new story. I have drawers full of cast objects, charms and beads that I use as finishing elements in my art. I find boxes with broken jewelry and odd stuff on my doorstep often. People in town know I use these second hand interesting things (S.H.I.T.) in my art. As a mixed media artist, you never throws ANYTHING away.

SUPPLIES
Creative Paperclay®
Stamps
Old jewelry
Beads
Stencil
Polymer medium

This piece started by laying out shapes of Paperclay on an old painted, cradled panel. I stamped into the clay then went through my drawers full of objects I had previously cast with left over pieces of Paperclay. After selecting the lucky pieces, I glued them down on the dry butterfly shape. Then I coated everything with polymer medium to seal the clay before painting it.


Then I started the painting process using several shapes of purple, gold and buff colored paints. I dry brushed the gold over the purple to pick up the highlights in the texture.


I went through my drawers full of small objects, jewelry, keys, and whatever that I keep in muffin tins. I always search these treasures to finish off a piece of art.


Now I add my small treasures to my art to embellish it. Some I painted just a little and, of course, I added some stencil work.

There is nothing like the pleasure of creating.

Dream in Color.

Darlene Olivia McElroy

Thursday, May 12, 2016

Treasure Hunting with Delight

 I have a lot of found vintage pieces in my studio that usually find their way into a painting but, often, they make great casts. When I buy them at flea markets, junk stores or garage sales I try and think of all the ways I can use them. Here are some examples I made from things I had lying around. I have not gotten around to cleaning up the edges yet.

SUPPLIES
Found metal objects
Delight or Creative Paperclay®


So easy. Delight was pressed into vintage religious metal ornamentation. Because the metal pieces may end of in a painting, I will often make a silicone cast of it for the future.


 I love this vintage pin. The wings are so beautiful and were easy to cast. If I had wanted to use the whole pin, I would have made a silicone cast of it.


 A metal charm also makes a great cast.
Anything with wings
Metal frame cast will definitely go into a painting today!

Open your eyes to the possibilities around you!

Dream in Color!

Darlene Olivia McElroy


Thursday, November 26, 2015

Fun with Texture and Delight


I like being prepared and one way I do it is to create 4" x 4" masonite boards with different textures. I do these when I have a break in time and I am not working on a specific project. These are texture ideas for future pieces of art.

SUPPLIES
masonite boards
Delight (or Paperclay)
found objects
texture rollers


I used a textured roller to achieve this alligator skin look. When the Delight was hardened, I applied a metallic bronze paint to the surface. When that had dried, I rubbed a green metallic rub. I felt in love with this sample.


When through my kitchen drawers and found this silicone hot pad that I thought would make a great texture.
I started by stamping the Delight with a stain of light brown then did a wash of silver when the brown had dried.


A scrap of lace also made a great texture on the Delight. This had a wash of red oxide paint on it.


I used a volcanic rock from my yard to get this real natural moonscape type texture on the Delight. When it hardened I painted it grey then did a wash of bronze. I dripped alcohol on it while it was wet.


Years ago I picked up some laser cut plexiglas that I use with spray paint and decided to try it with the Delight. I applied red oxide paint then did a blue metallic rub when it had dried.


Reticulated metal also makes a great for Delight or Paperclay. Multiple washes were applied.

So get out your textures and have fun.

Dream in Color and have fun!

Darlene Olivia McElroy


Thursday, October 23, 2014

Looking at Things With New Eyes

I am trying to purge and get rid of needless things but keeping finding cool stuff to use in art so it is "crazy time".  This week it was a Chinese tea block which I have had for years. I decided to use it as a mold then make a mold from it.

Supplies were:

Tea Block
Creative Paperclay®
Brayer
Liquid latex
I just put a pancake of Creative Paperclay® directly on the tea block and brayered it down. I didn't care if tea particles stuck to it as I was going for texture and was just experimenting.

When the Creative Paperclay® had dried it looked like an old architectural shard. I did brush off excess particles with an old toothbrush.
I added a wash then went over it with some dry brushing in raw sienna and burnt umber. At this point I have no idea what I am going to do with this piece but since my work is like creating puzzles I am sure this is just the piece I will need some day for one of my paintings.
The other day I had picked up some liquid latex so decided to see if I could make a mold off the tea block. After applying it to the block I left it on overnight. In the morning it was cured and I could peel it off. The result was so wonderful that I am ready to make tons of molds this way.
Then I decided to see how well it would stamp into the Creative Paperclay®. The mold seemed very thin so I wasn't sure how well this would come out but it worked very well.

Needless to say, I had a great time just playing around.

Play, dream in color and get your hands dirty.

Darlene Olivia McElroy