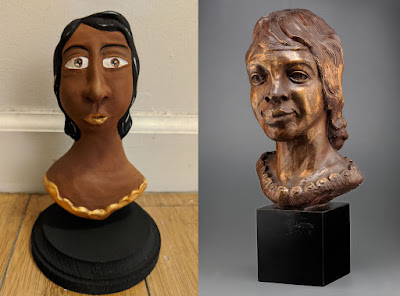
Hello everyone, today I am going to show you all how I created this standing bust that was loosely inspired by this Selma Burke sculpture for Women's history month. Selma Burke's most notable work was a Bas Relief sculpture of President Franklin D. Roosevelt that was used on the reverse side of the U.S. dime that she was never given credit for. You will need the following supplies for this tutorial:
Supplies:
Creative Paperclay®
Masking tape
Small wooden base
thick and sturdy 16 gauge wire
Drill
Sand paper
E600 Craft Glue
Acrylic paint
Sealer, Varnish
I already had a wooden base that I previously drilled a hole in laying around from a project that I didn't finish. Make sure that you use a drill bit that is just a smidgen bigger than the wire that you plan to use to stick into the base.
Create your armature with the heavy wire, make sure that you leave about a half inch of wire sticking out from the bottom so that you can later put your bust into the base. I doubled the wire here so that it would be strong enough to hold the piece up.
Begin building your sculpture, here I used some thick paper and masking tape. Keep bulking up and tightening it until you get it to form the shape that you want.
Begin adding clay onto your armature when you are satisfied with the shape.
Here I set the piece aside to dry since I work in layers. I after it dries I return to it to begin adding features.
Here I am using a ball point stylus tool to work on building the nose with.
After setting the piece aside to dry after a few passes, I am happy with how it looks and done with the sculpting phase. Here I am using an 800 grit sandpaper sheet to get the piece nice and smooth.
With this sculpture I decided to have the base removable so I did not glue the bust onto the base. If you chose to glue it to your base, I would do it at this point after your sanding is done. You can use epoxy if you want a really strong hold or E6000 glue could work as well.
Using regular acrylic paints here to paint my bust. I decided to give this one color instead of going with the bronze look as in the original sculpture.
Just a shot of my messy portable work space, I rarely work in my designated work area. When you are done, be sure to cover with a protective finish!
This is how she turned out, she needs a necklace...
Well anywho, thank you all once again for stopping by, and I hope that you enjoyed today's tutorial!
*****Stay Safe, be well and take care!*****
You can find Creative Paperclay® at the following retailers Creative Paperclay® Online Store, Michael's, Amazon, Joann's.


No comments:
Post a Comment