Showing posts with label Holly. Show all posts

Friday, December 19, 2014

Photobooth Prop Phrenzy with Rachel Whetzel

Happy HOLIDAYS, Creatives!! Rachel Whetzel here! I've been a busy elf this season, helping with some projects for the Christmas Party at my husband's work. One of the larger projects we're doing, is creating a photobooth area. Employees can get dressed up, and be silly while taking their pictures at the party! We've made a TON of the props, some signs, and fun festive frames, but I wanted to do more than the usual paper cut outs on a stick for a few of them. I got busy making THESE using Creative PaperClay® Modeling Material. After our party, I'll share more of the projects that weren't Creative PaperClay® related on MY BLOG.


This is my last post here on the blog for a while!! I'm taking a break from some design team commitments, and spending HUGE amounts of time at basketball games. Thank you all so much for your support, and for the love you show each of us designers here! I have enjoyed being here so much. Of course, I won't stop creating, farming and generally misbehaving, so if you'd like to keep up with me on my other interweb haunts, I would love that. (links at the end of this post) Now, ON TO BUSINESS! 

WHAT YOU'LL NEED to make your own photobooth props:
  • Creative Paperclay®
  • Paints and Brushes I use Folk Art acrylic craft paints and Krylon Spray paints
  • Foil
  • Empty and clean large can
  • Headbands
  • Various decorations... (holly, berries, hat band ribbon, metal pipe cleaners, bells
  • Sturdy small dowels
  • Drill (I use a hand drill) 
  • Glue (I used E6000) 
Gather your supplies for your creations, and get cracking smooshing and shaping your foil into shapes! I created the core for my carrot nose, rudolph's nose, and Frosty's pipe. 


Wrap and twist your foil around a headband to create the core for your antlers.


Cover your pieces with Creative PaperClay®, and place them in the oven to speed up your drying time. I usually put mine in at about 190 degrees F. 


To add stability to my pieces attached to headbands, I added a layer of Creative PaperClay® to the underside of the headbands. Here they are, complete with paint. 


Once your pieces are dry, sand them, and paint them, and add your decorations! I put some holly, berries and a hat band around the hat:


Some orange spray paint, and shading using stain to bring out the "carrotness" of my carrot nose:


Some red paint and glitter to Rudolf's nose:


And some bells and pipe cleaners wound into coils to his antlers. I also painted the headband red, to imitate his halter. 


Once everything is painted and decorated, add your dowels by drilling a hole into the pieces that will need a dowel, and glue them into place. Now you're READY FOR ACTION!! 


Thanks for reading! I have loved every second of my two years here as a Designer for Creative PaperClay® and I hope to be able to return in the future!! In the mean time, if you'd like to keep up with me, and see more of what I'm up to and keep up with me, I'd also love it if you'd visit MY BLOG and Subscribe! You can also find me on FACEBOOK!

Friday, November 21, 2014

Winter Skeleton Snowball Snowman by Rachel Whetzel

It's been CHILLY out in the world, Creatives!! Rachel Whetzel here! All the snow talk on line is making me feel very Wintery, so today, I'm sharing a little twist on a classic Winter icon, using Creative PaperClay® and a LOT of glitter.
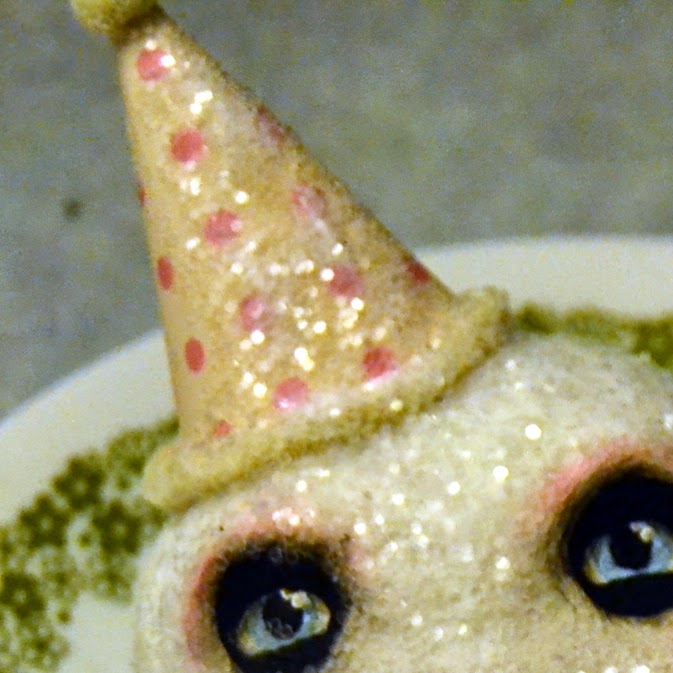
I have made a few Skeletons using Creative Paperclay®, but never (I'm not sure WHY...?) any SNOWMEN... so I got started the other day, with a vague snowman/snowball idea in my head. As I worked, I changed directions a little bit, and ended up creating a Skull snowball. I may be a bit partial, but I really REALLY like how she turned out!


WHAT YOU'LL NEED to make your own Snowball Skeleton:
  • Scrap Paper and Tape (I used some old homework from the boys, and some Washi that isn't my favorite) 
  • Creative Paperclay®
  • Paints and Brushes I use Folk Art acrylic craft paints and Krylon Spray paints
  • Pastels 
  • A 3X3 inch (or so) piece of patterned paper. 
  • Yarn or metal pipe cleaners
  • Glue. I used E600 and Crafter's Pick the Ultimate
  • Glitter. I used an old jar of clear glitter I purchased at the thrift store, but you can get it at any crafting or school supply store.
  • Fake Holly or other collar decorations
To start, I create a core for my snowball. Using a core helps me use less clay, and also speeds up dry time, because innards don't need to dry! To create my core, I used a couple pages of old homework from my boys, and rolled them up into a ball. Then, to keep the shape, I wrapped the papers up in some of my less favorite Washi tape. Not because it needs to be Washi, but because that's what was close, and I was lazy. Any tape will do. Masking is nice too, because it's easy to shape as you tape. 


Once I had a good basic shape, I pressed Creative Paperclay® over the top, and created a more uniform roundness to the snowball.


When my shape was satisfactory, and while my clay was still wet, I layered on some more clay and shaped it into a face. You can add fresh clay to dry also. In both cases, you should use a bit of water on your finger tips and wiped onto the location you're adding new clay. This helps the two surfaces join well. Some rolled clay for the eyebrow bone, a rolled piece for the nose, and balls at the cheek and chin. Blend all the edges, and shape. I used my fingers for the whole process.


I also added a small round of clay at the bottom of the ball, to help the piece sit in one direction when it's resting on a counter or shelf.


I popped my piece into the oven at a VERY low temp (190 degrees) to speed up my drying time. Then I painted it with white gesso, and added the face of my piece. When I was working on the mouth, I originally tried to make an actual skeleton mouth, but I realized the piece would look more like a snowman if I used "coal" dots instead, so that's what I ended up with. For the eyes, the skeleton look is achieved by painting the black for the hollow eye sockets, and then painting eyes in over that. Notice that the nose is also similar to a skelton's. I think that is key to letting people know this isn't your ordinary snowman. Last, use your pastels to add a rosy glow to your skeleton's cheeks, brow bones, "nose" and chin.


Blend the eye socket area where the white meets the black with some shading. You can use your pastels for this area too. 


Now you're ready for your GLITTER!! I used Crafter's Pick, the Ultimate for this part. I kept the glue thin at the front of the face, and made it thicker around the sides and forehead.  I didn't put any glue on the eye area.


Sprinkle your glitter on, and while it's drying, get to work on your HAT! To make my hat, I used a large glass to draw a circle, and cut it out of my patterned paper. Then I folded it in 1/2, and rolled it into a cone. I cut a little of the excess off, and taped the inside seam of my cone to hold the shape. Then I glued the outside seam. I tied some yarn, cut the tip of the cone to create a hole the strings would fit through, and pulled the "pom" into the top of the hat. Then I glued the same yarn around the "bottom" of the hat, on the outside of the paper. Once that was dry enough, I glued the whole thing down onto my snowball snowman's head. I also added some glue and glitter to the top to make the hat look a little frosty! All of this gluing was done using Crafter's Pick. 


To create the "collar" on my snowball, I used some vintage Holly leaves and berries that I had saved from a thrift store find I have had stashed for years. For this part, I used my E6000 glue, because I wanted to make sure the plastic holly leaves and berries stayed in place well. 


Once that glue was also dry, I painted just a bit more glue (Crafter's Pick) onto the leaves and berries, and frosted them with some glitter! 


Here she is again! I feel like she needs a name... IDEAS!? 


Thanks for reading! If you'd like to keep up with me, and see more of what I'm up to, I'd also love it if you'd visit MY BLOG and Subscribe! You can also find me on FACEBOOK!