Showing posts with label coloring clay. Show all posts

Tuesday, August 11, 2015

Lets add some color to Creative Paperclay Tip By Gloriann Irizarry

 
August is in and today tip will be base on a question I been asked many times.
 
Can you add color to Creative Paperclay® Material?
 
Well the answers is:
Yes you can.
 
This material is so versatile you can sculpt is right out of the package or lets add some color to it.
Its easy you can use many mediums out there like:
 
Water Colors
Acrylics
or my personal favorite the Tim Holtz Adirondack Alcohol Inks


If you want to try to add color to your Creative Paperclay® start by adding some color to your paperclay. 
 
 
Open your favorite color of Tim Holtz Adirondack Alcohol Inks and add drops directly to your clay.
 
 
I do recommend to wear gloves while mixing the clay since the alcohol ink will stain your hands.
Mix has much color has you want. Remember the more colorful you want the more ink you need to add to the Creative Paperclay®


I like to color my clay when I'm sculpting masks, Art dolls  and Ball Jointed Dolls BJD
 
 
By adding the color directly to the Creative Paperclay® is simple. This step will save you  time by not having to color or paint it once your done sculpting your piece.


Have in mind the color of the clay will lighten up once it dry.
Look at these BJD torsos examples of already dry Creative Paperclay®.


The Creative Paperclay® used one on the left torso is lightly tint with Tim Holtz Adirondack Alcohol Ink and the started torso on the right is plain white right from the Creative Paperclay® package.
 
Sanding the tinted clay will not change the end color. Try it and feel free to share with us your results with us at our Creative Paperclay® Q&A Facebook page Click here to join us.
 
 
Thank you so much for joining us today and stay tuned for more wonderful tips soon to come in this your Creative Paperclay® Blog.
 
Sincerely


Friday, March 27, 2015

Grunge Surface with Creative Paperclay®

As a fine artist I am always trying to find ways to add texture to my art and usually practice on one of the many old pieces of art that are laying around the studio. I love the grunge line quality I got and the results even surprised me.

SUPPLIES
Creative Paperclay®
Acrylic paint
Wax paper
Brayer
Painted Panel (old)
 Matte medium


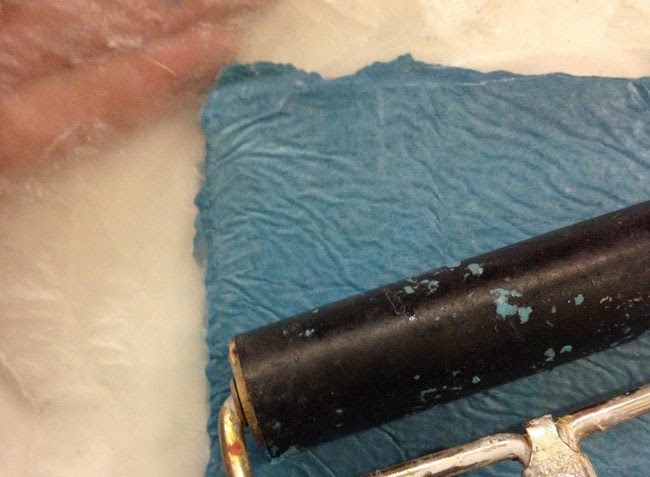
I started by mixing a navy blue acrylic paint into a slurry of Creative Paperclay® with my palette knife until it was well mixed. Since my surface was mainly orange and brown I decided to make my slurry color a cool color.


I roughly spread the colored slurry onto an old painting (on a panel) then laid wax paper over it and brayered it flat. I left the wax paper on until the slurry was almost dry then I made lines by scraping with my finger nail (because I am lazy). Finished it with a coat of matte medium. I will definitely be using this technique in a painting soon.

Darlene Olivia McElroy

Colouring Clay

Hi, it's Ann from the Creative Paperclay® Design team and the blog AnnMakes (at http://annmakes.blogspot.com).  My tip for you today is about colouring your air drying Creative Paperclay® Modelling Material.


When working with Creative Paperclay® and embedding items I like to make sure that the parts of the clay that will show up and around the edges of the items blend in with the rest of the piece.  One way I have found this to work is by colouring the Creative Paperclay® in advance.  I measure how much of the Modelling Material I will need for my project and then I add a generous amount of acrylic paint in the desired colour to the clay.  I knead until the colour is well mixed.  I found that a little paint will give a light colour and more paint gives, well, more colour!  Also the amount of kneading will dictate how well distributed the colour gets.  I like to achieve a marble look by kneading it moderately.  I have also found that adding paint to the air drying Creative Paperclay® gives me a bit more time to manipulate it.


Try it out, you may enjoy the process and the outcome too!

Thanks for stopping by today.  Please, come visit my blog for other handy dandy tips and tutorials. (http://annmakes.blogspot.com)