Wednesday, November 6, 2019

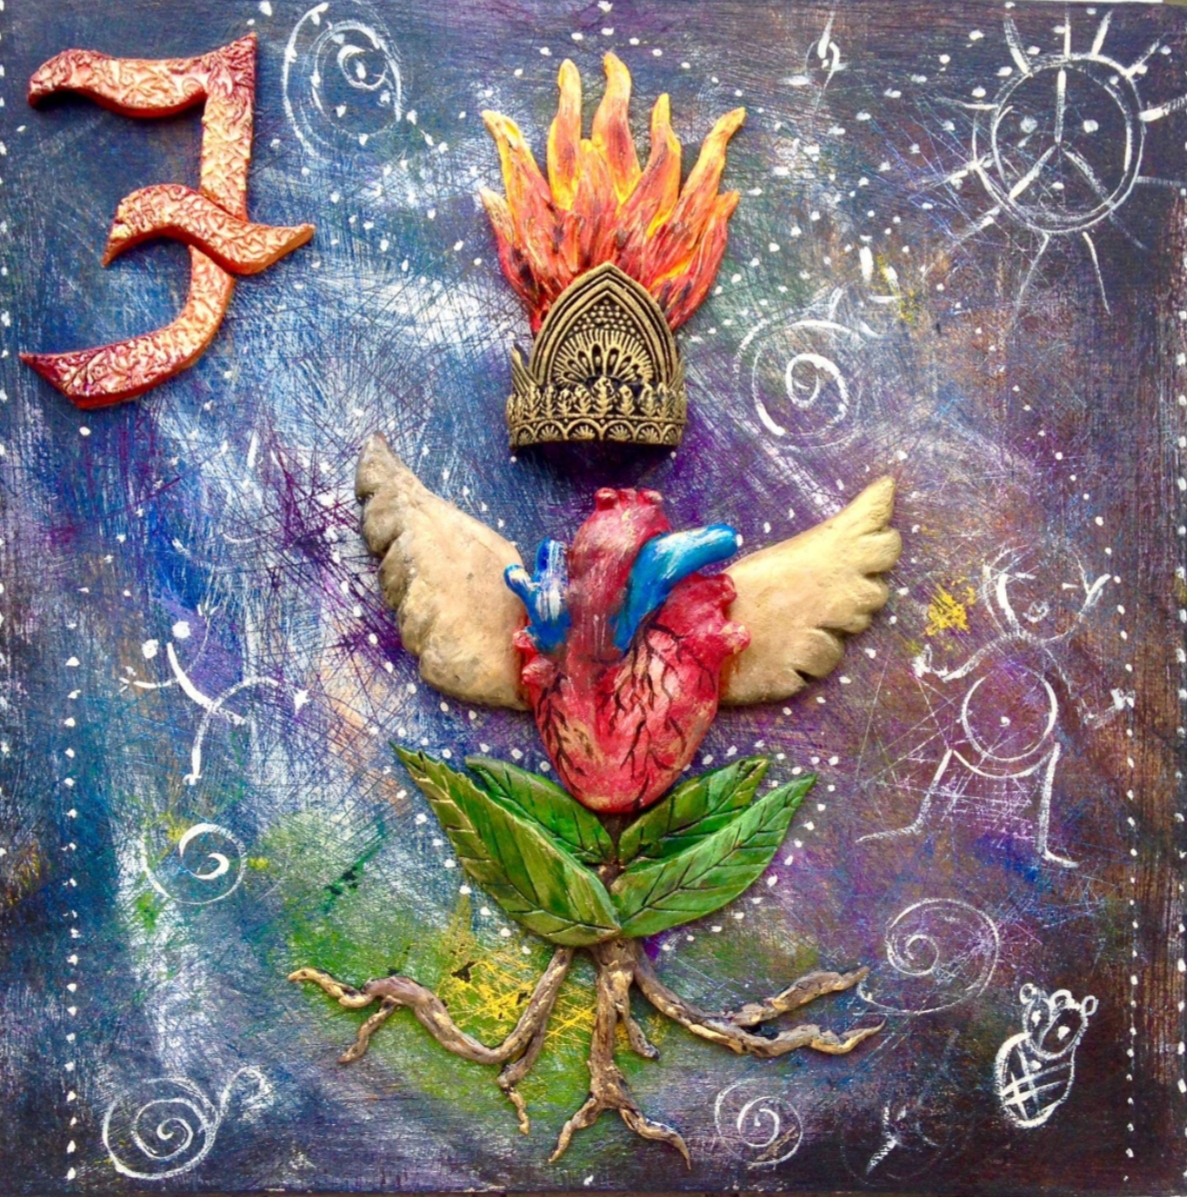
"F" IS FOR FREEDOM


"F" IS FOR FREEDOM 


Created for The Migrant's Alphabet traveling exhibit and Alphabet, Poetry Book.
Delight Modeling Medium & Acrylic Paint on wood panel.  Direct sculpted, textured, scratched.
Each of the 328 dots represents a prayer of love, peace, health, and intention.  There are Taino symbols of Water, baby, fertility, sun, snail, and coqui. 
Roots and leaves are a recurring symbol in my artwork.  For me strong roots and leaves, new growth are a of hope.
A flaming heart full of passion and fueled by dreams with golden wings is the epitome of freedom.
The background was painted in many layers.  Maybe 10 - 12 layers of paint.  Like the layers (the circle) of life, some layers are bright and sunny, some are dark and dreary, bits of color blend together to make new colors and show through on the the surface that is scratched and scared with the patina of time and the edges are worn with age.
I created this piece in the month of my 50th ride around the sun.  It was the perfect project to kick off the next half century of my journey.  I am so honored to be invited here.
Thank you, Jane Dávila for hosting this project!


Monday, November 4, 2019

Making Armatures for Your Sculptures


Hello, welcome to another post! Today I am going to talk to you about the insides of your sculpture otherwise known as the armature. To sum it up, the armature is the skeleton of your sculpture, the “bones” that support the actual body of the sculpture. An armature is needed when working with air-dry clays. It can be anything from a bottle to the cardboard tube that comes on a toilet roll or paper towel. I recently did a show on Armatures that can be used with Creative Paperclay®. I have included the video below. I go over the sculptures that I have made and what I have used as armatures.
For those of you interested in sculpting, I host a show called Clay Talk on Facebook live the first Thursday in every month. It is on the Creative Paperclay Modeling Material Facebook page. If you miss the live show don’t worry. I will be posting the videos here. Below is the show on armatures.


I hope this was helpful. If you have any questions just ask away in the comment section below. You can also learn a lot on the Creative Paperclay Q & A Group on Facebook. Don’t forget to join the live show on the 1st Thursday of every month.  This month another design team member, Gloriann Irizarry, will be hosting the show and will share with you how to make jewelry with Creative Paperclay®. Don't miss this one, you could make great presents! Mark your calendars - November 7th at 8pm EST


Thanks for stopping by!

Friday, November 1, 2019

November 2019 First Friday Fan Day


Need some inspiration for your next Creative Paperclay® project? Check out what folks are making with Creative Paperclay™.


Pendant Lamp
Hand Print Ornament
Scandinavian Gnomes
Clay Stone Paperweight

Succulent Pot
Sugar Skull
Cornucopia

HELP US FIND YOU!!
  1. Use the hashtag #CreativePaperclay on all your social networks.
  2. When using Facebook, be sure the your posts and images using the #Creative Paperclay hashtag are set to public, otherwise we won't be able to find you.
  3. Share your projects on the Creative PaperClay® Facebook page.
I'm always trolling the web, looking for great Creative Paperclay® projects. If you find something, post it on our Facebook page.

GOT QUESTIONS???

Find the answers to your paperclay questions. See what other folks are creating. Stop by our Facebook group and say, "Hi!" Creative Paperclay Q&A
Carole

Thursday, October 31, 2019


Making Little Hoot with Creative Paperclay


Hi everyone!  I am late getting the blog up today as it will not accept a video as long as mine.  Therefore I have taken it to my You Tube Channel and I am leaving the link here for you to follow and watch the tutorial:

https://www.youtube.com/watch?v=bJCVi-QXQ0c&feature=youtu.be


Thank you so much for your patience!

My Best Always,

Carly

Friday, October 25, 2019

Create a Ring holder with Creative Paperclay


Hello everyone! My name is Cinnamon Willis and I am going to show you how I created this sculpture. With Election Day coming up, I was inspired to create this hand with the fingers shaped in a "V" to inspire all who are capable to go out and vote! This sculpture also doubles as a ring holder, you can create this with all five fingers extended to have a full hand of ring holders if you would prefer.

Supplies:

  • Creative Paperclay®
  • E6000 Glue
  • Wire to build an armature with, can be aluminum
  • Pliers
  • Acrylic paint
  • Sanding paper
  • Drill
  • Wooden base
  • Dowel


To begin, take the wire and bend it into the shape of a hand. Do this step with pliers so that it would be easier.


Cover the armature with masking tape and newspaper to bulk it up. If you plan to have any fingers bent, cover them with tape in newspaper and leave the knuckle exposed so that you can manipulate the fingers to get underneath them to sculpt later.


Begin to add the clay onto your hand, leave knuckles exposed if you plan to bend the fingers and pose them afterwards. It will be easier to work on shaping and sanding them last after you are done working on the rest of the hand. When you have worked out the overall shape of the hand, proceed to go back to bend the fingers in place to work on the knuckles. Wrap the wire with masking tape and then cover with clay.


When the piece is dry, sand if you would like a smooth finish and paint with acrylics.


Take the base that you plan on using for the piece and drill a hole in it that would be roughly the same size as the dowel that you plan on using. Take the same drill bit and use it on the base of your sculpture.


Paint the base with your choice of paint before attaching it to the sculpture. When it dries, take your E6000 glue and attach the rod to the base. Sit the base out for 24 hours and allow to dry.


Attach the base to the sculpture with the E6000 glue and allow it to dry.


Take a photo and remember to go out and vote!

Thank you all once again for stopping by, and I hope that you enjoyed today's tutorial! You can find Creative Paperclay® at the following retailers Creative Paperclay® Online Store, Michael'sAmazon, Joann's.

See more of my work at Melandolly.com and be sure to catch updates on my Instagram page


Wednesday, October 16, 2019

Scarecrow ornament on a stick


Supplies Needed:

Creative Paperclay
rolling utensil
piece of cotton fabric for texturing
craft glue
2" Styrofoam ball
paper drinking straw
1 piece of floral wire
1 decorative paper napkin
string for hanger and hat
black permanent pen
orange permanent marker
pink  permanent marker
gauze type fabric or raffia 
makeup sponge


ArtDeco products for painting

Decou-Page
Gesso
Asphaltum paint
blue for neck
Antique White
Crackle Glaze
Antiquing cream in black and raw umber


To begin with roll out paperclay 
You want a circle sort of shape and it should bee about 1/8" thick


next lay out piece of fabric


lay clay circle on fabric and roll over it again
this give you a fabric texture


Put glue on top of Styrofoam ball


Lay paperclay on ball with texture on the outside


gently wrap around ball


Notice you sort of have gather spots at the bottom
this is a good thing


Push straw into bottom of ornament


roll out a piece of clay about 2" x 8"


add to the bottom of the head...sort of gathering it with your fingers


roll out a snake


Make a snake fold in half


twist to make rope for the neck


attach rope with glue


make small ball press on rope and mark with X this makes it look like a knot

Mark stitching up center of face


floral wire


wrap around a pencil 


clip ends of wire to make a hanger for ornament


press into top of head dab of glue

Gesso head 
let dry


Paint entire piece Asphaltum


Let Dry


Using makeup sponge 
sponge antique white on to entire piece

when it dries...use permanent maker and make two circles
for cheeks and a triangle nose
outline with permanent black pen
let dry....


Coat entire piece using crackle glaze
let dry and you will see cracks appear
(I usually wait for several hours)


Paint entire piece with antiquing cream
let dry...using a damp cloth wipe off excess
leaving in cracks 


Making Hat


cut two circles from your napkin


remove the back layer of napkin off


paint decou-page on backs of both circles


sandwich together 


arrange on head let dry...it will remove after dry


once hat is dry sponge black antiquing cream on edges of hat to cover up 
any white areas


I used a gauze type fabric for hair but raffia works great too


glue hair in place

glue hat in place and run needle thru the hanger which is under hat
pull thread and tie a hanger


Glue gauze or raffia under the head around the straw


Hope you enjoy making him....Happy Fall