Friday, December 28, 2018

How to make a Robot Peg Doll


Hello everyone! My name is Cinnamon Willis and I am hoping that you all are enjoying the holiday season as much as I am! Today's project will show you the basic steps to create a wooden peg doll. I turned this one into a robot, but you can make yours into whatever you would like it to be.


Supplies:

  • Creative Paperclay®
  • Wooden peg doll
  • Acrylic paint
  • Sanding paper
  • Aleene's Original Tacky Glue
  • Acrylic medium or gesso
  • Acrylic paint
  • 20-22 gauge wire (optional)


First I start out with an ordinary peg doll. These can be found in almost any art supply store for a couple of dollars. I brought these from my local Michaels in a pack of four, so that means I have three more to work on!


After taking a good look at the peg doll, I start mapping out where I plan to place things such as the arms, hands and feet on my robot.


After deciding where things would be, I sanded down the parts of the doll that I needed to add my clay to. This step makes it easier for the clay to grip onto the wood, it's very difficult to attach clay to smooth finished wood.


Once I get those areas rough, I slowly began smoothing some clay over the wood to bulk out my figure.


During the process of me sanding down the wood, I managed to sand off my character's face. I just drew it back on in this stage.


In this shot, I am sanding the clay on the piece down and preparing it for being painted. I'm using a sanding stick that I found on ebay, they're really good to get into small places.


Here, I gave the piece a light coat of acrylic medium, but you could us gesso instead. I added the medium to give the piece a surface that would be easier to paint onto without having to paint many coats on top of it. i also made a little heart for it to hold.


I used about 4 coats of metallic gold acrylic paint here to get an even coat.


With the little heart, I painted about one and a half coats of magenta metallic paint.


I used some white pearlescent paint here to give the piece a few highlights.


I felt that my robot wouldn't be complete without some kind of swirly antenna on top of his head. I had some wire laying around that looks to be around the 20 gauge range and I just shaped it with my hands. I then made a small hole in the back of his head to poke the end into and put a tiny bit of Aleene's Original Tacky Glue in it to give it a little hold. After it dried, I shaped the wire to lay a bit more onto the robot's head.

Thank you all once again for stopping by, and I hope that you enjoyed today's tutorial! You can find Creative Paperclay® at the following retailers Creative Paperclay® Online Store, Michael'sAmazon, Joann's.

See more of my work at Melandolly.com and be sure to catch updates on my Instagram page!


Melandolly


Thursday, December 27, 2018

Creative Paperclay® Snow Covered Tree


Hello again! I hope you are having a wonderful Holiday Season!

This is my last tutorial and I want to thank everyone who has checked out all of the tutorials on the blog.


Supplies:

Creative Paperclay®  

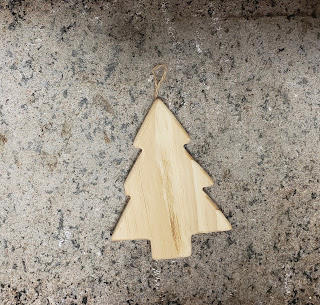
Wooden tree

Green acrylic paint

Textured snow

White glue

White Gesso

White glitter


Step 1; Make small triangle pieces with Creative Paperclay® and attach to the tree for branches. Sometimes it helps to paint the area with a little bit of glue so the clay will stick better.


Step 2;  draw lines on each branch to look like the needles on the branches. After you get one side finished you can let it dry so it's easier to do the other side with out smashing your work. You can  do just one side and write the date on the opposite side to make it even easier.


Step 3; After the tree is completely dry paint the tree with white Gesso and let it dry then paint with green acrylic paint. Mine looks a little neon but it's really not.  Let dry


Step 4;  Take the texture snow and paint as much snow as you want on each branch. I put a lot more at the top of the tree and down the edges so it didn't look too flat. You can even add a little glitter before the snow dries.


Now you have a Creative Paperclay® tree ornament.
Thank you again for checking out all of my blogs and have fun sculpting!


Creative Paperclay®       
https://www.paperclay.com

Hobby Lobby, Michaels, Joann, Amazon


Monday, December 24, 2018

Have Fun Making this Creative Paperclay Ornament!


I wanted to make some last minute Christmas Ornaments and here is an easy tutorial on making one out of a gourd and Creative Paperclay!

Materials needed for this project:

Paint Brushes
Mold (flowers and leaves/IOD medallions/flourishes)
eyelet
sealer
super glue gel


These are some of the molds and gourds that I laid out to use. 


These are a couple of the gourds that I started out using the Delight Clay on. I ended up adding some flourishes to both of them that I molded out of the Creative Paperclay. They didn't get dry enough for me to paint so I set them aside to dry and finished up the other one.


On the one that was completed for this project, I used the flower petals and leaf mold and created a Poinsettia. I started out by cleaning the outside of the gourd and creating a top which I glued to the top of the gourd and inserted an eyelet which I also applied Super Glue Gel to. The glue will dry as the clay does and creates a strong bond.


I molded each of the petals and applied them to the gourd with some Super Glue Gel, just as I did with the leaves. Of course as I rolled each of the balls for the center I put down some Super Glue Gel first and then added the balls. I sat the ornament in front of a room heater for the night and it was ready for paint when I went out the next morning. I didn't put the others in front and they weren't quite ready.


I painted the top with the Plaid Paint in Gold and painted the background in the Plaid Paint in True Blue. The flower petals were painted in Plaid Paint in Apple Red and the leaves in Plaid Paint in Kelly Green. I painted the center in Plaid Moon Yellow. I got a small amount of the Plaid Gold paint and dry brushed it on the flower petals and the leaves. I don't think that the pictures do this ornament justice. It turned out beautifully and the Creative Paperclay was so easy to work with in the molds, as was the Delight Clay. These definitely won't be the last ornaments I make just maybe the last ones for this year.

I hope you try using Creative Paperclay or Delight Clay in making ornaments. You certainly don't have to use gourds, you can use plastic ornaments or whatever you desire. I work with gourds quite a lot so that's what I had on hand. I hope you enjoyed this tutorial and leave a comment below. Check out the Creative Paperclay website and also the Plaid website for more ideas and all of their products.


Barbara


Thursday, December 20, 2018

Mixed Media Magic with Delight™

Happy Holidays!! Jenn here today, sharing a wintery tag using embellies molded from Delight™ air dry modeling compound. Delight™ is made by the Amazing Creative PaperClay®!
I love the soft hues associated with Winter and I really wanted to do a collage using some of the many pieces I have molded with Delight™.
Supply List:
Chipboard tag 4" X 7.5"
Heavy White Gesso
Delight™ air dry modeling compound
Iron Orchid Molds
Renea Bouquet Flowers
Tim Holtz Chippie sentiments
Cheesecloth
Art Anthology Inks
Art Stones
Sparks Acrylics
White Crackle texture paste
Stencil
Stamps and inks

Prep all of the supplies including molded pieces. Be sure to allow the molded pieces to dry overnight before adding them and creating the tag.

To create this tag start by coating it in heavy white gesso and allowing it to air dry.
Next add a white crackle texture paste through a stencil. Let the paste dry completely to achieve the most crackling effect.The one used here is bricks by Tim Holtz.

Next add your first molded embellishment. This is a column. On this tag I have created leaves, flowers, clock, and the column all from Delight™ air dry modeling compound using silicone molds.


Next add color using a spray ink or watered down acrylic. Here I started with a purple ink. More color can be added once this one dries or is dried with a heat tool.


Add some scrolled lettering stamping lightly. Continue to build and add embellishments and flowers until you have the desired result.

Delight™ air dry modeling compound is lightweight when dry so it is great for creating projects such as tags and cards. It takes very well to inks and sprays when dried and gessoed as well.
Thanks so much for viewing my post today! I hope that you are inspired to give this amazing clay a try and create something amazing!
Creative Paperclay® and Delight™ are conveniently available for you to purchase online and at the below listed retailers.

Until Next time Stay Creative!

Happy Holidays!!


Saturday, December 15, 2018

Bowl completion...Just in time for Holiday decorating!


So excited with the look of this bowl!!  So festive and easy to do with only a few materials and a little bit of time.

First off, check out my last blog post (http://creativepaperclay.blogspot.com/2018/11/challenge-bowl-from-creative-paperclay.html) for instructions to create the bowl out of Creative Paperclay Modeling Material.
Once you have a completely dry bowl gather the following materials to complete a gorgeous, eye catching Holiday table decoration:
1) 2 colors PLAID Folk Art Multi-surface metallic paint (I used Antique Gold #658 and Tanzanite #6313)
2) Dremel or other hand drill with multiple sizes of drill bits
3) tools: a paint brush, a sponge brush, & a pencil
4) 2 types of yarn (I used Lush Alpaca (amethyst) and eyelash yarn (aqua)
5) a thin wire to use as a needle and/or a plastic embroidery needle

First, use the pencil to mark hole placement all the way around your bowl.  I made my marks about 1/2" apart and about 1/4" down from the top of the bowl.  Keep in mind you will be drilling at these marks so give yourself enough space between marks and edge.

Begin to drill using a small drill bit to make the pilot hole.  Work carefully all the way around the bowl.  Once pilot holes are complete, gradually increase the size of the drill bit and holes, one step at a time.  I changed the drill bit 3 times before I was happy with the size of the hole.  NOTE:  The size of finished holes will be tied to the size yarn you choose.  Obviously thicker yarn will  need a larger hole.

Once the holes were completed, I wiped out the bowl with a damp paper towel to remove all Creative PaperClay dust.  Now, time to paint!

I painted the entire bowl with Antique Gold paint using the paint brush.  The brush helps to get paint into textured areas.  I applied 2 coats.
Once the gold paint dried, I used the sponge brush to careful brush Tanzanite paint over the textured bottom.  For this step, little bits of paint on the edge of the sponge brush will allow paint to remain on top of the texture rather than sinking into the crevices.
 

2 coats were applied.  The "foot" of the bowl can be left gold or have tanzanite brushed across as well.

I do love texture and detail.  For that reason I chose a fluffy yarn to stitch.  The thickness of this yarn filled in gaps between holes.  For this yarn, I cut a thin piece of wire to use as my needle. I cut a piece of yarn long enough to wrap around the bowl edge plus some.  The yarn was folded in half and then the "needle" added.  Leave a little tail of yarn loose after the first stitch.  This will be knotted with the other end once stitching is completed. (NOTE: Because of the hole size, I could not use a plastic needle for this step.  The thickness of the yarn plus the size of the needle eye was too large for the holes)
So this looks pretty enough and I could probably stop.  But as I said, I do love texture and detail.  Bring on the eyelash yarn!!
The eyelash yarn takes a bit of time and patience.  I used the plastic needle so it could be woven into the Amethyst yarn.  To start, place the needle under 2 loops along the edge.  Double back over one of the loops and then under 2 again.  Repeat the process a few times before trying to pull out the loose eyelash threads. NOTE:  If this is done too soon, all of the stitching will pull out.  TAKE YOUR TIME!
Continue until you have gone completely around the bowl.  To complete, weave the end under a few loops and trim the excess.


For your holiday table, think about displaying your beautiful bowl on a mirror in the center of the table!
I hope you have enjoyed this project.  I am lucky enough to be back creating with the Design Team for another 6 months!  Keep watch for more projects using Creative PaperClay as well as Delight Air Dry Compound.

Have a Blessed Christmas...Happy Hanukkah...Happy Kwanzaa...merry Festivus to all ❤


Friday, December 7, 2018

December 2018 First Friday Fan Day


Need some inspiration for your next Creative Paperclay® project? Check out what folks are making with Creative Paperclay™.


Sculpture Using Tin Can and Clay
Spiral Icicles
Snow Clowns
Clay Cones
Miniature Houses with Tea Lights
Leaf Magnets

How to Make a Dragon with Paperclay
Glitter Roses 

HELP US FIND YOU!!
  1. Use the hashtag #CreativePaperclay on all your social networks.
  2. When using Facebook, be sure the your posts and images using the #Creative Paperclay hashtag are set to public, otherwise we won't be able to find you.
  3. Share your projects on the Creative PaperClay® Facebook page.
I'm always trolling the web, looking for great Creative Paperclay® projects. If you find something, post it on our Facebook page.

GOT QUESTIONS???

Find the answers to your paperclay questions. See what other folks are creating. Stop by our Facebook group and say, "Hi!" Creative Paperclay Q&A
Carole