You will need the following supplies:
acrylic paint- I used Americana Multi-surface Satin in Paprika and White Birch, and Golden Fluid Acrylics Inference Gold.
antiquing medium - I used Plaid Antiquing Medium -Apple Butter Brown.
varnish
string or ribbon
beads
Fray Check or clear varnish
paper towel or soft cloth
craft mate or tile to work on
template - cut out cardboard
 |
| Template |
Let's get started!
Step 1
Roll out your clay, about 1/4" thick and place your template on the clay.
Step 2
Use a craft knife to cut out the owl shape.
Step 3
Smooth the edges.
Step 4
Cut out a triangle for the beak and blend edges to attach.
Step 5
Use a rubber stamp to make a pattern if you like.
Step 6
Make a hole between the ears.
Step 7
Cut out 2 small circles and 4 larger ones. Place the smaller ones inside 2 larger ones to form the eyes.
Step 8
Cut approximately 1/3 off each of the remaining circles. Use the larger piece to form the eyelids and attach. blend the seams.
Step 9
Set aside to dry.
Step 10
Apply a coat of gesso.
Step 11
Paint with your favorite acrylic paint and let it dry thoroughly before moving to the next step.
Step 12
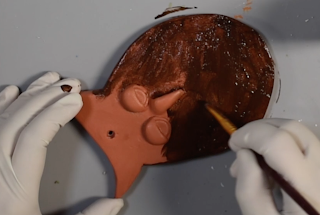
Apply a coat of antiquing medium.
Step 13
Wipe off with a damp paper towel or cloth.
Step 14
Set aside to dry.
Step 15
Varnish your owl.
Step 16
Fold your string in half and thread through the hole, forming a loop.
Step 17
Thread the ends of the string through the loop and pull until tight
Step 18
Add your beads and tie a knot.
Step 19
Fold the string over and tie another knot so you have a loop to hang.
You can also follow along in the video below.
Congratulations, you have made your own owl wall hanging!
Thanks for watching .You can share your creations with us on our Facebook page. We would love to see them! For more inspiration have a look around the blog. There are tutorials for many levels using Creative Paperclay®. You can also visit my blog www.papermachepatch.com.
Thanks for stopping by! Remember, you can find Creative Paperclay® online at Creative Paperclay Co and also at Michaels, Hobby Lobby, Dickblick and Amazon.
Happy Crafting!
Suzette
Instagram: https://www.instagram.com/papermachepatch/
Pinterest: https://www.pinterest.com/suzettehussey/


3 comments:
What a cute little owlet! Sometimes the simplest projects carry the most personality!
so cute! I may have to do this with one of my art classes! They would love it
That is one cute owl! And the tutorial is simple enough for any one to do. I love it!
Post a Comment