

Necklace with Creative Paperclay®
Face Pendant
Supplies:
Creative Paperclay® Sculpted or molded face
Black or White Gesso (I used Liquitex brand.)
Acrylic Paint (I used Silver and Violet)
Paint Brush (Gesso can be hard on
brushes. Use cheap foam brushes for this.)
Sandpaper
Metal Leaf or Metallic Foils
Metal Leaf or Metallic Foils
Mica Powders or Metal Pulver (I used Eberhardt
Faber Pulvers in purple, green, & blue)
Ranger Perfect Medium or other adhesive for
leaf, foils, & powders
Fine wire - I used 30 gauge. This is for adding beads and other
embellishments to your pendant.
Assorted beads and embellishments
Bead Stringing Materials – I use Medium Soft Flex® Beading Wire
Assorted beads and embellishments
Bead Stringing Materials – I use Medium Soft Flex® Beading Wire
Jewelry Findings – To finish off your necklace
you will ned crimp beads and one clasp
Leather, Suede, or Felt – Just a small piece to
cover the back of the pendant for a professionally finished piece.
Glue – e6000, Fabri-Tac, Barge, or other heavy
duty adhesive.
What's on my Workbench
Wednesdays?
Today I have made a
Necklace with a Creative Paperclay Face Pendant
I've been experimenting
with Creative Paperclay® and Delight Clay™ modeling materials. I am new to
working with both of these mediums so there will be lots of test pieces as I
explore all of the fun possibilities. As a sculptor I especially love
faces. I am quickly amassing a collection of faces that will never become
full sculptures. As my collection of faces grows I am thinking up lots of
ways to use these spare pieces. The possibilities are endless!

Here are a few of my test
pieces. The blue one is made with Delight Clay™. Delight Clay™is pure white
out of the package. I made this one blue by mixing in some alcohol
inks. I like how once the ink is blended into the Delight Clay™ modeling
material it becomes fully incorporated and doesn't stain your hands or work
surface. This material sculpts and holds detail amazingly well for being
so soft and marshmallow-ish straight out of the package. I will elaborate
more on that in another post. The other faces were made from Creative Paperclay® using molds of
some of my original sculpts. As a side note, sometimes I sell my molds
and faces. Hit me up if you need some for your projects
(LALA_415@Yahoo.com).
One of the things I like
to do with these Creative Paperclay® faces is to make jewelry. They
make great brooches, pendants, earrings, beads, bracelets, and hair
ornaments. The toughest part for me is deciding which face to use and
what to make with it. The options can be mind boggling!

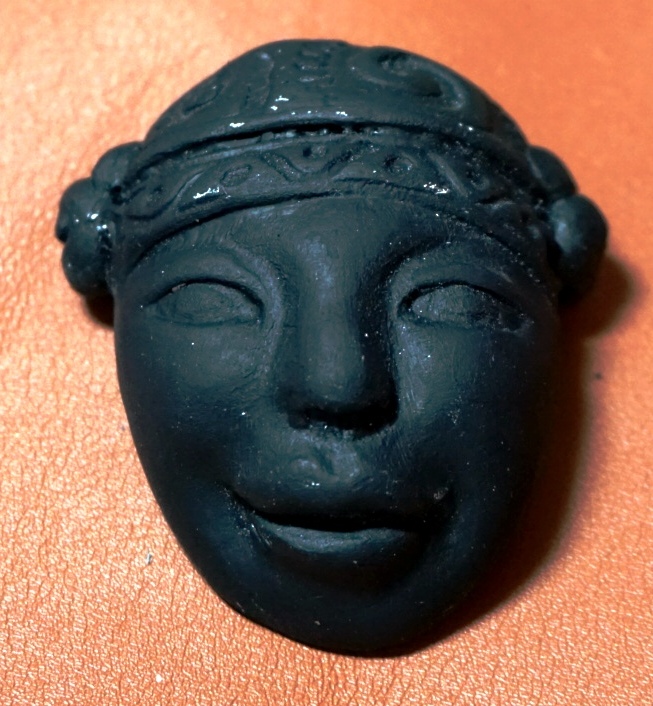
I like them all but, I have decided on this face for today's project, a necklace with a Creative Paperclay® face pendant. For your project you can use any face mold or sculpt your own. Even simple sculpted faces make great jewelry!
I thought she should be
dressed up a bit so I gave her a beaded headdress. I made the headdress
using one of my texture sheets.
Roll out a bit of Creative
Paperclay®, press into lightly, oiled texture sheet or rubber stamp, decide
what part of the design you like best, cut to fit across forehead, moisten
forehead with a bit of Creative Paperclay® slurry (just add a bit of water
to a pea sized bit of Creative Paperclay®.) to adhere headdress to
forehead. Play around with the placement before sticking it on
permanently. I also added a few sculpted details on the
sides.

Since this is a pendant
you will need to add holes for stringing it up and adding beads and
embellishments. Use a needle tool or a toothpick to make holes on either
side for stringing and adding optional embellishments. You can drill
holes with a simple hand tool after it's dry if you prefer. When I don't
know what the piece will be used for I often leave them without holes.
The beads will be added later but I made sure to add extra holes across
her headdress to add a band of bling.After the Creative
Paperclay® face and headdress is dry you can lightly sand the surface to remove
any imperfections.
Optionally, you can add a
couple of light coats of gesso sand after each coat dries. I used white
gesso first and then black. No reason for this really. I just
didn't know where this piece was going.
Paint your face with
acrylic paints. I used violet and silver
mixed together because I wanted her to be metallic. I dabbed the paint on randomly with my
finger. A brush, sponge or dabber would
work as well.

At this point you can add
metal leaf, foils, mica/metal powders if you would like. I also dabbed a bit
more paint over the metal leaf.
Allow the paint and
adhesives to dry completely then add a couple coats of sealant or varnish. Allow your sealant or vanish to dry completely
between coats.
Now comes the fun part! Decorate your Creative Paperclay® face pendant with beads, crystals, feathers or other embellishments.


Different background and lighting give her a completely different look. Look at your piece in natural light, once she's dry before adding your sealer or varnish.
Now comes the REALLY fun part! Using complimentary beads create an original, show stopper necklace! Glue leather to back of pendant. Allow glue to dry completely. Wait at least an hour. Trim off excess leather.

Finally you get to the Really, Really
fun part…. Wear your gorgeous new creation with pride! BRAVO!
You did it!

Until then, stay creative!

Ciao!
LaLa
2 comments:
Love the look of is!
Thank you for your appreciation, Kat! I am looking forward to wearing this one soon! I'm planning on a few other versions as well. The same face (I really happy with her) but, different colors and stones. The options are really endless!
Post a Comment