Friday, July 27, 2018

How to Create a Paperweight with Creative Paperclay®


Hello everyone! My name is Cinnamon Willis and I am going to show you all how to create a paperweight using Creative Paperclay®.

Here is what you'll need!

  • Creative Paperclay®
  • Scissors
  • Rocks
  • Newspaper
  • Masking tape
  • Sand paper
  • Acrylic paint
  • Aleene's Tacky glue
  • Lambs wool (or synthetic hair from the hair shop)
  • Felting needle (Optional)
  • Wool felt sheet (Optional)


First I start off by making a ball out of newspaper and putting something heavy like rocks in the center.


I wrapped it with masking tape to get it to hold its shape and put a coating of gesso on top. As I've said in my previous tutorials, the gesso just makes it a bit easier for the paper clay to adhere to the masking tape. You can totally add the clay to the tape without it, but it will be a bit more of a struggle. 


Here you can start bulking up the piece with paperclay. Allow the piece to dry and sand it to the level of smoothness that you are happy with.


At this stage I added little nubs to the bottom of the piece so that it becomes stationary and doesn't roll around.


Paperclay shrinks a bit when it dries, so be sure to check the nubs to see that both sides dried evenly and that the piece isn't wobbly. You may have to add a bit more clay to one side so that the piece is stable as I had to go back and do. Allow the nubs to dry and sand them down as well. 


Once the piece is stable, you can begin to work on the face. Here I started plotting with pencil where I wanted the eyes nose and mouth to go. I normally skip this step and work free style, but I would totally recommend doing this for those who are not comfortable working without guides, or those who are just learning.


When you are done with sculpting, you can once again let the face dry and sand it. You can now move on to painting your piece. 


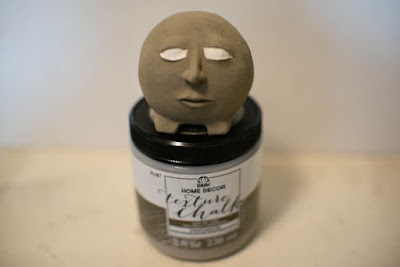
On this piece, I was fortunate enough to be able to try out  FolkArt's ® Home Decor ® Texture Chalk™, which was sent over to me from PLAID. It has a nice gritty and chalky texture, so I ended up not covering this piece with varnish as I usually do out of fear that it would ruin the look of it. The color is Wet Sand that I am using here.


The paint gave the piece a nice and rough texture, and since it was so thick I ended up using just one coat which saved me a lot of time! Bonus points there!


Ok so this step is completely optional since I have a new obsession with needle felting and  already had some Leicester Longwool strands and wool felt sitting around in the studio. If you are unfamiliar with needle felting and are curious about it, please head on over to Youtube to see some videos on it. It's really easy to do, for the most part you are just stabbing wool with a needle until the shape that you are trying to get begins to form. It's kind of therapeutic, but that is a whole lesson within itself! Anywho, I made this hat and partial wig using that method and glued them on with Aleene's Tacky Glue. You can make something similar with good old fashioned glue or a needle and thread!


Thank you for stopping by and be sure to look for some Creative Paperclay® in your local craft store and also on these sites I listed below! I hope you all enjoyed this tutorial and come back on the fourth Friday next month for my next creation!
Michael's
Amazon
Joann's


You can find the texture chalk paint that I used at PLAID.


Thursday, July 26, 2018

How to make a Creative Paperclay® decorative fish with Delightclay® seashells


                                                          Welcome to another tutorial.


                              Keeping with a summer theme I decided to make a Creative Paperclay®                                                                                                       fish and seashells with Delight™ 


Supplies;

Foil

Creative Paperclay®

Delight™ air dry modeling compound

6 inch Oval wood base

¼ inch dowel 4 inches long

Gesso

Acrylic paints, your choice of colors

Wilton Candy Mold - Seashell

Craft sand

Sculpting tools

Drill

Strong glue

Paintbrushes


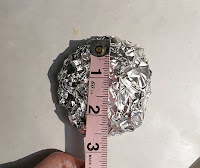
Take foil and make a flattened round shape that is approximately 1 ½ inch thick and almost 3 inches wide. Roll out Creative Paperclay enough to cover the foil about ¼ inch thick. Smooth the entire piece.


 Tail and fins.  Take Creative Paperclay that is in a triangle shape that is 3 inches wide by 2 ½ inches long with a flattened end press on one end of the body for the tail. Use water as glue to connect the two. 


 Make a triangle for the nose and attach it the same like you did with the tail.


Draw lines on both sides of the tail and fins take the end of a paint brush and put indentations in the body for the scales. I put a paper towel under the tail to support it while it dries. 


 Hold the body of the fish up and look down at it to so you can get the eyes even. Take the end of a large paintbrush handle and press in for the eyes. Let dry a little so it’s easier to work with. 


Make 2 more triangles that are about 1 ½ inches wide by 1 ½ inches long and ½ inch thick.  Add the triangles to the top and bottom of the fish for the fins. Draw lines on the fins let dry. 


Drill a hole in the center of the wood base for the dowel then take a knife or drill and make a hole at the bottom of the fish for the dowel to go in.  Wait to glue the dowel in the fish and base till after you paint them. 


   Base coat the fish with Gesso let dry then paint the fish with acrylics of your choice, I painted mine with gold then antiqued with a metallic blue then antiqued it again with white. 


Step 8: Paint the eyes black.  Paint the dowel and base with acrylic paint. I used a gold color. Glue the dowel in the base with wood glue. Glue the dowel into the fish with a strong all-purpose glue. Paint the base with glue and sprinkle sand to cover the top. Let everything dry.  


Step 9:   Seashells

Sprinkle either baby powder or corn starch in the plastic seashell mold and press the Delight™ into the mold pull out and trim the edges with scissors. Let dry.

I painted the shells with a light beige paint then highlighted the edges with pink and gold. Then glue the shells onto the base. 


       Creative Paperclay® and Delight™ are conveniently available for you to purchase online and at the below listed retailers.


                                                   Thanks for checking out this tutorial.


Thursday, July 19, 2018

Butterflies and Blooms

Hello everyone! Jenn here today sharing this collage created using Delight™ from Creative Paperclay®!
I am constantly molding flowers and other embellishments using Delight™ because they are a great thing to have on hand. For this project I pulled out my stash and made a collage!

Start by coating a small canvas with heavy white gesso and allow to dry. Then gather up molded pieces and arrange them in the composition you like.


Apply heavy white gesso again making sure to get everything coated. Next, add color by starting with a base color such as the Plaid acrylic in Key West (Apple Barrel®) that I chose. Water down by spritzing with a water bottle and dab off excess. Dry with a heat tool.

Continue layering colors in the palette you choose. Build the colors one at a time drying in between each. I used several products in my collage which I have listed at the end of this post.

Add art stones and Dew Drops from The Robin's Nest for texture.


For my collage I used the following products:
Prima and Plaid silicone molds
Art Stones
Mini Art Stones
Wooden swirl embellishments
Plaid™ acrylics
Irridescent acrylics
Art Anthology Colorations
5 X 7 canvas
Heavy White Gesso

Thanks so much for viewing my post today! I hope that you are inspired to give this amazing clay a try and create something amazing!
Creative Paperclay® and Delight™ are conveniently available for you to purchase online and at the below listed retailers.

Until Next time Stay Creative!


Wednesday, July 11, 2018

"POP" Art Brought to Life with Creative PaperClay®

If you have been following my Creative PaperClay® escapades you know that I love to use the product with my art students.  I teach art to grades K-8th in a local Catholic school.  Exciting the littles is a pretty easy task.  Exciting the bulk of my middle schoolers is a continuing journey to find the perfect blend of materials and creativity.  This year I found what I believe to be the perfect blend!

I introduced my 6th graders to the Pop Art of Roy Lichtenstein.  We explored his art, discussing the colors, backgrounds, his use of motion words, as well as his influence on comics.  In talking about his use of action words, I mentioned "Batman"...the boys immediately lit up.  I have a pop art piece on the wall of my classroom, a hand on a telephone receiver with the single word "SLAM!".  We talked about how the use of one word allows the viewer to understand the force behind the image.

Each student received a wood board.  These boards had been taking up real estate in my classroom for four years (and God only knows how many before I got there) and I was ready to rotate them out!  The day's assignment:  Paint your board in a solid color (I gave them a limited number of choices) making sure the surface was completely covered.  After the painting was complete they rotated through a bubble wrap station to create "Benday Dots" over the surface.  As you can imagine, the bubble wrap printing excited them...something a bit different from the norm to roll with paint and print.  I was amazed at how quickly they completed the tasks.  The drying racks were quickly filled and students were ready to continue to the next step.
All of my middle schoolers have art journals.  I had them choose a motion/action word and sketch a design to highlight it.  They were to add possible colors with the understanding that nothing was set in stone and the design could evolve from the original as the piece took shape.  That was class #1.


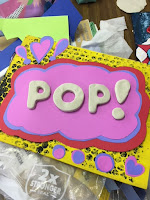
Class #2:  For the next step I brought out brightly colored cardstock, pieces of matboard, and 1/4" foam core scraps.  Working from individual sketches, the students began to create the "pop" that would give motion to the words.  I demoed how foam core or matboard pieces glued between the layers would quite literally have their designs popping off the wood board.  If I hadn't pulled them into the project before, this defintely got their attention.  All around the classroom the students began to work and were disappointed when it was time to clean up.  I promised that they would have plenty of time to work during the next class and that I was bringing in a very cool product for them to use to add another dimension to their pieces.


Class #3: Creative PaperClay® 
The students were excited to get to work the following Monday.  I gave them these basic instructions:  "You will receive a piece of airdry clay and a paper towel.  Go to the sink and get the towel damp (wring out any excess moisture).  Wrap any part of the clay in the towel when not in use so that it remains moist.  All of the clay MUST BE USED today!"
I put out rolling pins and texture sheets, alphabet cutters of a couple of different sizes.  "Do NOT roll the clay paper thin!  Keep some thickness to your letters.  Do NOT pound your clay into the table!  It WILL stick and you will be sad."  I showed them how to use their fingers to flatten the clay as well as using a rolling pin.  Again the students were told to use all of their piece of clay or share any extras with classmates who might need a little more.  Soon the classroom was filled with "action" 😉


Once each student completed his/her word and any other details, they were placed on a sheet of scrap paper to dry until next class.  I was so excited with the multiple ways pieces developed.  Next class (final for the project): coloring and highlighting the words

Last class: I sadly was away for this class and had a substitute.  Instead of having the students paint, we had them use Sharpie Markers (I value my substitute's sanity 💓 )  The students first used a fat, black Sharpie to highlight the edges.  They were directed to color the edges solidly, not leaving any white showing.  Next, they could choose a color for the top of the word.  Many went back to their original sketches for color reference, while others picked the brightest & boldest color in the bin.  Once words were colored, they were glued in place using Elmers Glue.  Thankfully my substitute told the students they could not take the finished project home until I had a chance to see them.  I was thrilled when I got back to work!
 
Dominic D. (left) & Annie W. (right)

 
Michael C. (left) & Daniel M. (right)

 
Jilliane D. (left) & Isabella M. (right)

 
Isabella O. (left) & Diya G. (right)

Malia H. (left) & my example (right)

I hope you have enjoyed this post.  I think even Roy Lichtenstein would be pleased with how his work was interpreted.  To see more of my work and the work of my students please check out https://polymercreations4u.wordpress.com/ as well as the Creative PaperClay blogspot on the 2nd Wednesday of every month

Until next time...stay CREATIVE!